
Evolution3 BenchTop Installation Manual – Assembly and calibration
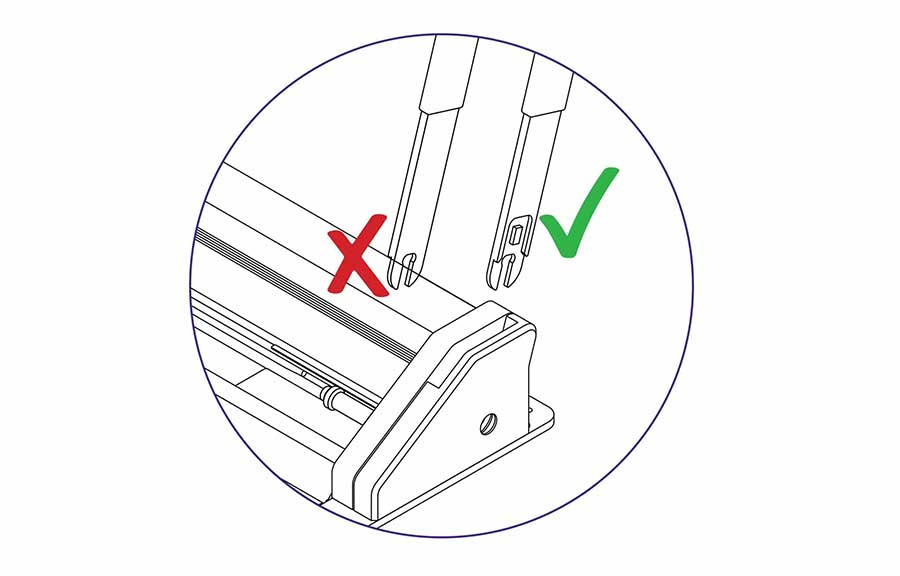
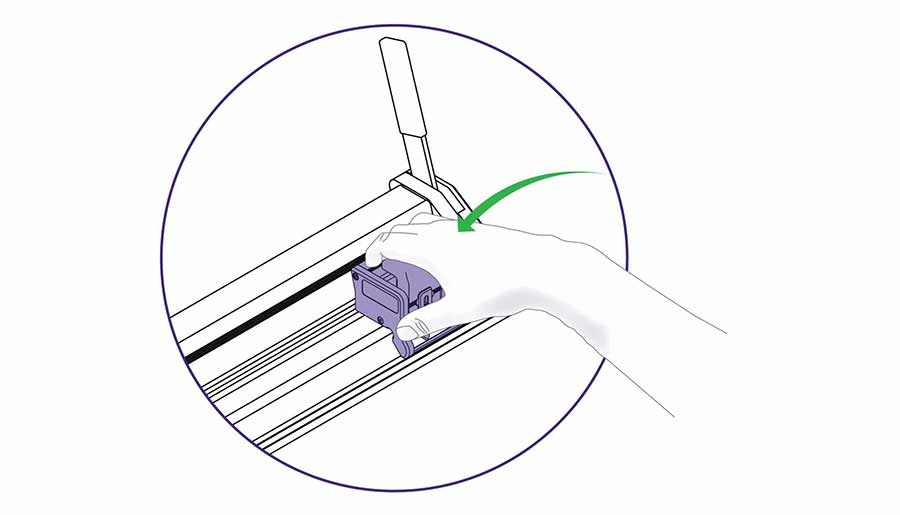
Ensure the flat face of the lever is facing to the centre of the unit.
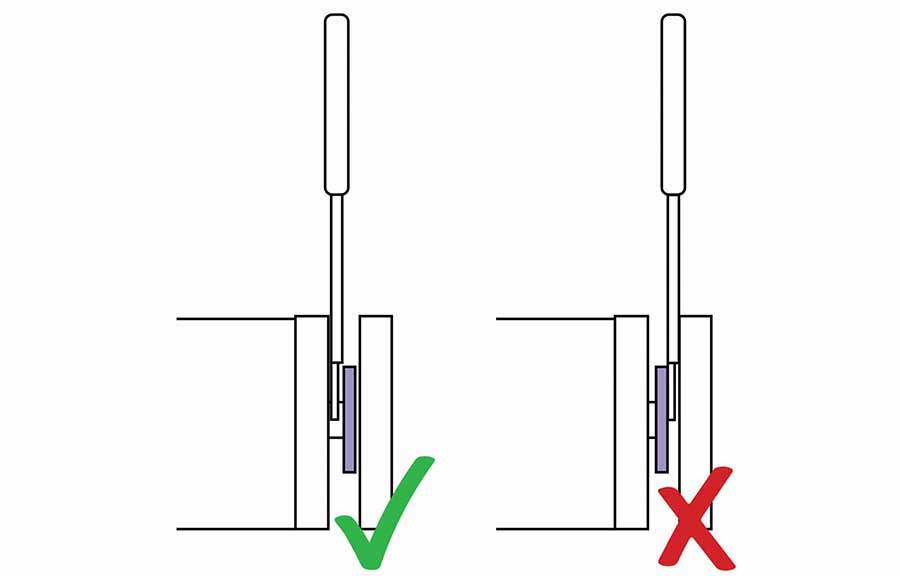
Insert the handle between the body of the cutter bar and the steel plate that can be seen within opening.
TIP: You can use the 3mm Allen key to move the steel plate within the opening if you are struggling to insert the handle.
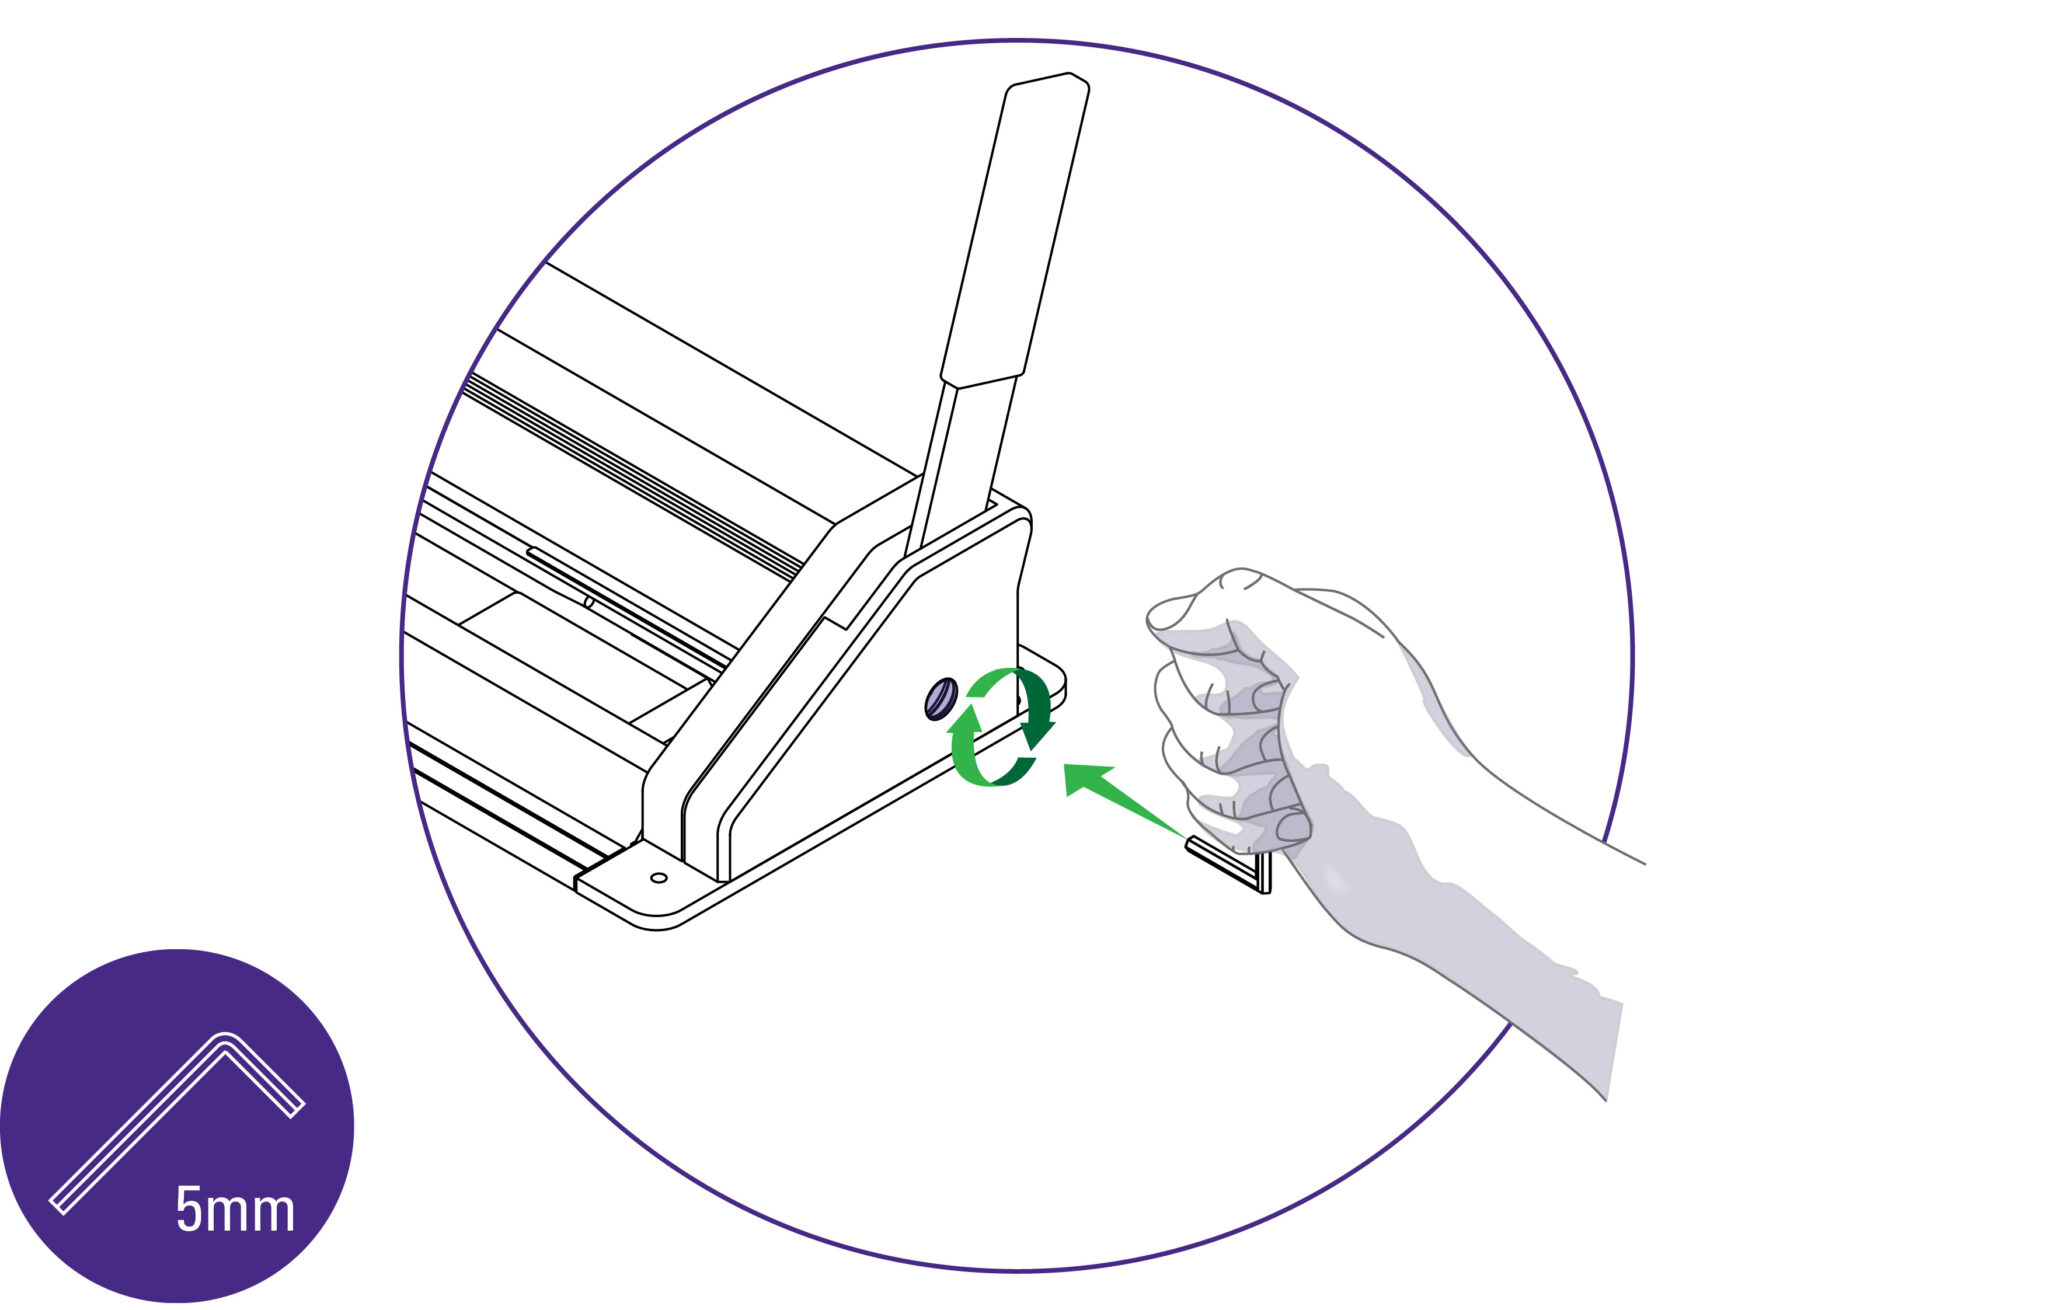
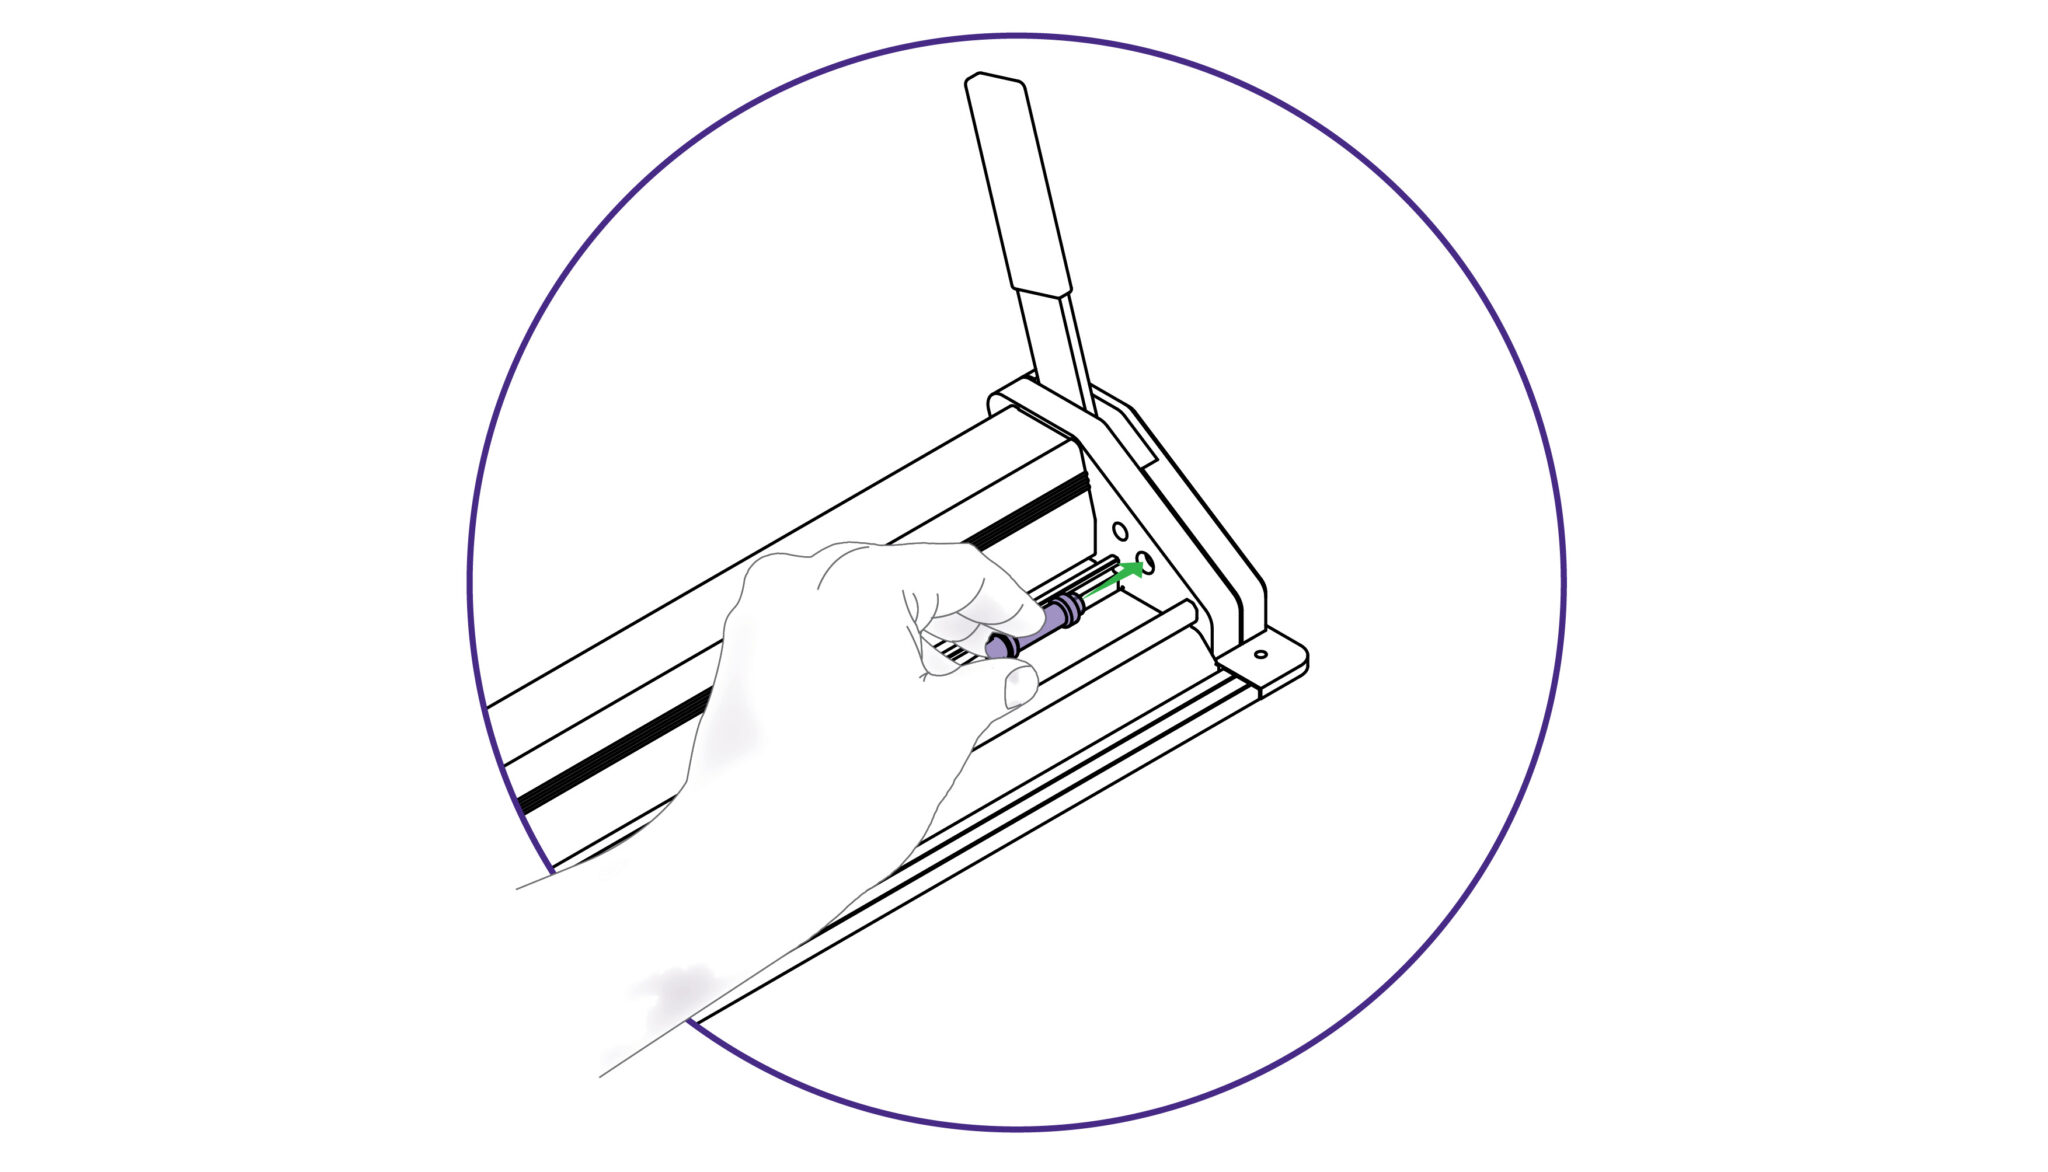
Use the 5mm Allen (hex) key and insert it into highlighted section. Tighten fully.
| Do this firmly |
Repeat these steps on the other end again ensuring the flat face of the lever is facing to the centre of the unit and the handle is inserted between the body of the cutter bar and the steel plate . Tighten the fixing screw firmly.
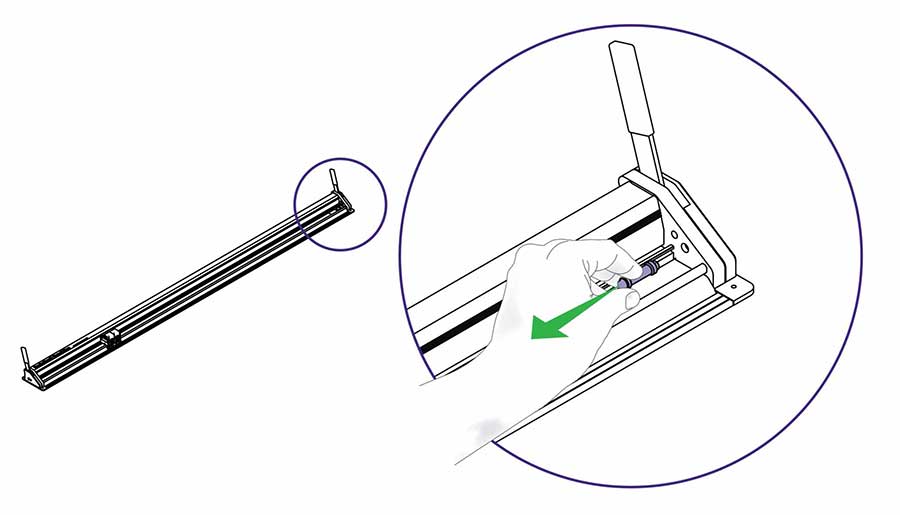
Pull and remove end stop.
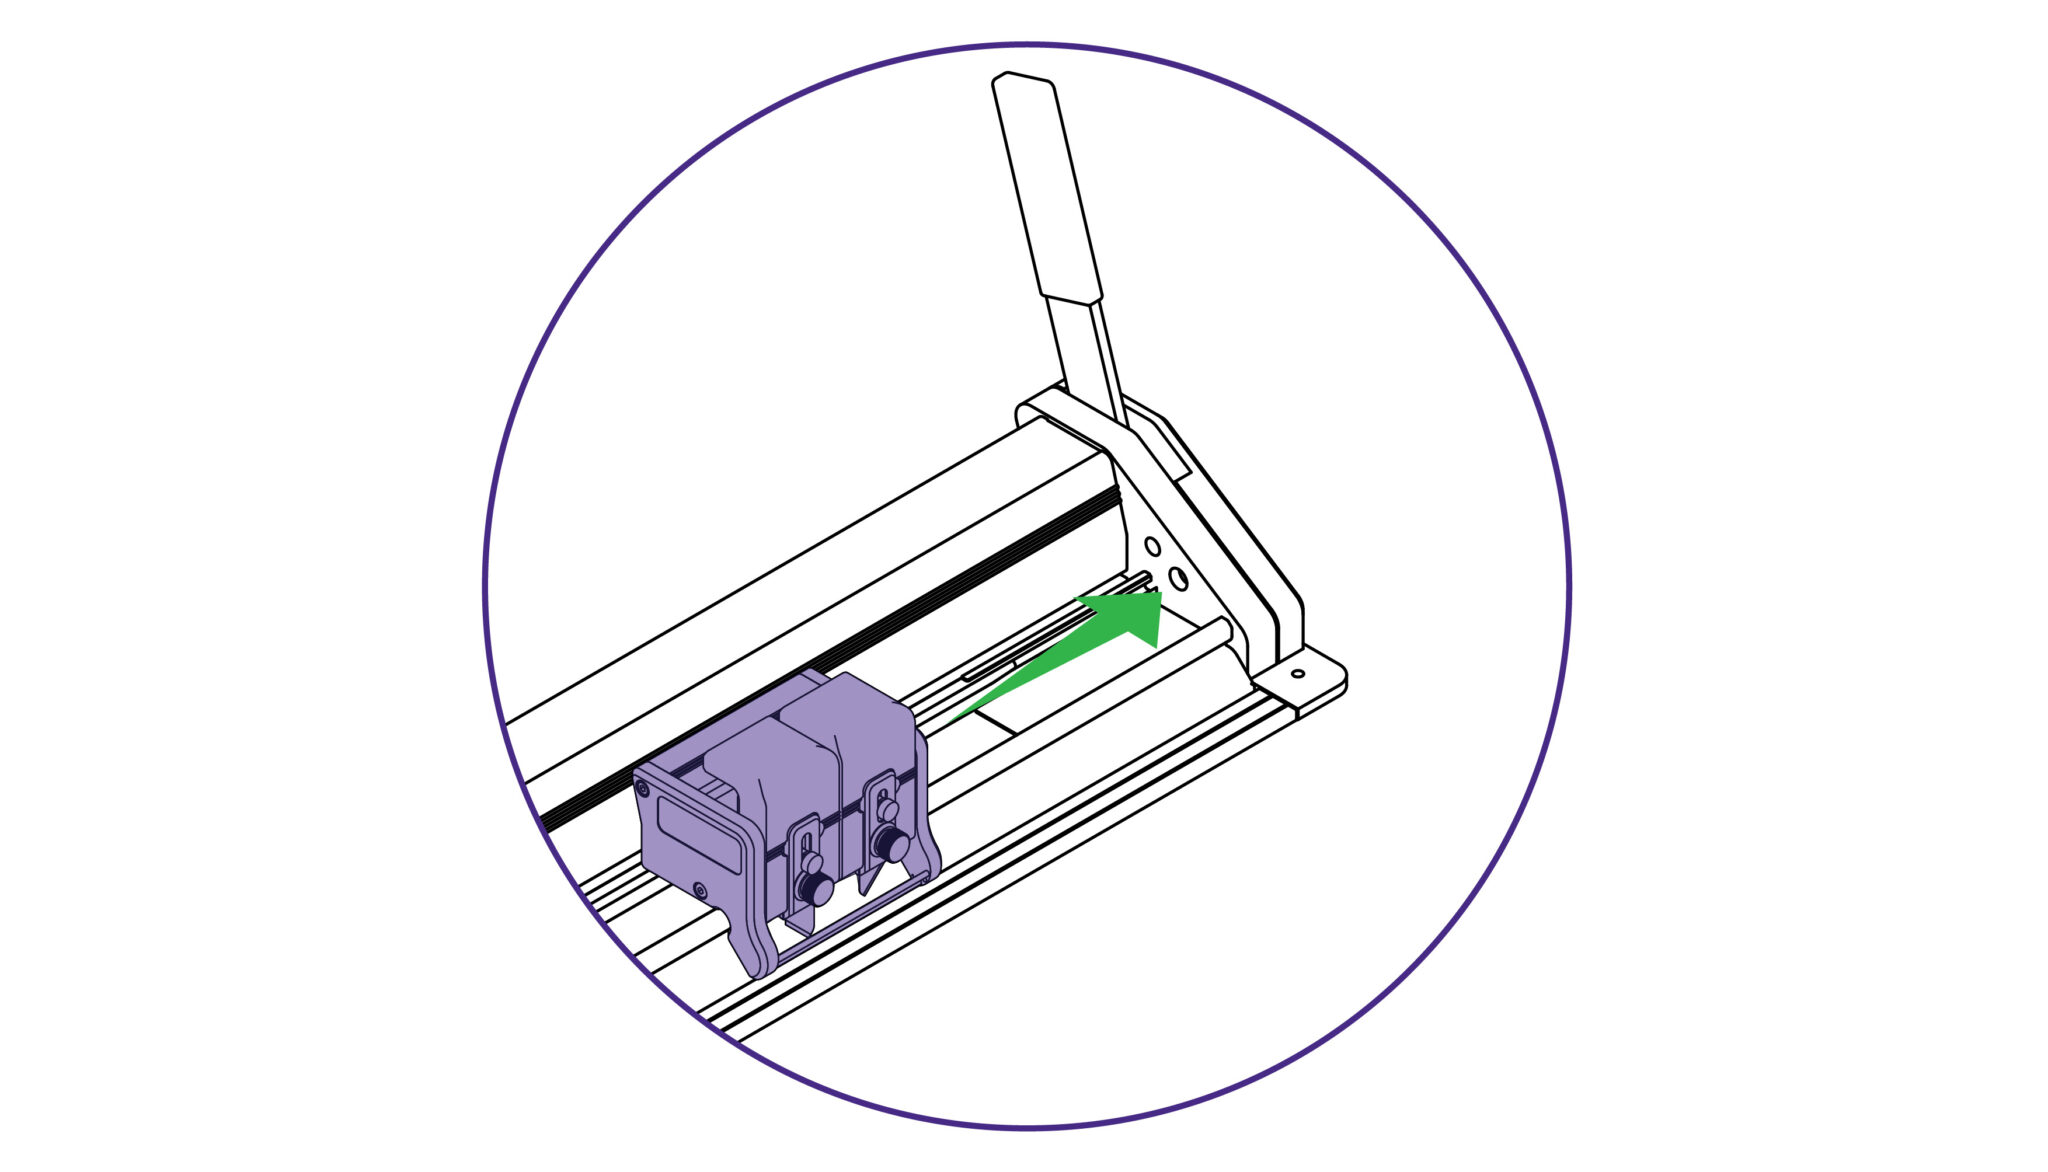
Slide the cutting head to the right.
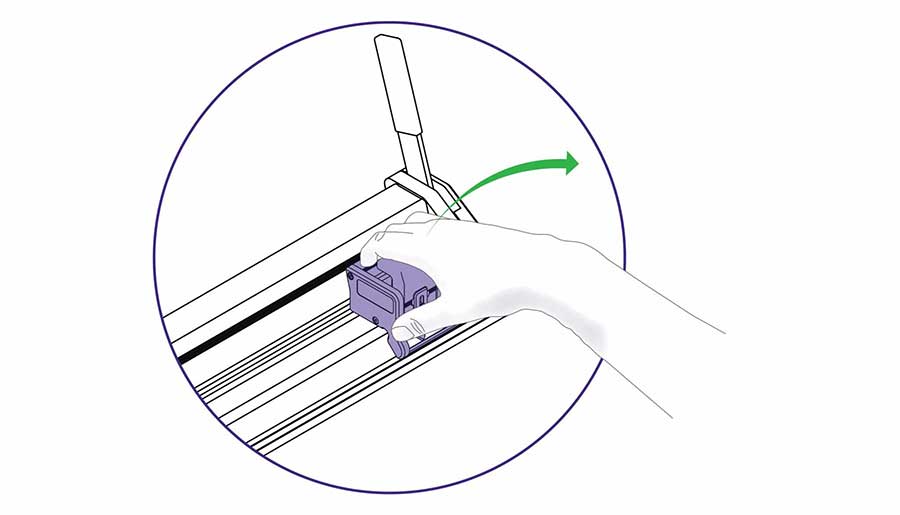
Gently lift to remove the cutter head, then replace end stop.
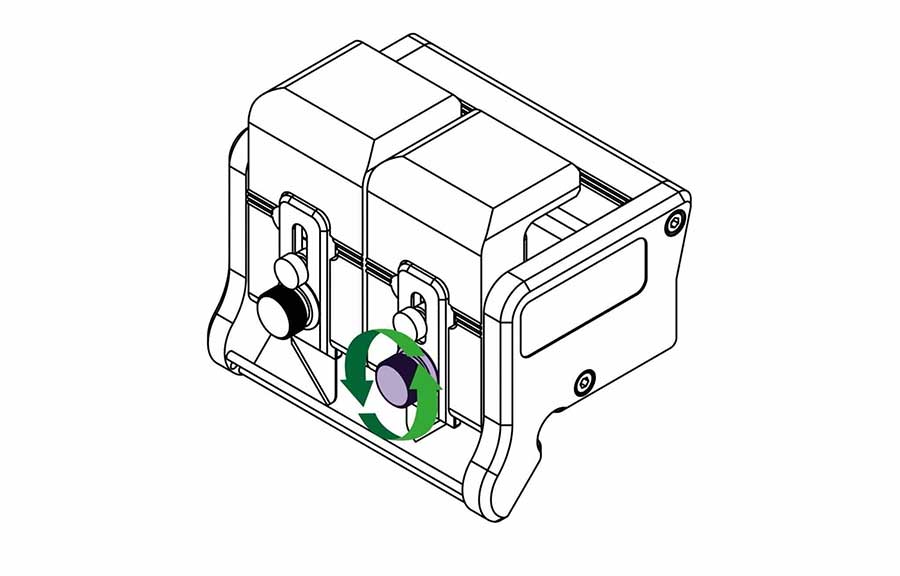
Undo the highlighted knob to remove the magnetic blade clamping plate.
Pull the magnetic blade clamping plate away from the cutting head.
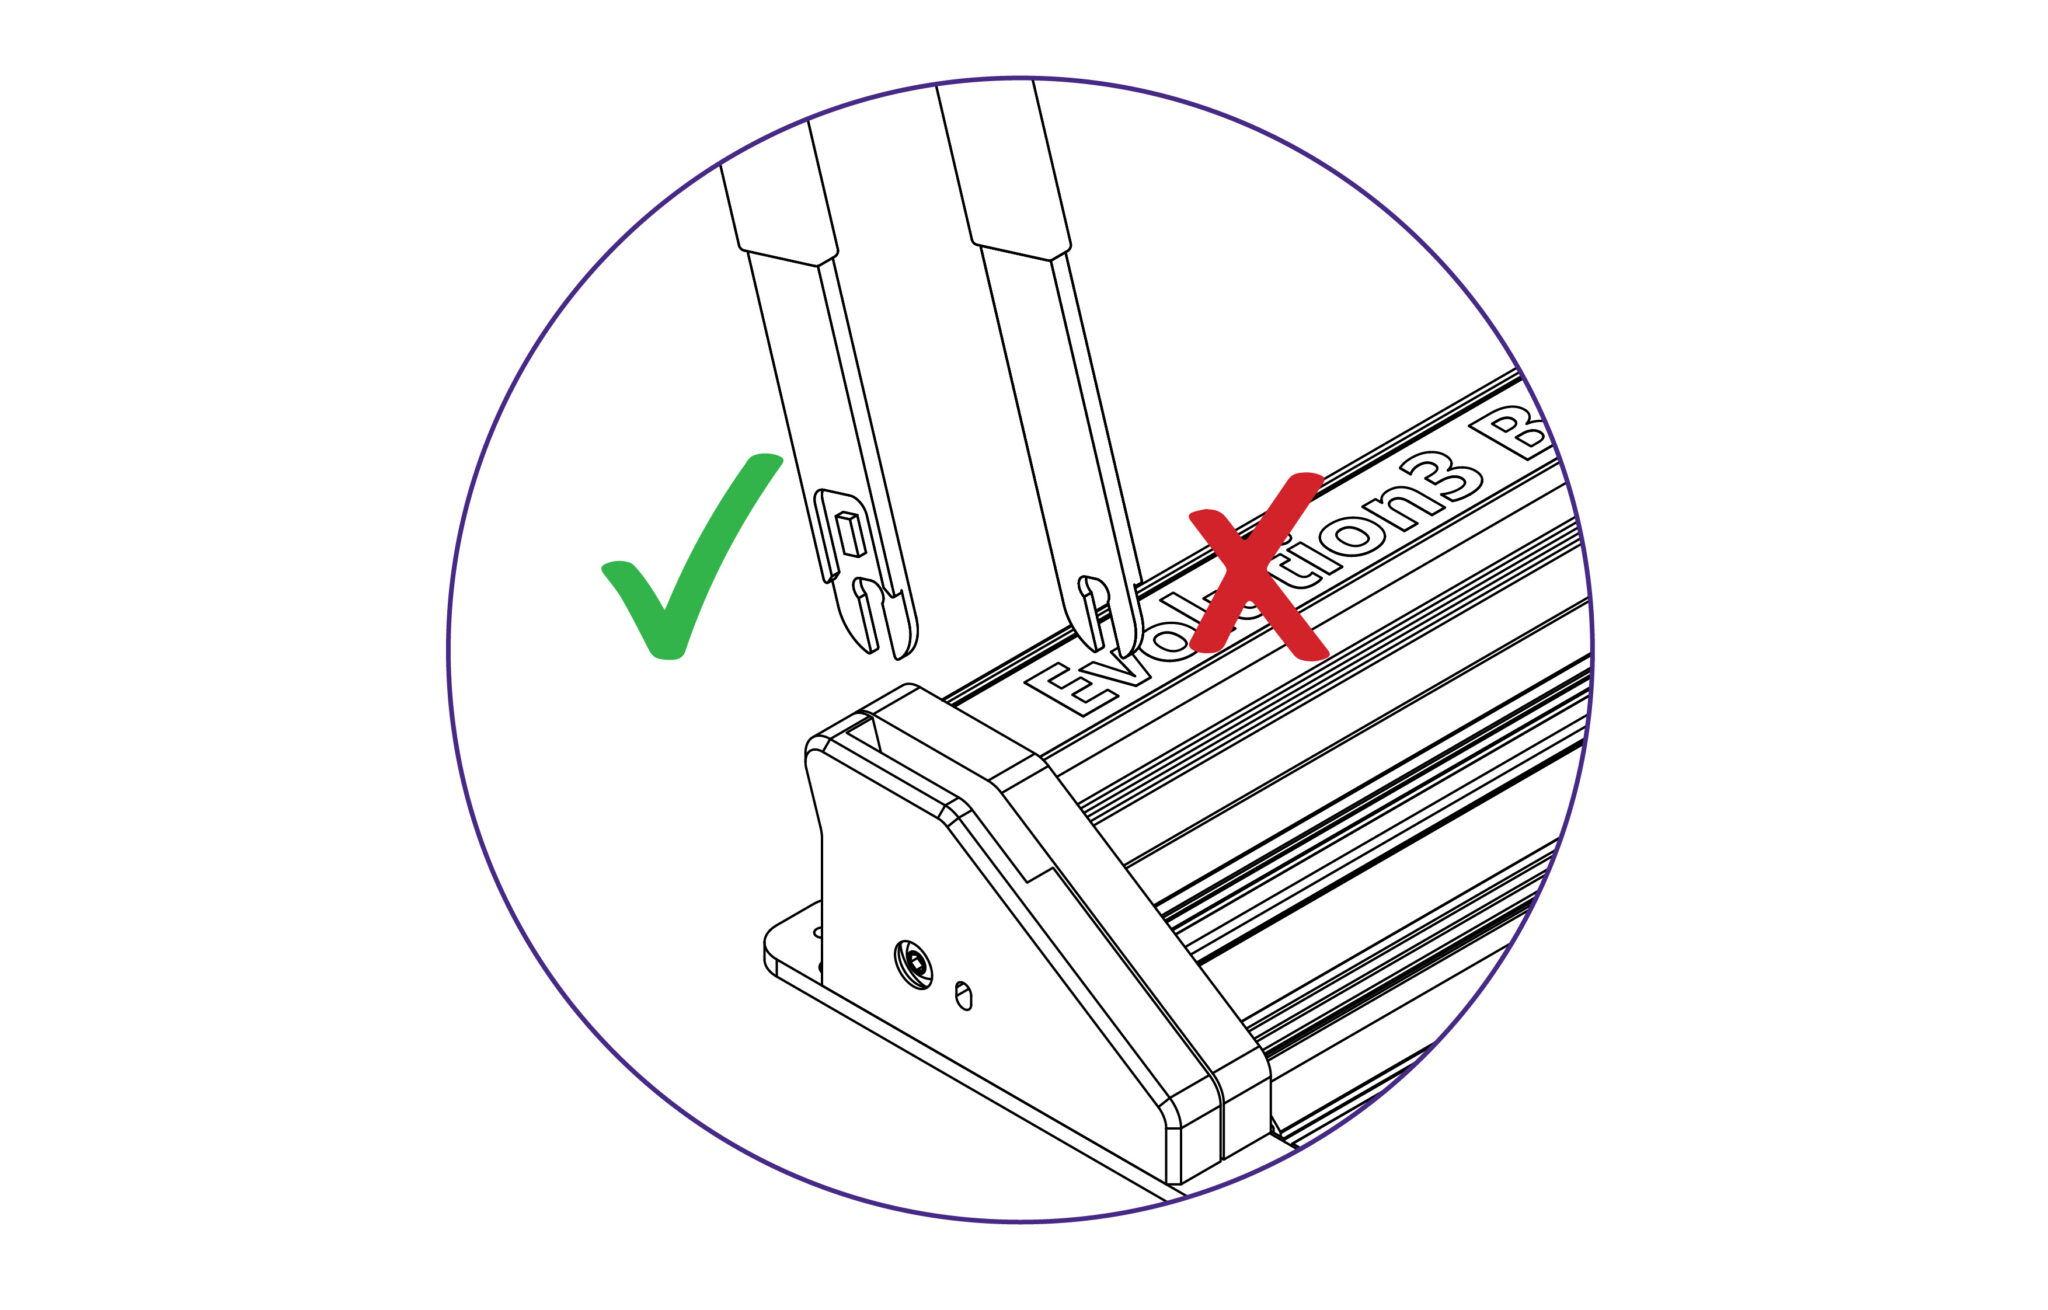
Insert a Graphik blade, check it is facing the correct way for your desired direction of cutting. Place the small pin in the hole at the top of the blade and align with the edge of the clamping plate.
Replace the blade clamping plate onto the blade holder but do not tighten fully until the blade depth has been set (see how to adjust the blade depth >).
Repeat on the other blade holder if required.
Insert a piece of A4/letter paper under the cutter bar at one end, push the lever away from you to fully lower the cutter bar. Test the paper is clamped by trying to move it.
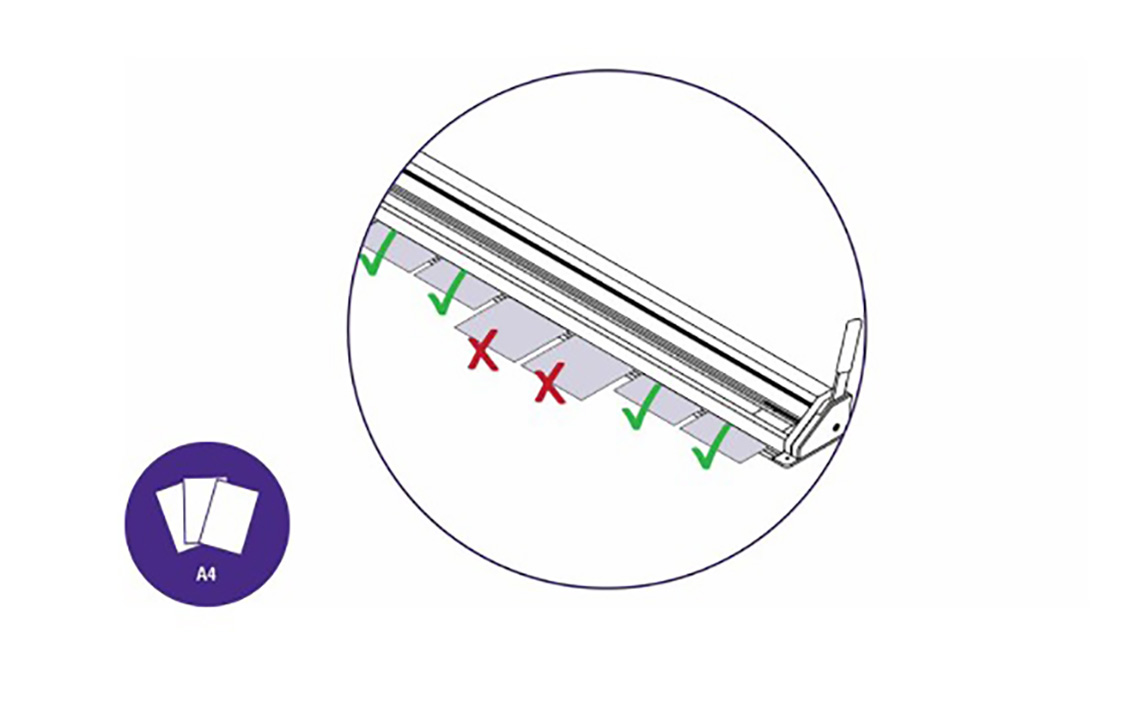
Repeat over the length of your BenchTop and take note of the areas where the paper moves when you pull it.
NOTE: if the BenchTop clamps the paper along the entire length and there is no movement, the next steps do not apply to you, see aligning blade in the cutting groove >
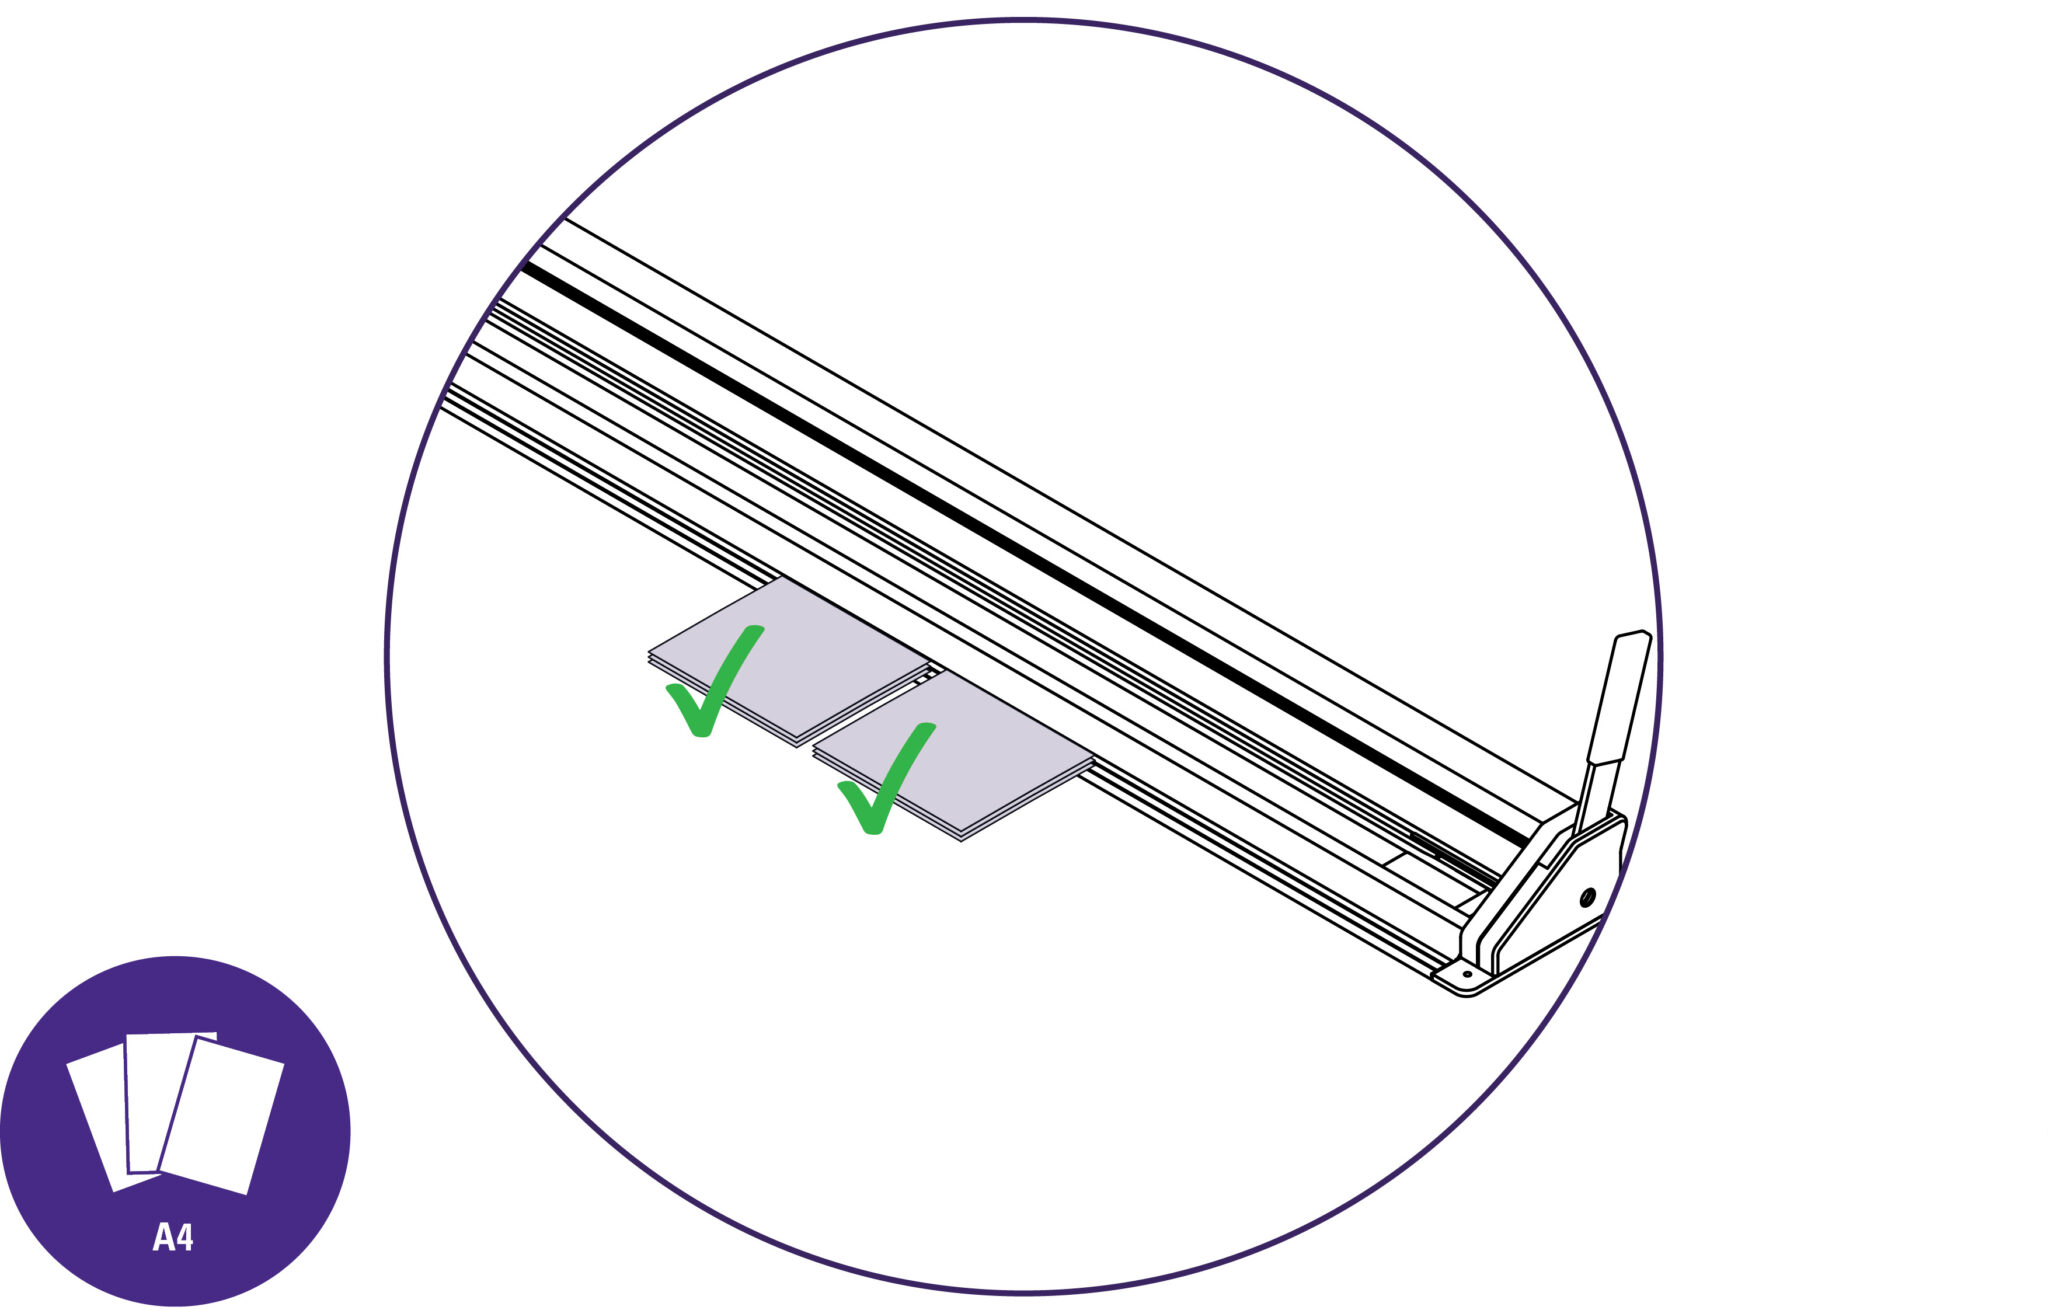
In the areas where there is movement, insert more sheets of paper, one at a time until the cutter bar clamps them.
Once you are happy with the cutter bar clamping all sheets of paper, leave them in place.
Move the cutter bar away from the base plate, leaving the paper in position.
| Be careful when lifting |
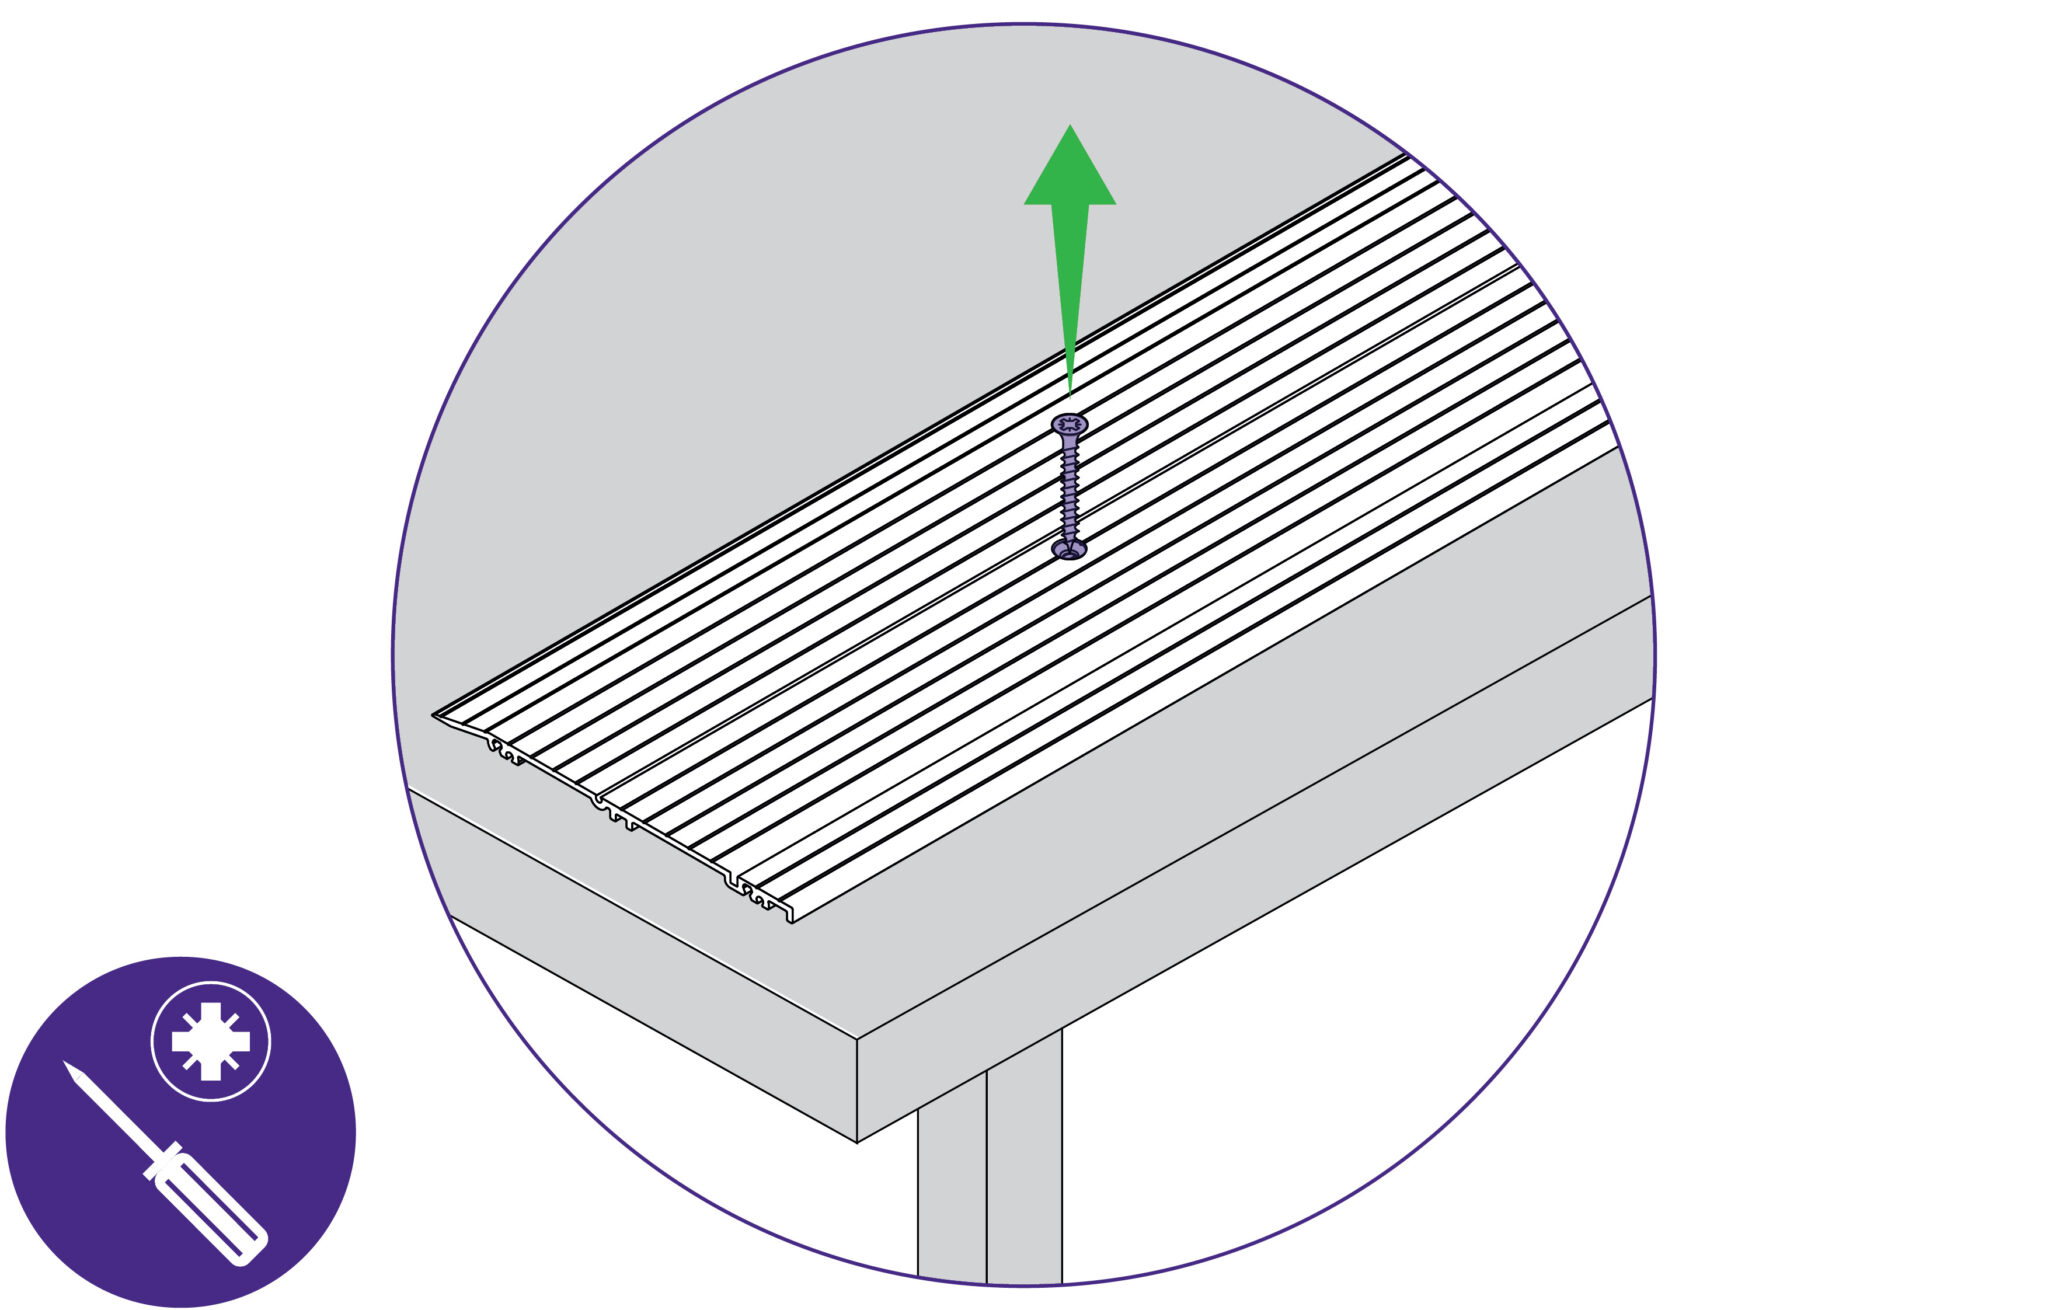
Using the posi-head screwdriver, remove the screws from the base plate.
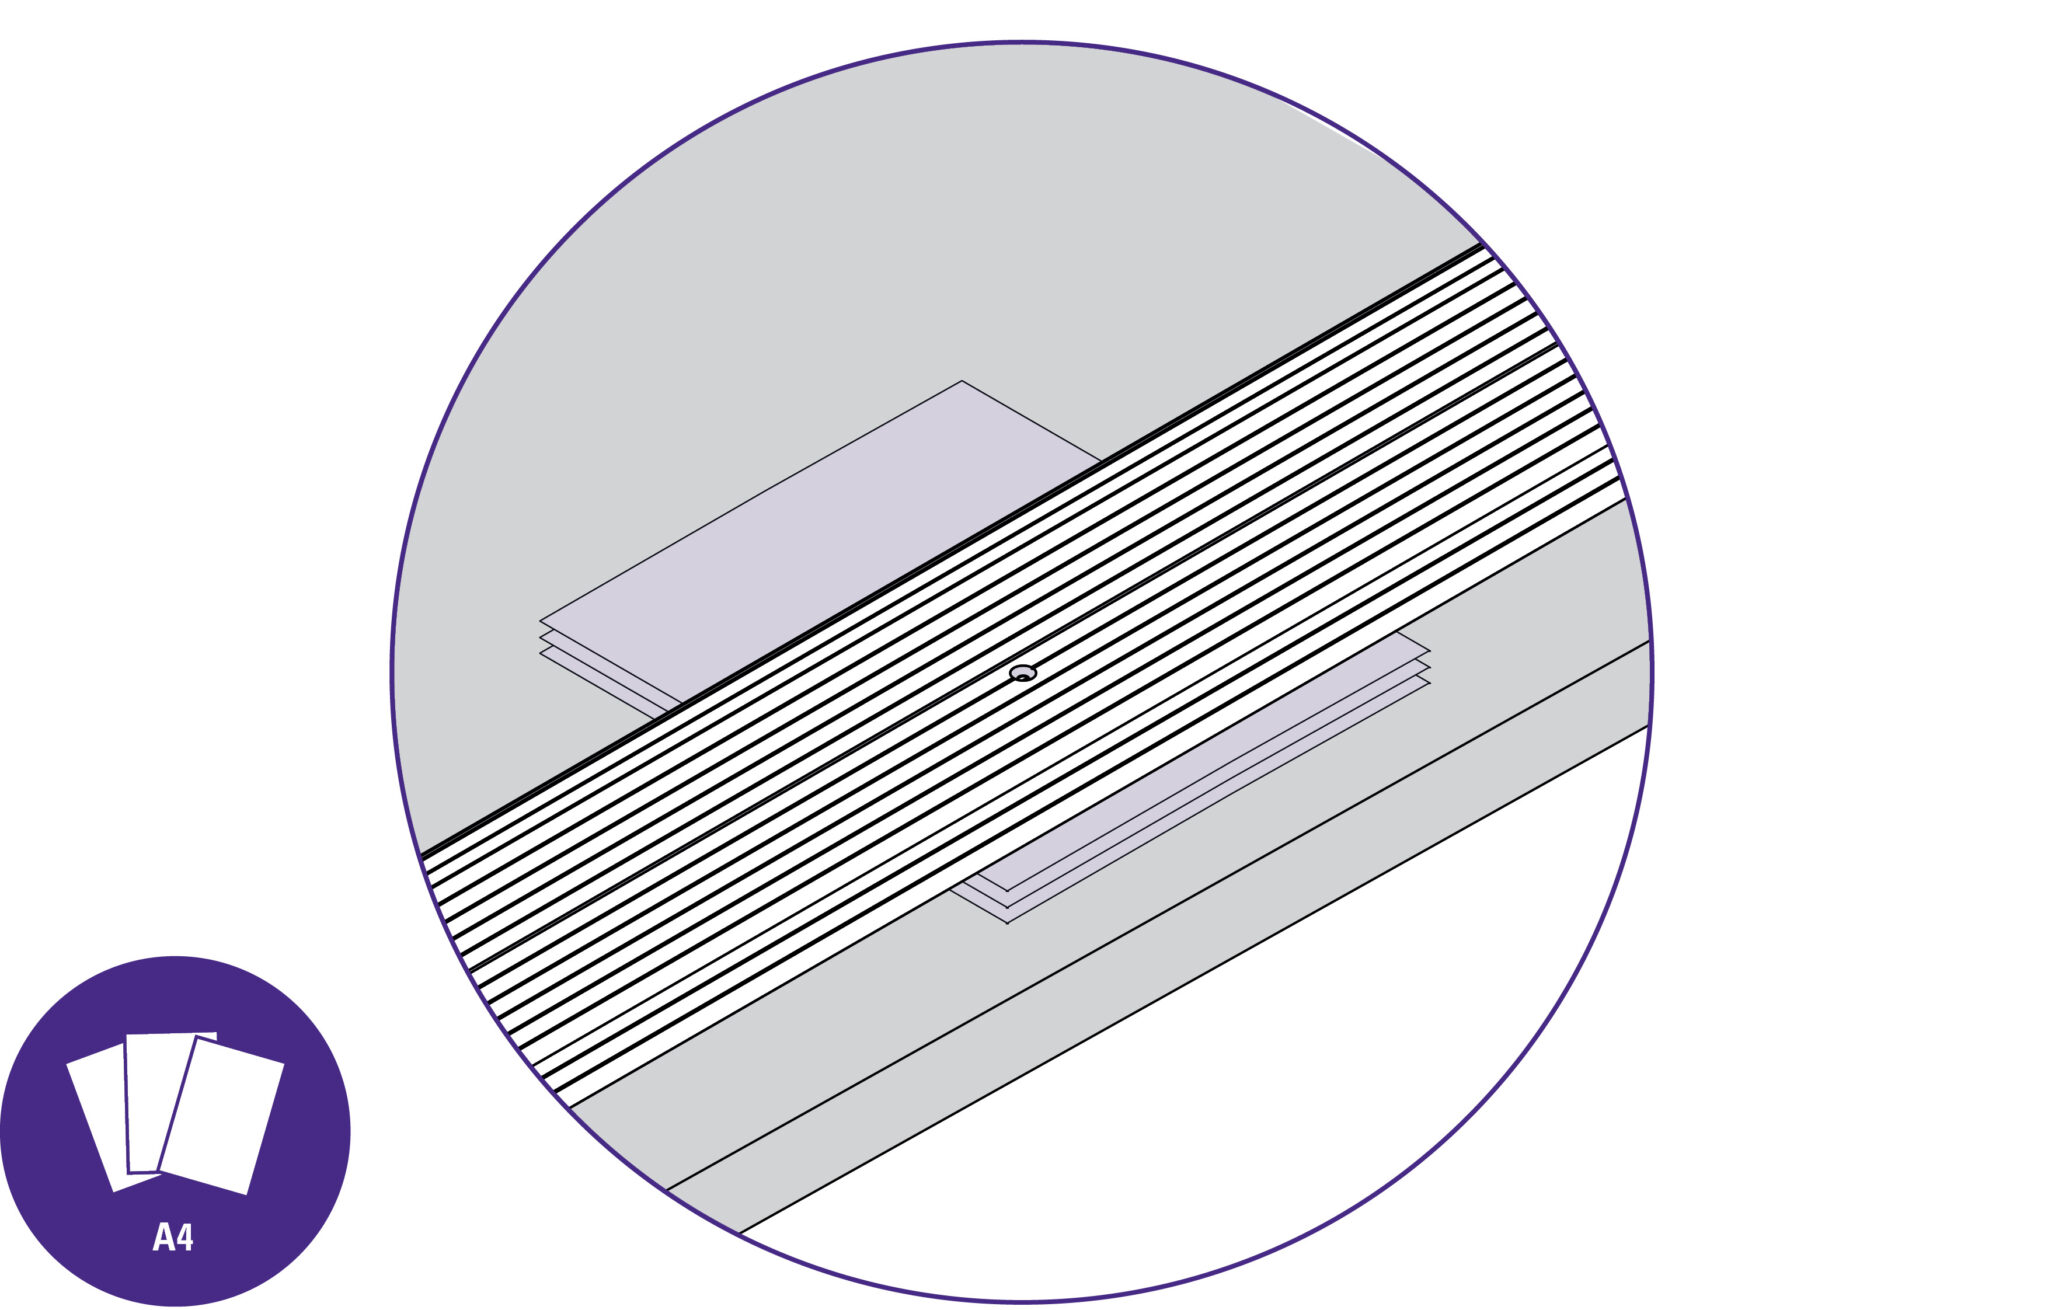
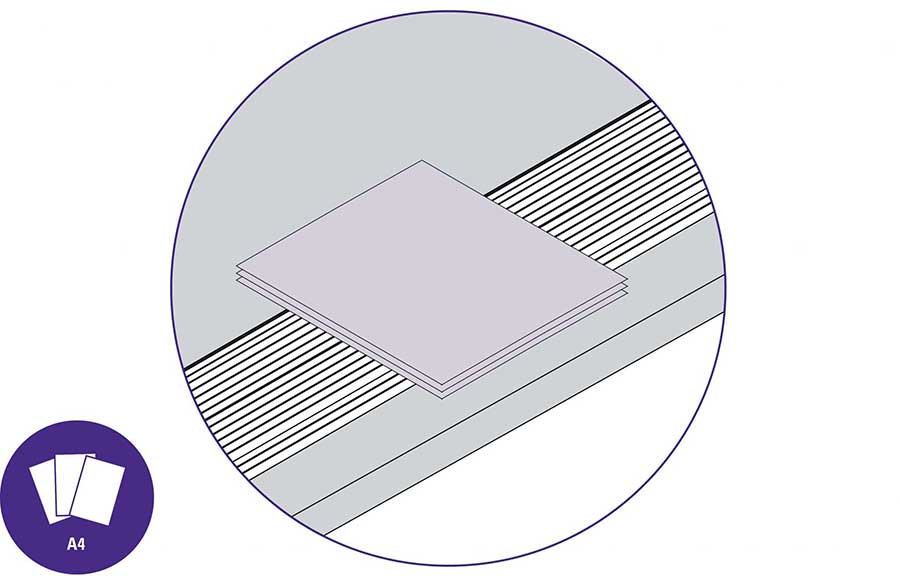
Slide the stacks of paper underneath the base plate in the locations they are required making sure the baseplate under the screw holes are fully supported.

Use a posi-head screwdriver to re-fix the base plate in position on top of the paper.
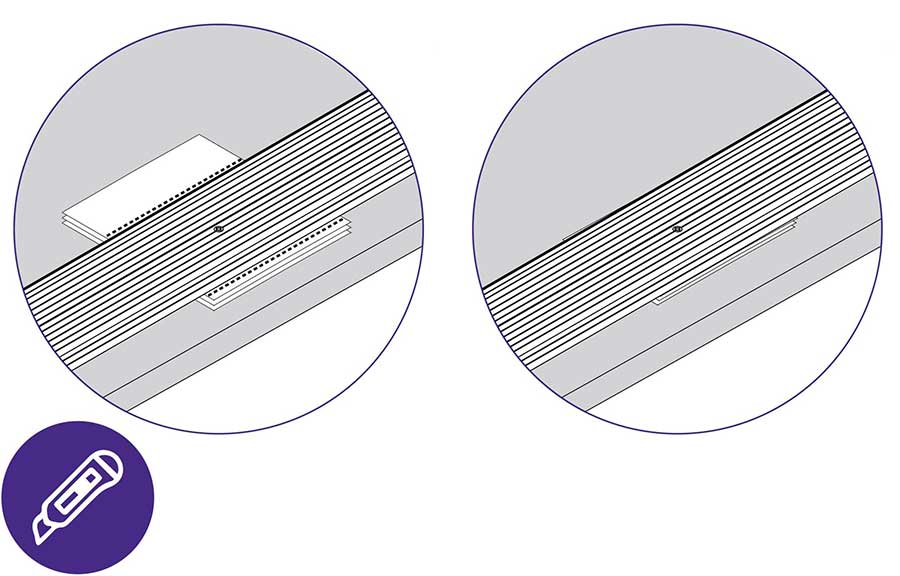
Use a craft knife to carefully cut the excess paper from either side of the base plate.
IMPORTANT: Using sharp blades can be dangerous, take extra care
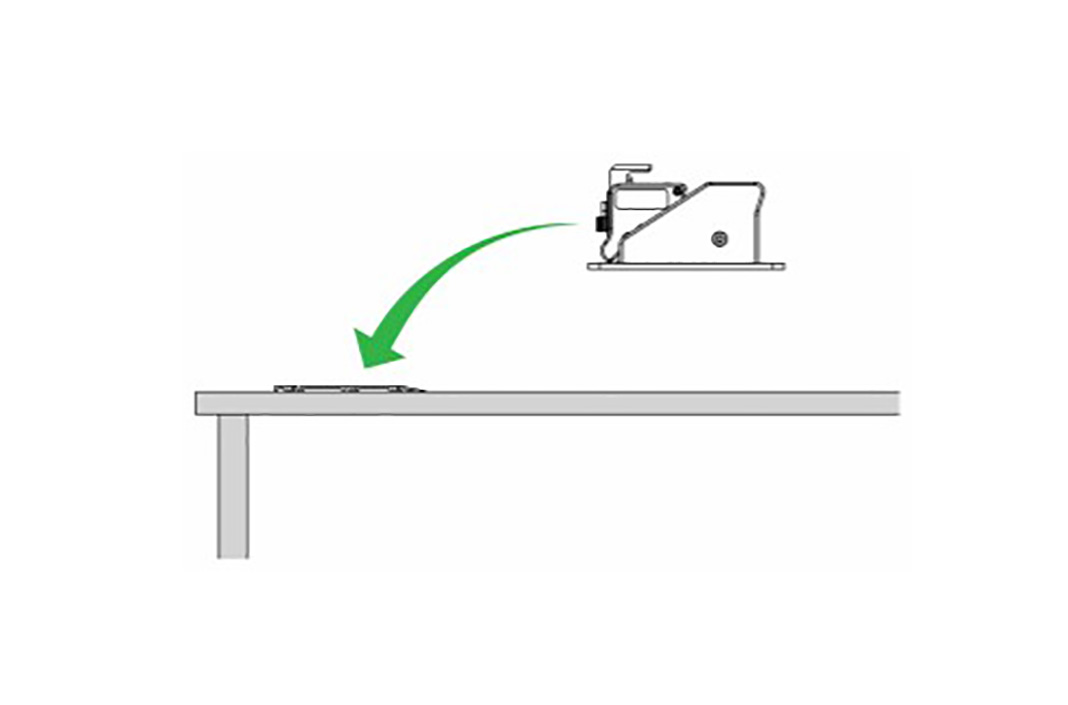
Using 2 people, lift the cutter bar back into position over the base plate.
| Be careful when lifting |
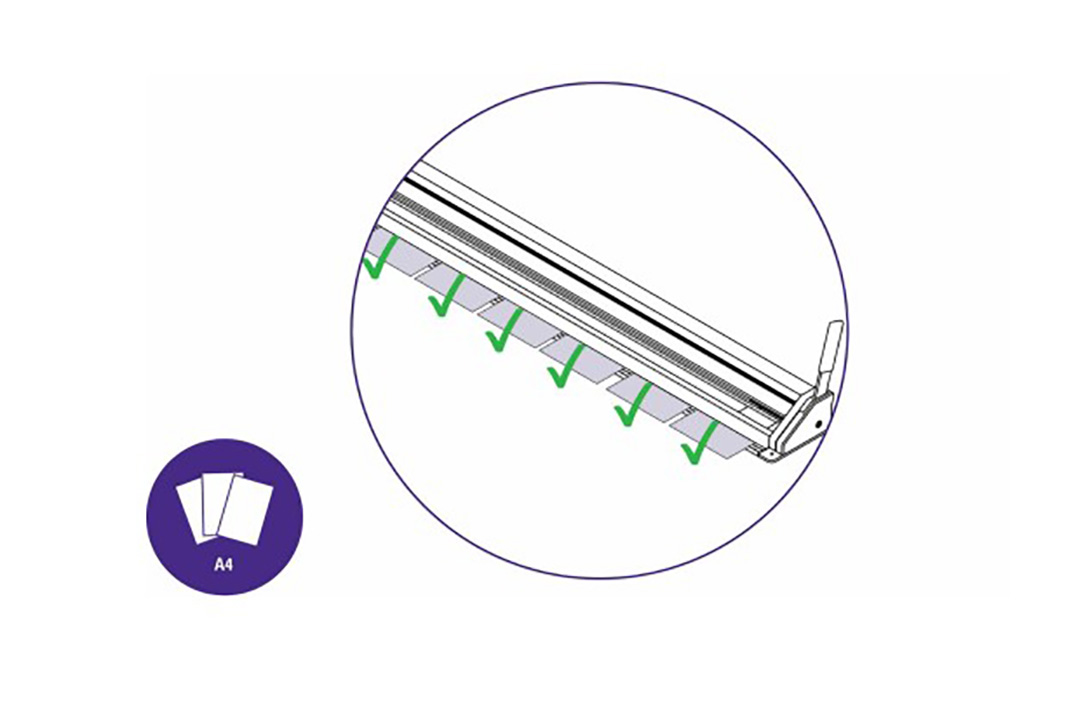
Repeat the clamping check along the whole length of the cutter bar, make further adjustments if necessary until the paper is clamped along the whole length of the cutter bar.
Pull and remove end stop.
Attach the cutting head, and slide it to the left.
Always replace the end stop.
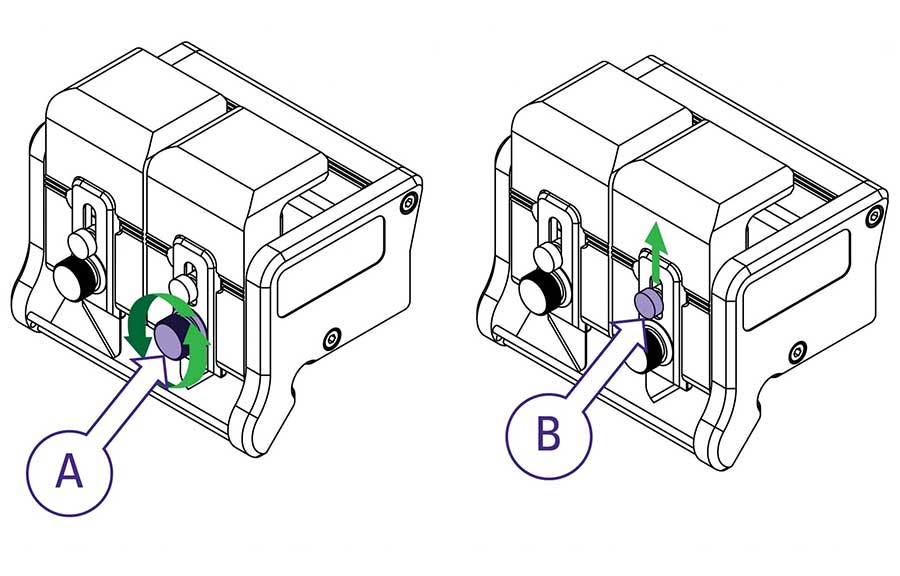
To adjust the cutting depth of the blade, loosen knob ‘A’ by a half to one full turn. Move knob ‘B’ to set blade to minimum cutting depth. Tighten knob A to lock blade in position.
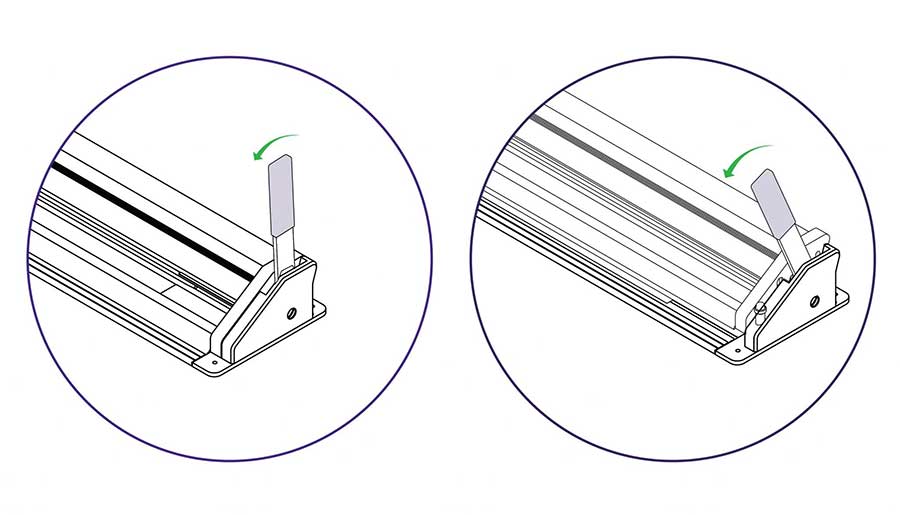
Depress the blade at one end of the machine and ensure the blade is in the centre of the cutting groove. If it is not, move the cutter bar forward or backward to achieve this.
Repeat at the other end of the BenchTop.
Once located, depress the blade and slowly slide the Double Graphik the complete length of the machine ensuring the cutter bare does not move out of position.
Keep a close eye on the cutting groove to make sure the blade does not come into contact with the edge.
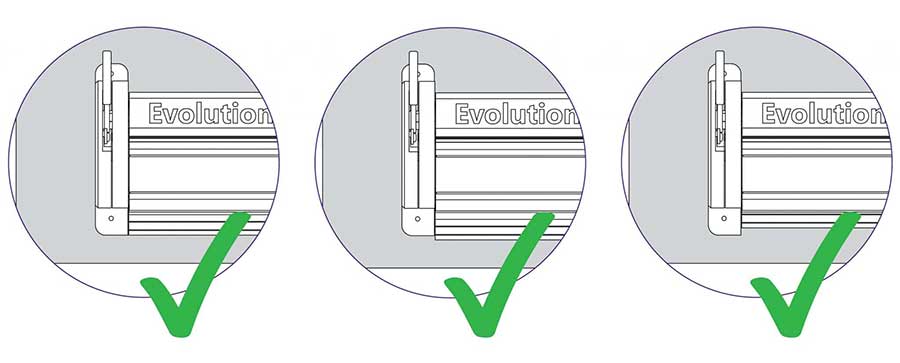
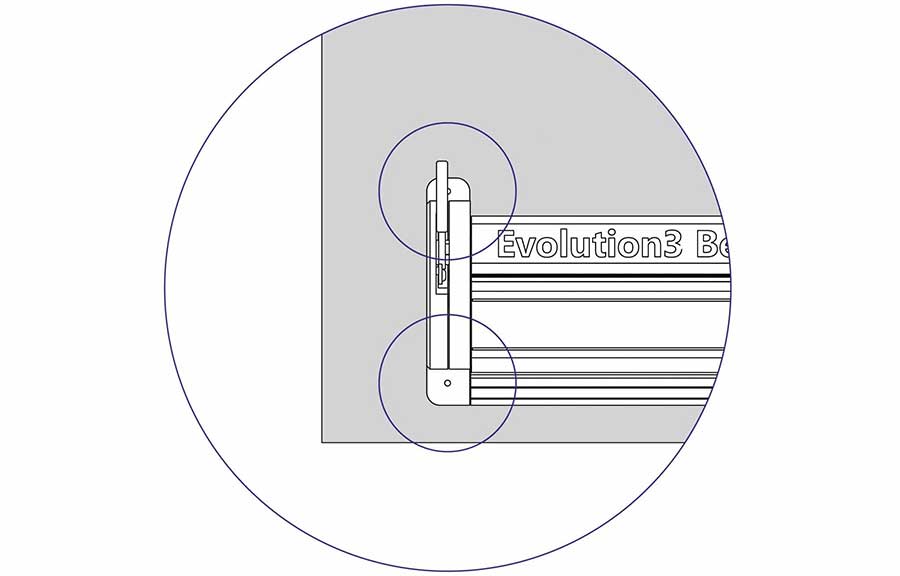
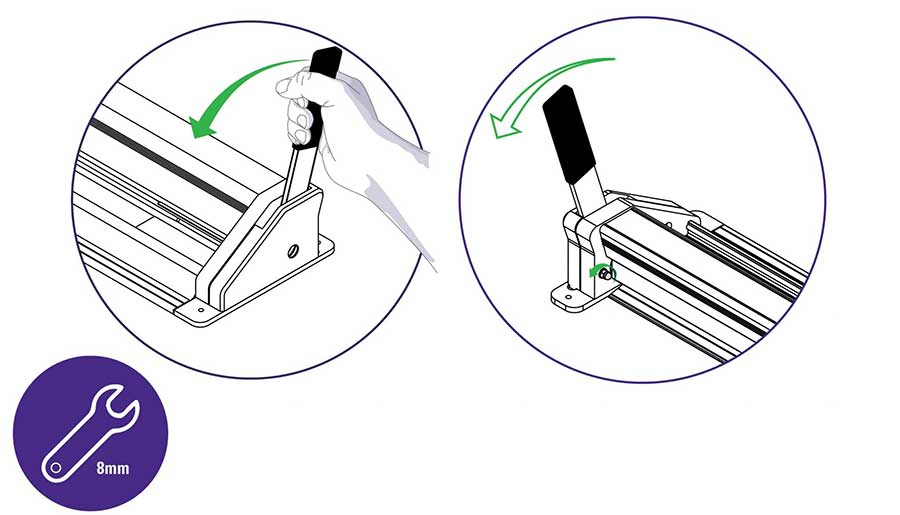
There are 2 fixing holes at each end of the cutter bar.
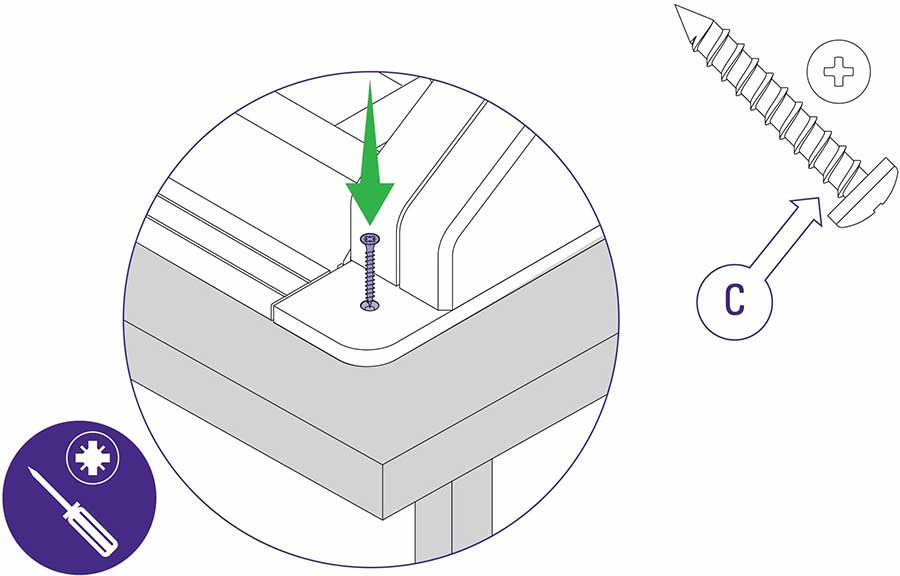
Use a posi-head screwdriver with part C to fix the benchtop in position.
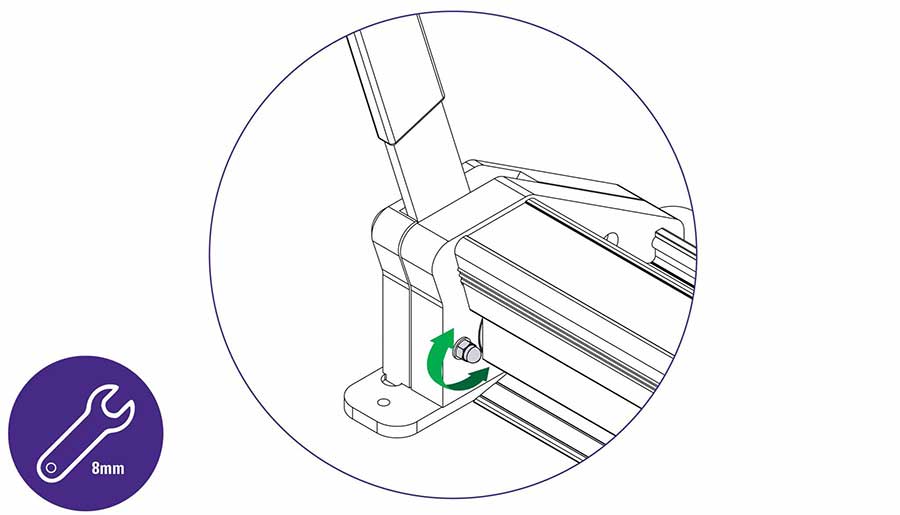
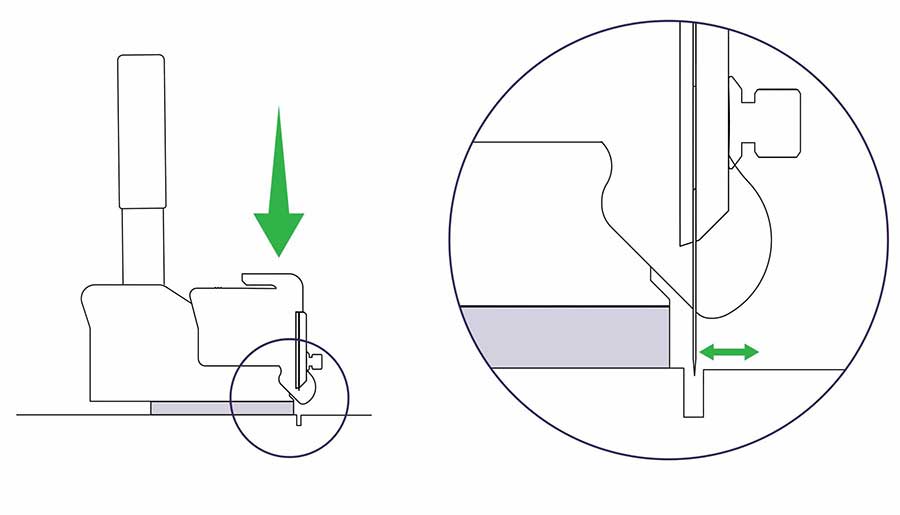
Use an 8mm spanner/wrench to adjust the highlighted nut to obtain the best setting to hold or hover the cutter bar above the base plate.
Loosen the nut a small amount, raise the cutter bar using the lever then carefully release the lever and the cutter bar should lower itself to the base plate. If not loosen the nut a small amount more.
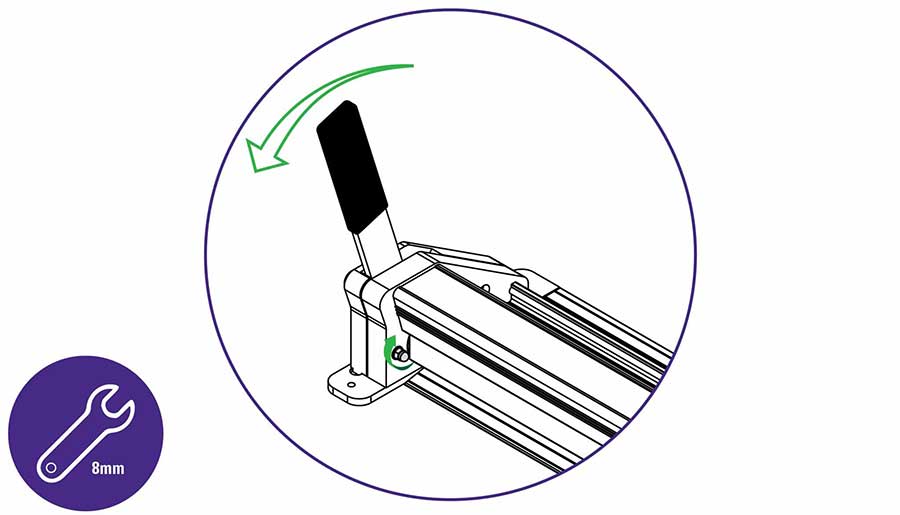
Raise the cutter bar and tighten the nut a very small amount until the cutter bar is held from falling.
Nudge the lever towards you in small movements, if the cutter bar then falls tighten the adjustment nut a very small amount and try again.
Ensure the flat face of the lever is facing to the centre of the unit.
Insert the handle between the body of the cutter bar and the steel plate that can be seen within opening.
TIP: You can use the 3mm Allen key to move the steel plate within the opening if you are struggling to insert the handle.
Use the 5mm Allen (hex) key and insert it into highlighted section. Tighten fully.
| Do this firmly |
Repeat these steps on the other end again ensuring the flat face of the lever is facing to the centre of the unit and the handle is inserted between the body of the cutter bar and the steel plate . Tighten the fixing screw firmly.
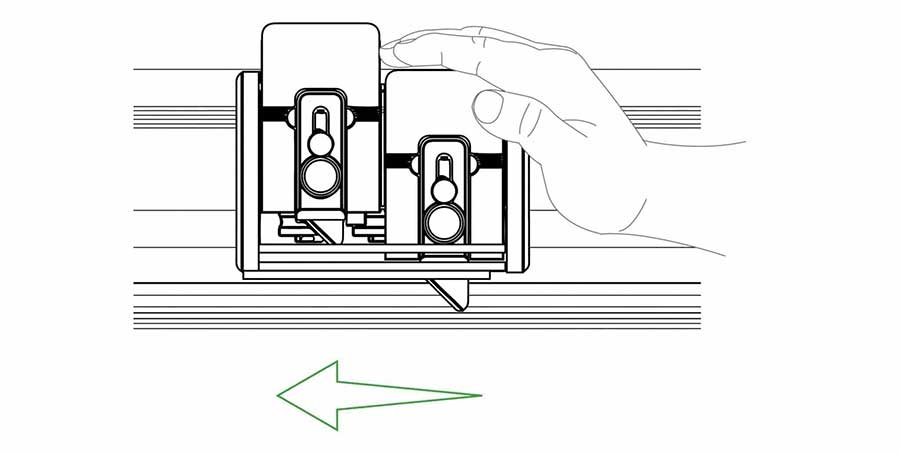
Pull and remove end stop.
Slide the cutting head to the right.
Gently lift to remove the cutter head, then replace end stop.
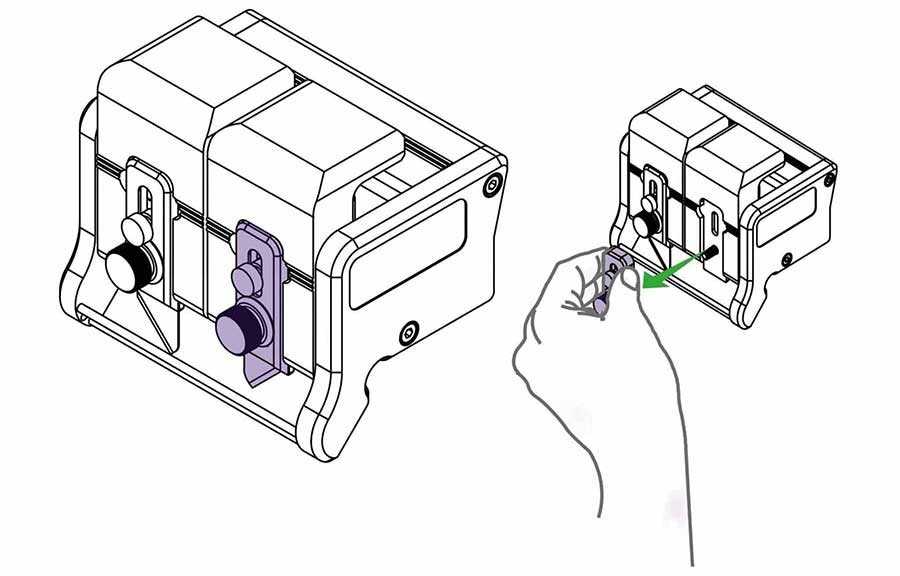
Undo the highlighted knob to remove the magnetic blade clamping plate.
Pull the magnetic blade clamping plate away from the cutting head.
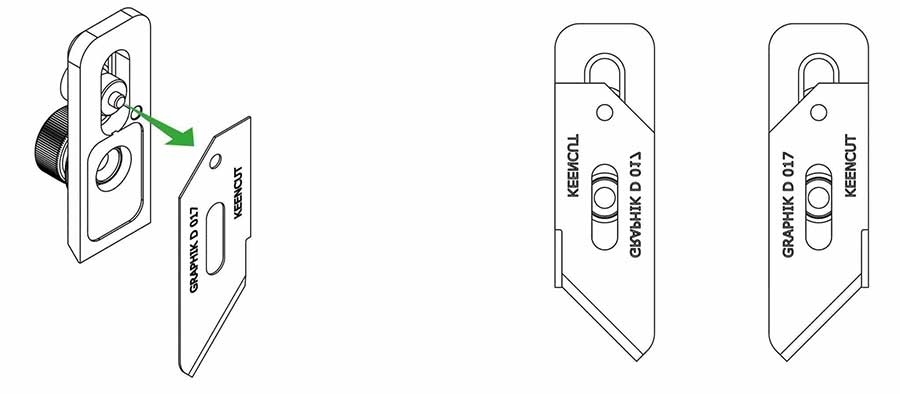
Insert a Graphik blade, check it is facing the correct way for your desired direction of cutting. Place the small pin in the hole at the top of the blade and align with the edge of the clamping plate.
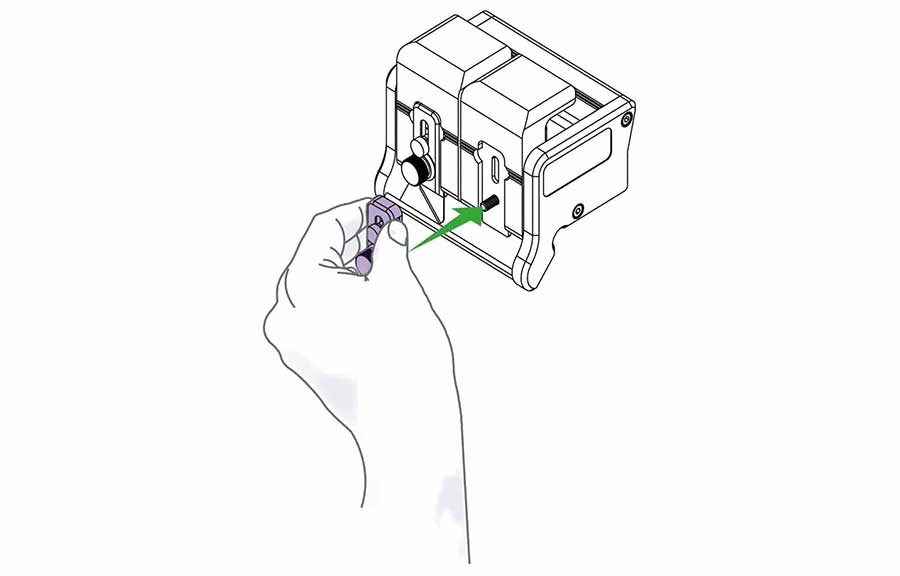
Replace the blade clamping plate onto the blade holder but do not tighten fully until the blade depth has been set (see how to adjust the blade depth >).
Repeat on the other blade holder if required.
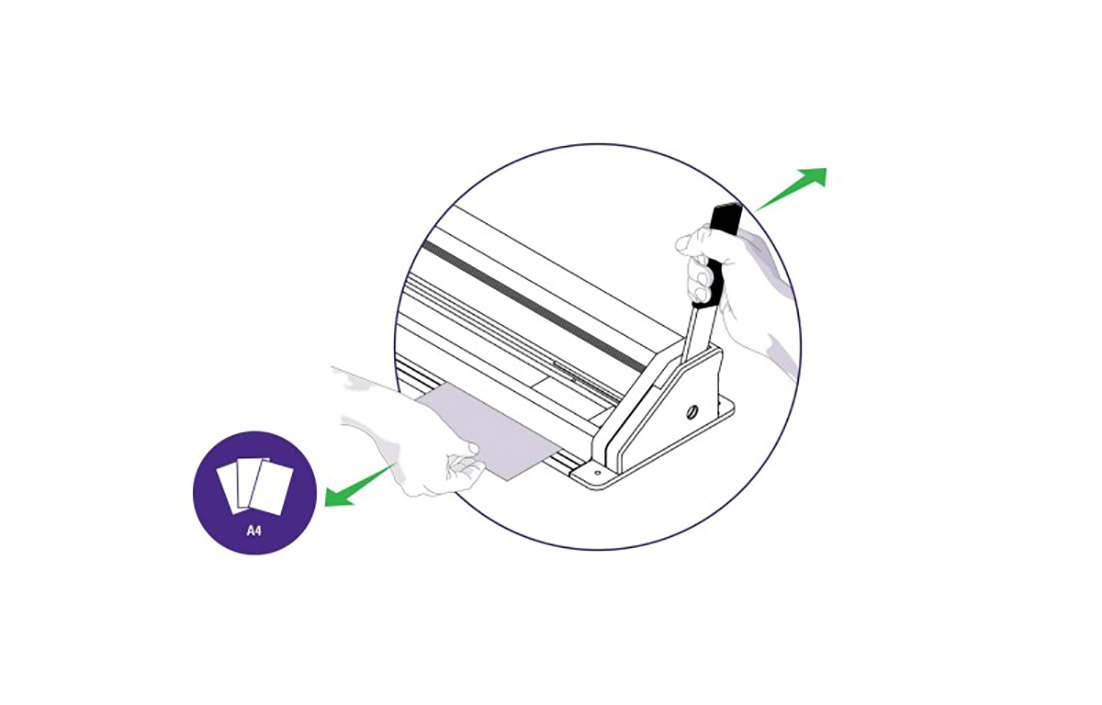
Insert a piece of A4/letter paper under the cutter bar at one end, push the lever away from you to fully lower the cutter bar. Test the paper is clamped by trying to move it.
Repeat over the length of your BenchTop and take note of the areas where the paper moves when you pull it.
NOTE: if the BenchTop clamps the paper along the entire length and there is no movement, the next steps do not apply to you, see aligning blade in the cutting groove >
In the areas where there is movement, insert more sheets of paper, one at a time until the cutter bar clamps them.
Once you are happy with the cutter bar clamping all sheets of paper, leave them in place.
Move the cutter bar away from the base plate, leaving the paper in position.
| Be careful when lifting |
Using the posi-head screwdriver, remove the screws from the base plate.
Slide the stacks of paper underneath the base plate in the locations they are required making sure the baseplate under the screw holes are fully supported.
Use a posi-head screwdriver to re-fix the base plate in position on top of the paper.
Use a craft knife to carefully cut the excess paper from either side of the base plate.
IMPORTANT: Using sharp blades can be dangerous, take extra care
Using 2 people, lift the cutter bar back into position over the base plate.
| Be careful when lifting |
Repeat the clamping check along the whole length of the cutter bar, make further adjustments if necessary until the paper is clamped along the whole length of the cutter bar.
Pull and remove end stop.
Attach the cutting head, and slide it to the left.
Always replace the end stop.
To adjust the cutting depth of the blade, loosen knob ‘A’ by a half to one full turn. Move knob ‘B’ to set blade to minimum cutting depth. Tighten knob A to lock blade in position.
Depress the blade at one end of the machine and ensure the blade is in the centre of the cutting groove. If it is not, move the cutter bar forward or backward to achieve this.
Repeat at the other end of the BenchTop.
Once located, depress the blade and slowly slide the Double Graphik the complete length of the machine ensuring the cutter bare does not move out of position.
Keep a close eye on the cutting groove to make sure the blade does not come into contact with the edge.
There are 2 fixing holes at each end of the cutter bar.
Use a posi-head screwdriver with part C to fix the benchtop in position.
Use an 8mm spanner/wrench to adjust the highlighted nut to obtain the best setting to hold or hover the cutter bar above the base plate.
Loosen the nut a small amount, raise the cutter bar using the lever then carefully release the lever and the cutter bar should lower itself to the base plate. If not loosen the nut a small amount more.
Raise the cutter bar and tighten the nut a very small amount until the cutter bar is held from falling.
Nudge the lever towards you in small movements, if the cutter bar then falls tighten the adjustment nut a very small amount and try again.
Ⓒ Keencut 2020 | Baird Rd, Corby NN17 5ZA United Kingdom | Contact us
Created by DeType | Privacy | Website Disclaimer | Terms & Conditions