
Excalibur 6000 user guide – Get to know your cutter
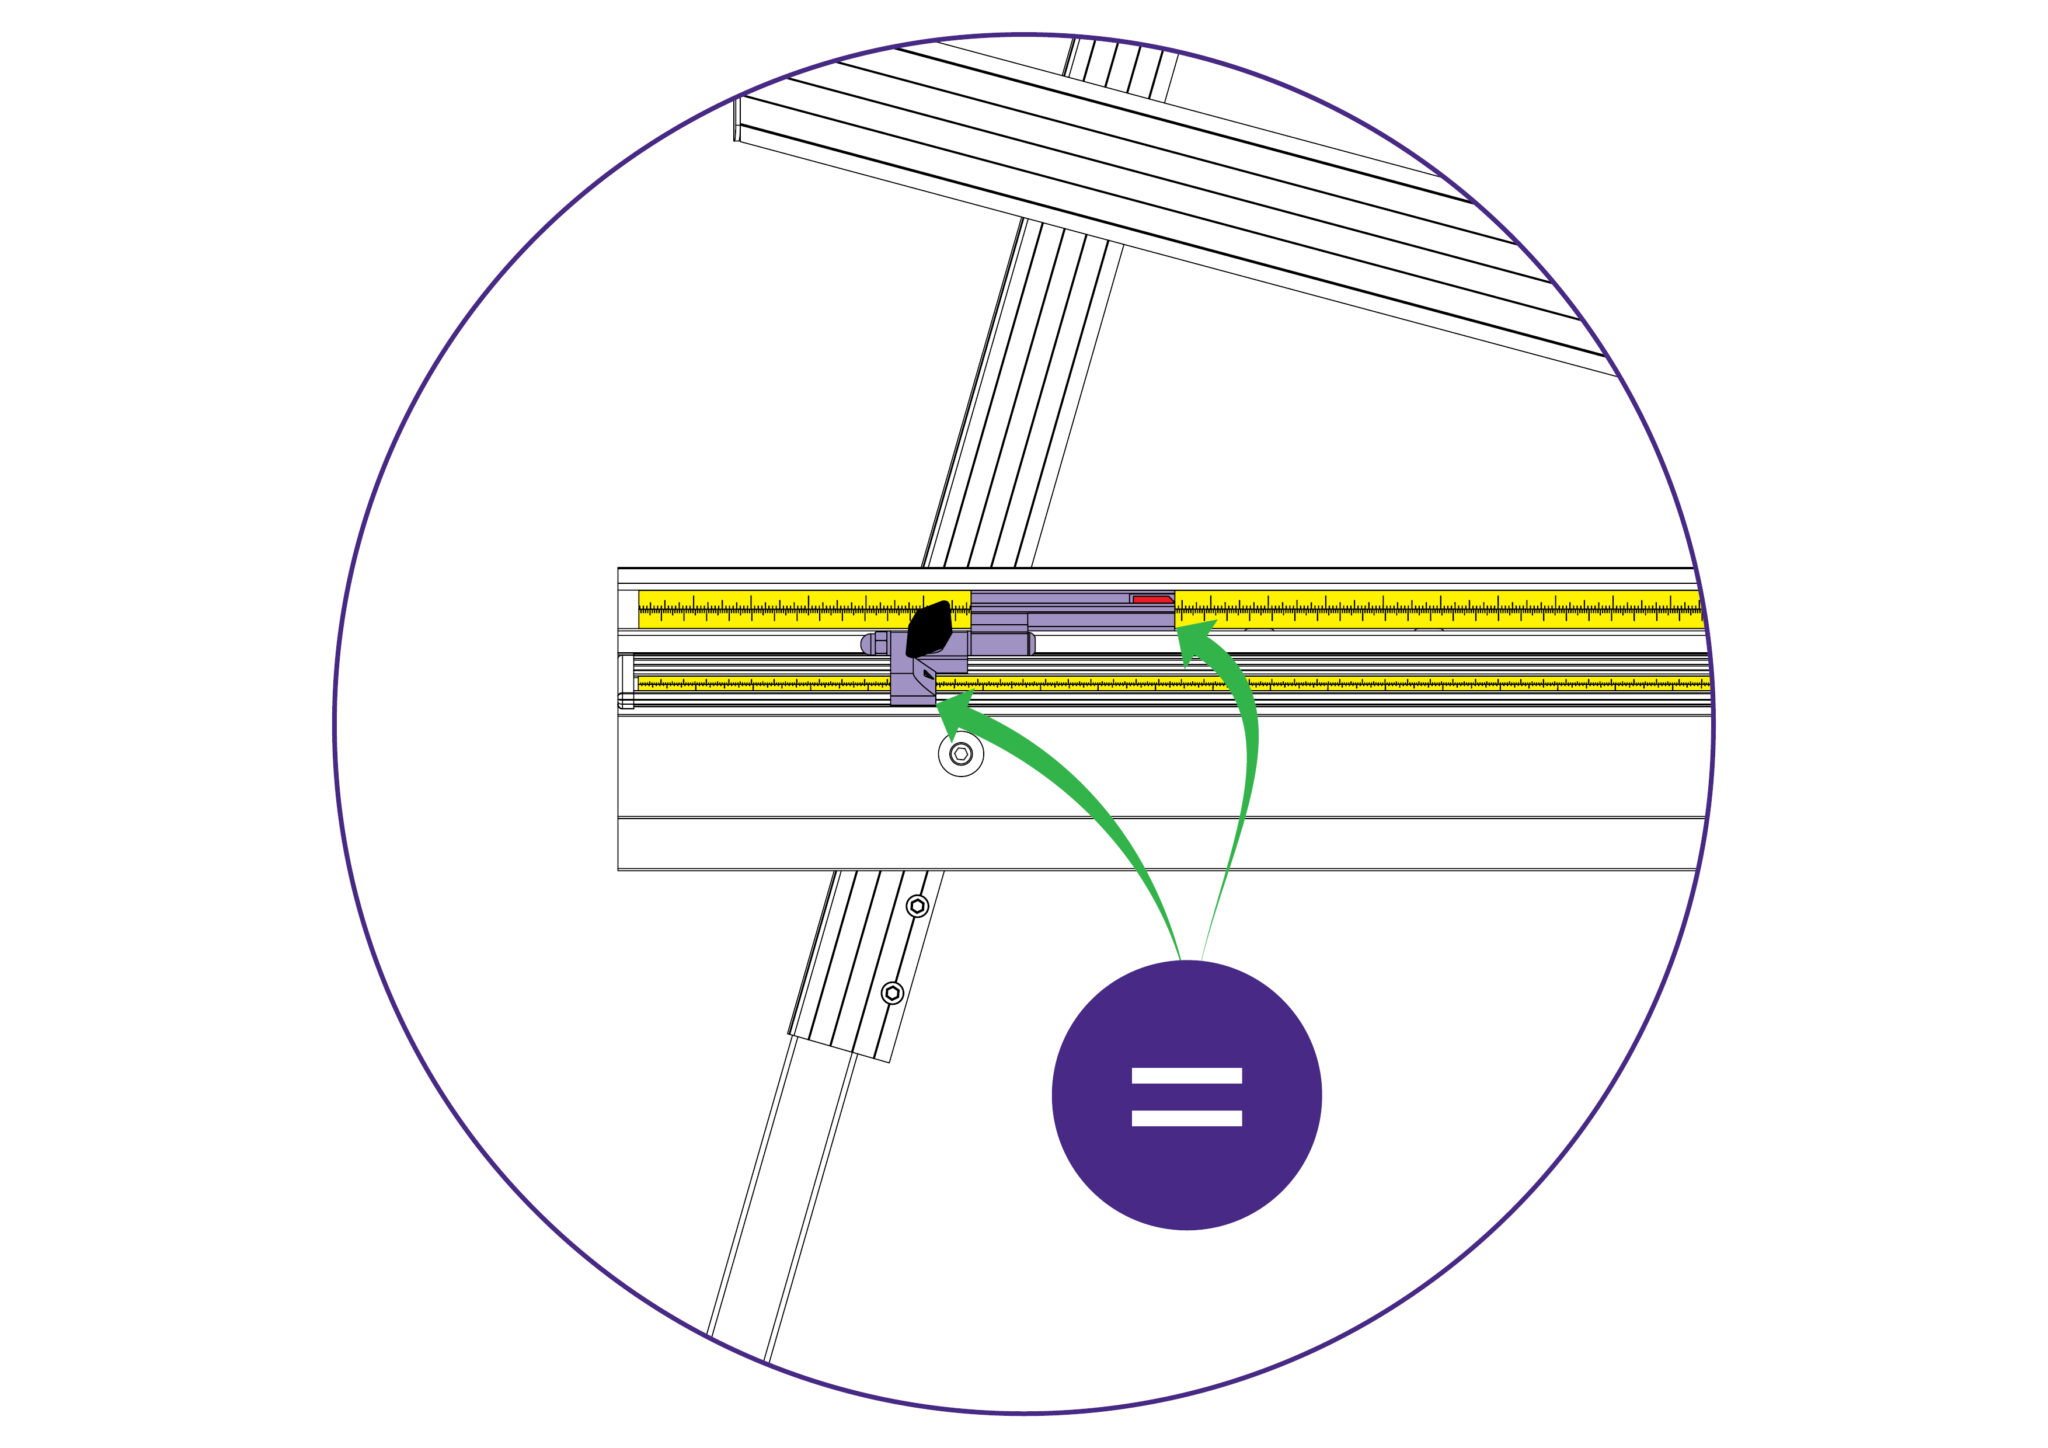
The right and left hand measuring stops enables the operator to slide in and position the materials to be cut at a set length, as decided by the fixed position of the stop.
As seen in the picture, the edges (with the arrows pointed at them) indicate the exact same length at which the material will be pushed up against the measuring stop. Ensure that both scales on the machine are calibrated as defined within the “Calibrating the squaring arm scales >” and “Calibrating the Easy Measuring Scale >” sections of the instruction manual.

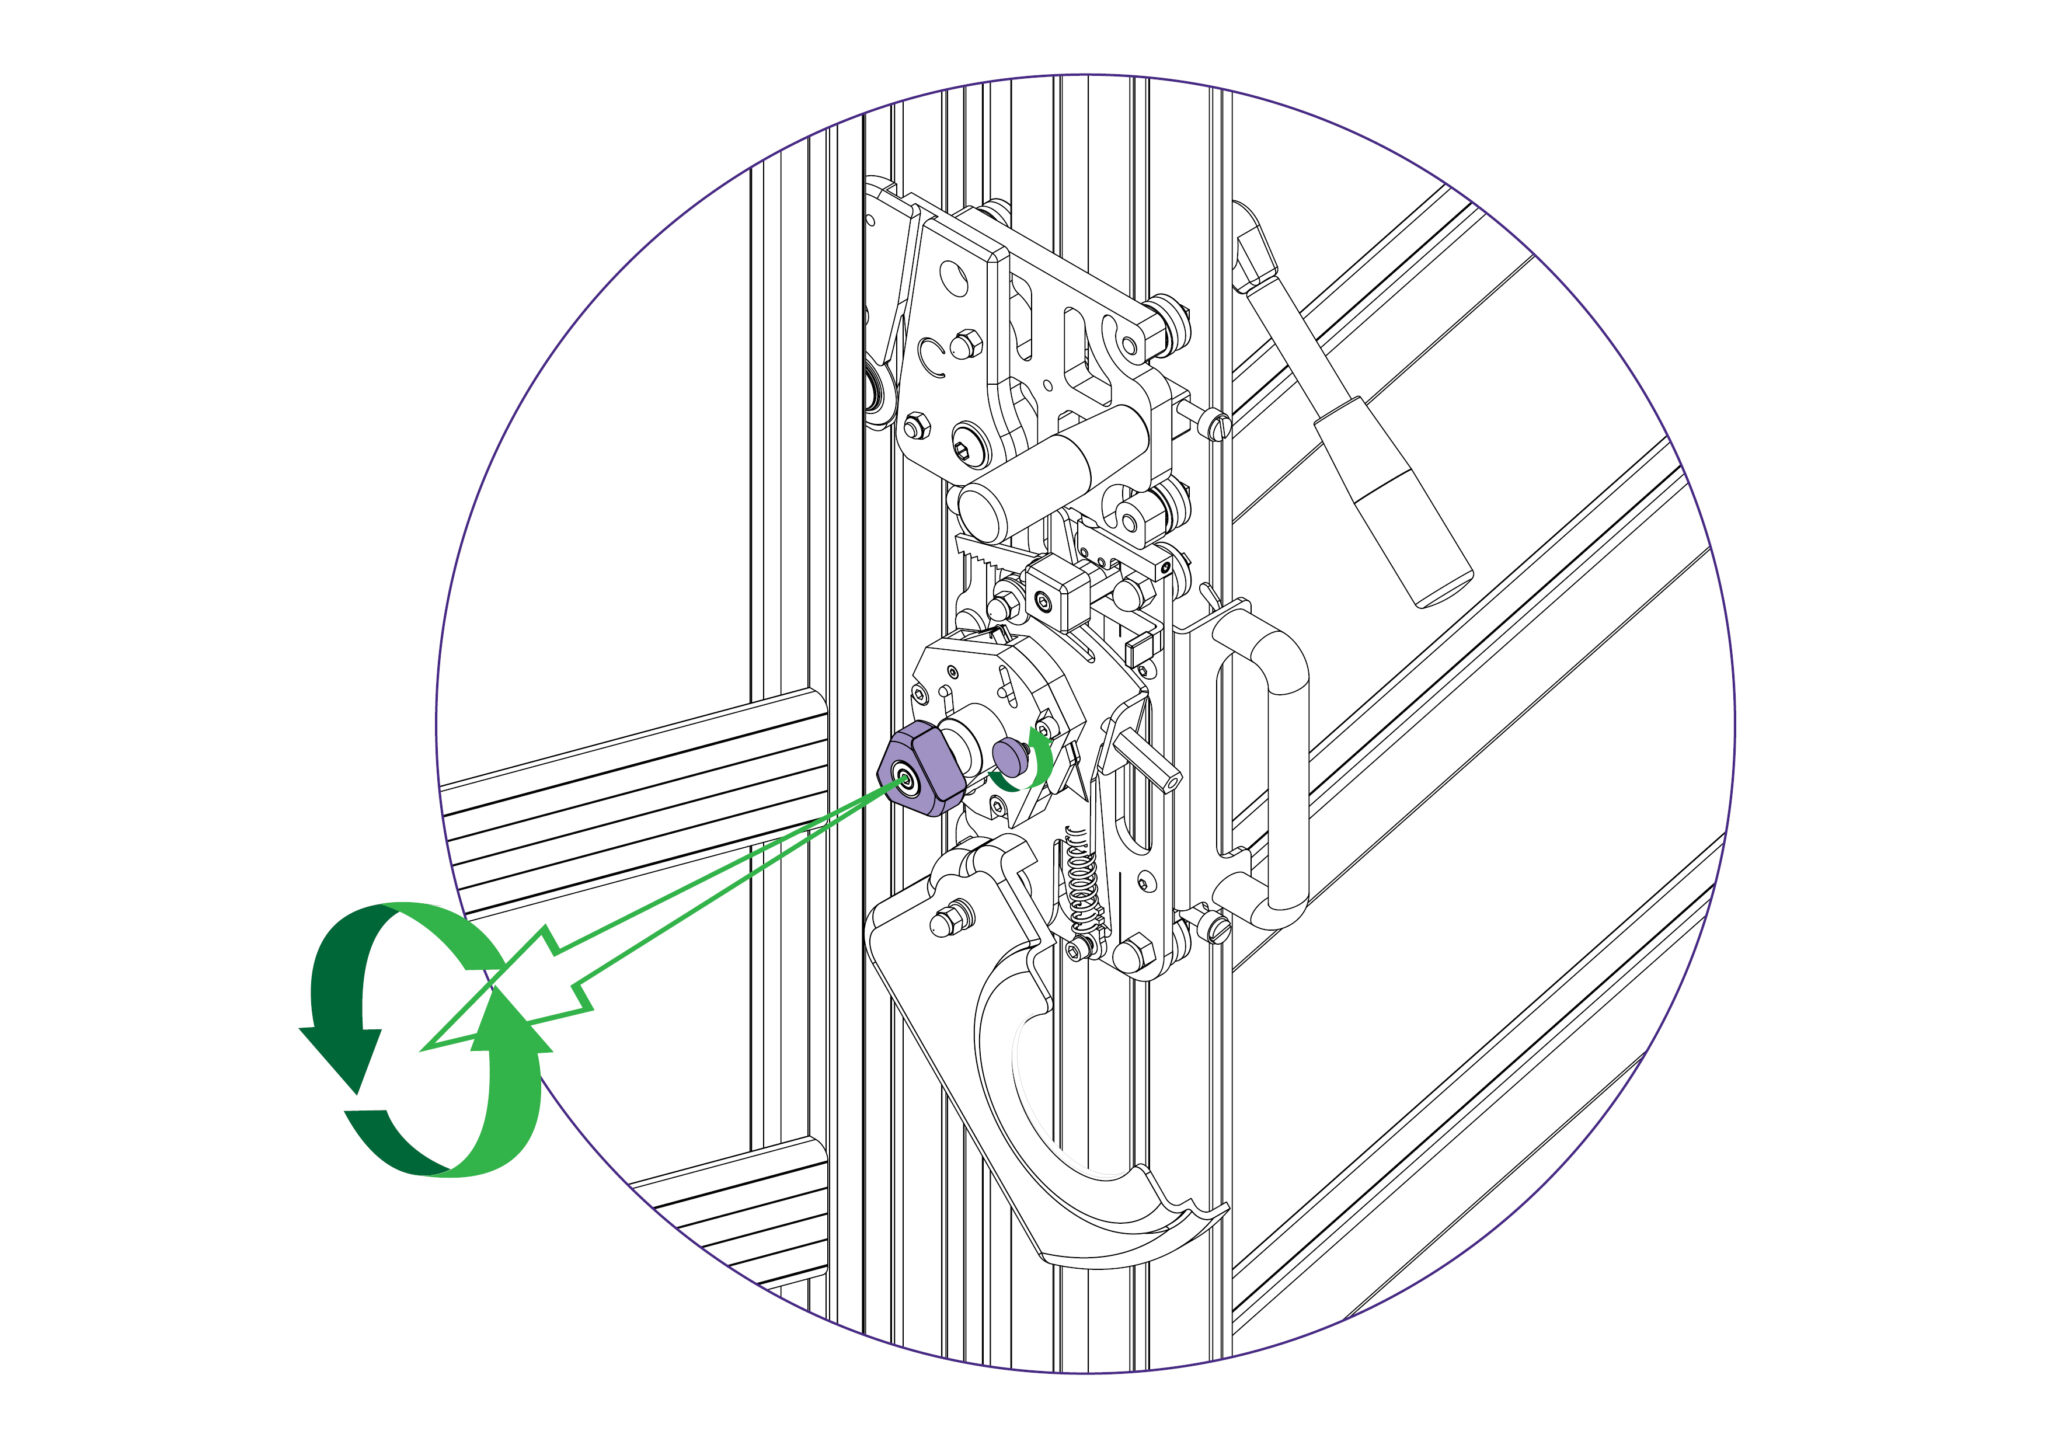
Rotate the black knob on the measuring stop counter-clockwise to loosen the stop and move it to the desired length measurement on either scale.
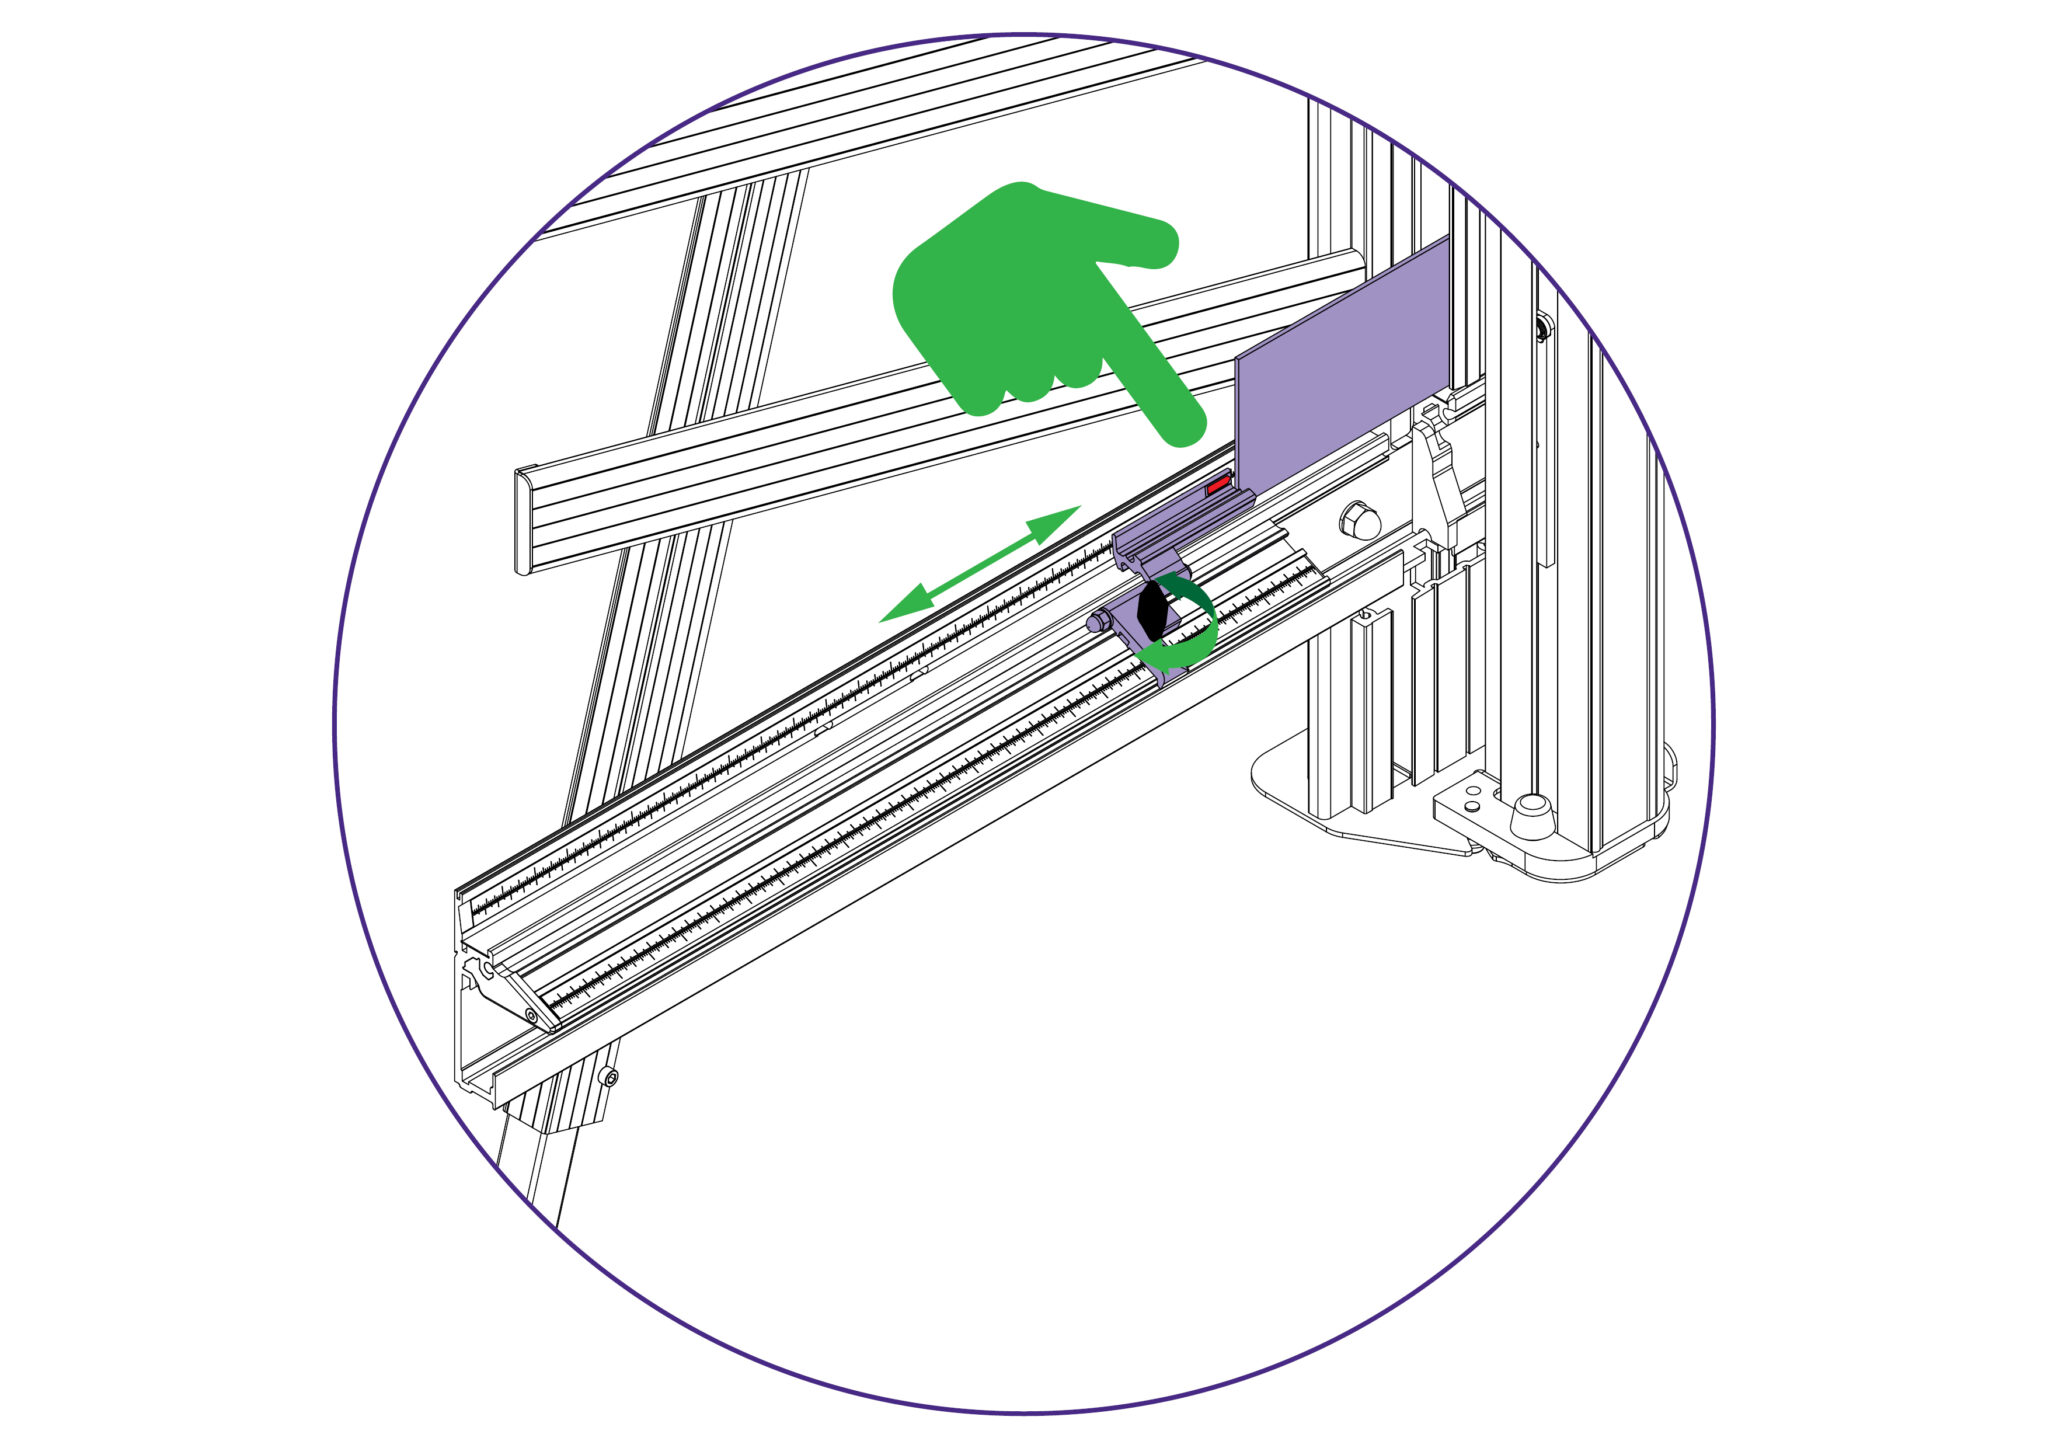
Rotate the black knob on the measuring stop clockwise to fasten the stop and set the material (to be cut) against the measuring stop.
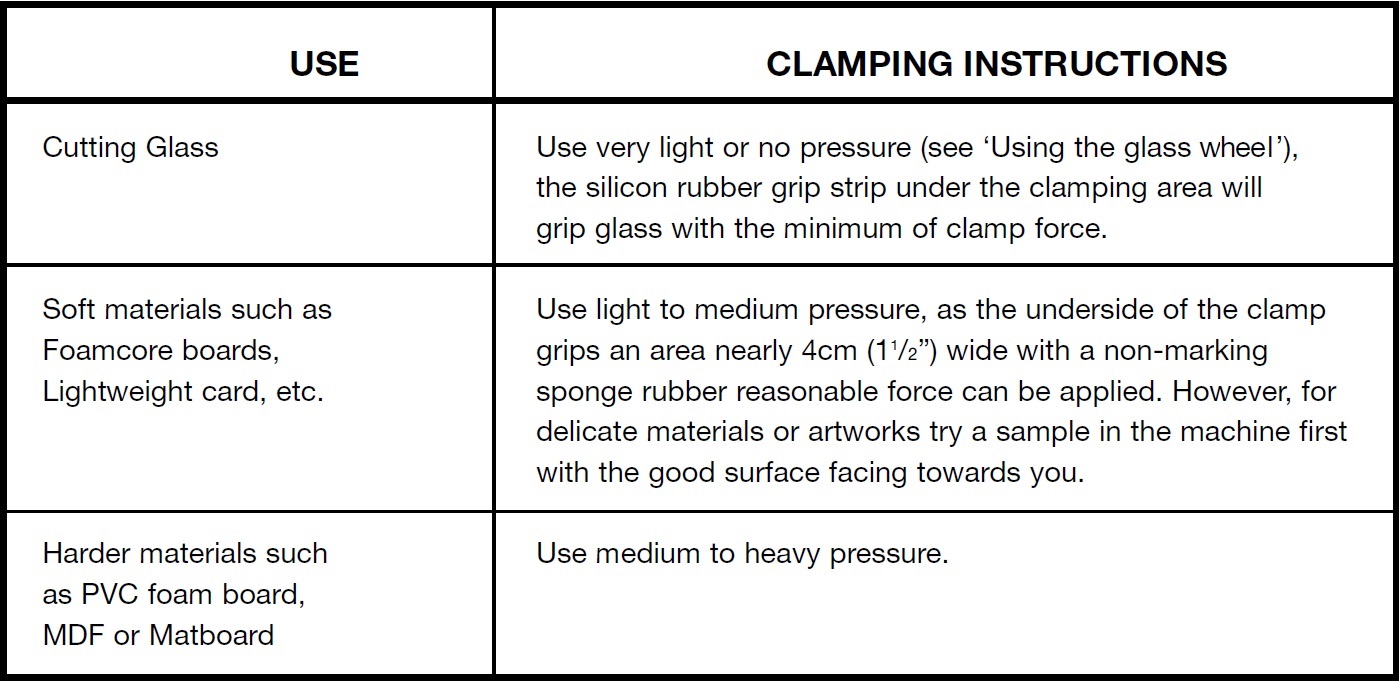
The clamping system enables the operator to control the grip pressure by means of an integral friction brake, that maintains the clamping force at the pressure applied by the operating lever.
Soft materials can be held firmly without sustaining damage and solid materials are held rigidly without movement.
By following the guidelines below it will help you to get the most from the machine.
The Excalibur 6000 is fitted with two Cutting Heads running on two vertical stainless steel tracks. The lower or multi-tool cutter head has a rotating turret arrangement where any one of the three cutting tools can be selected:
1) Cutting Blade – Using a standard Medium Duty utility blade (not Heavy Duty – they will not fit) to cut PVC Foamboards like Forex®, corrugated plastic such as Correx®, card, matboard and many other types of rigid boards up to 13mm (1/2″) thick.
2) Scoring Blade – An inversely positioned Medium Duty utility blade is used to score the surface of any brittle plastics including Acrylic’s such as Perspex® and Plexiglass. Once scored the plastic sheet is removed from the machine and ‘snapped’ along the score line. Any thickness (up to 13mm 1/2″) can be scored but tests should be carried out on a sample of the sheet to ensure it does ‘snap’ and to an acceptable quality (remember to use hand and face protection when doing this).
3) Glass Cutting – A high quality tungsten carbide wheel is used to score glass.
The top carriage in a standard machine is fitted with the TW (Twin Wheel) cutter for use with rigid boards such as MDF, hardboards, and some mountboards up to 4mm. Refer to Using the twin wheel cutter > or Changing the twin wheel cutter > for more details.
The cutting wheels are made from high grade tool steel and are heat treated to give a long life but this is dependent upon daily use and the materials being cut.
The signs of the wheels wearing out are:
1) A rough finish predominately on the right hand side of the cut, with flaking on materials such as MDF.
2) The bottom of the cut bursting out rather than being cut neatly.
3) The board trying to turn under the clamp when being cut (also check the clamp pressure).
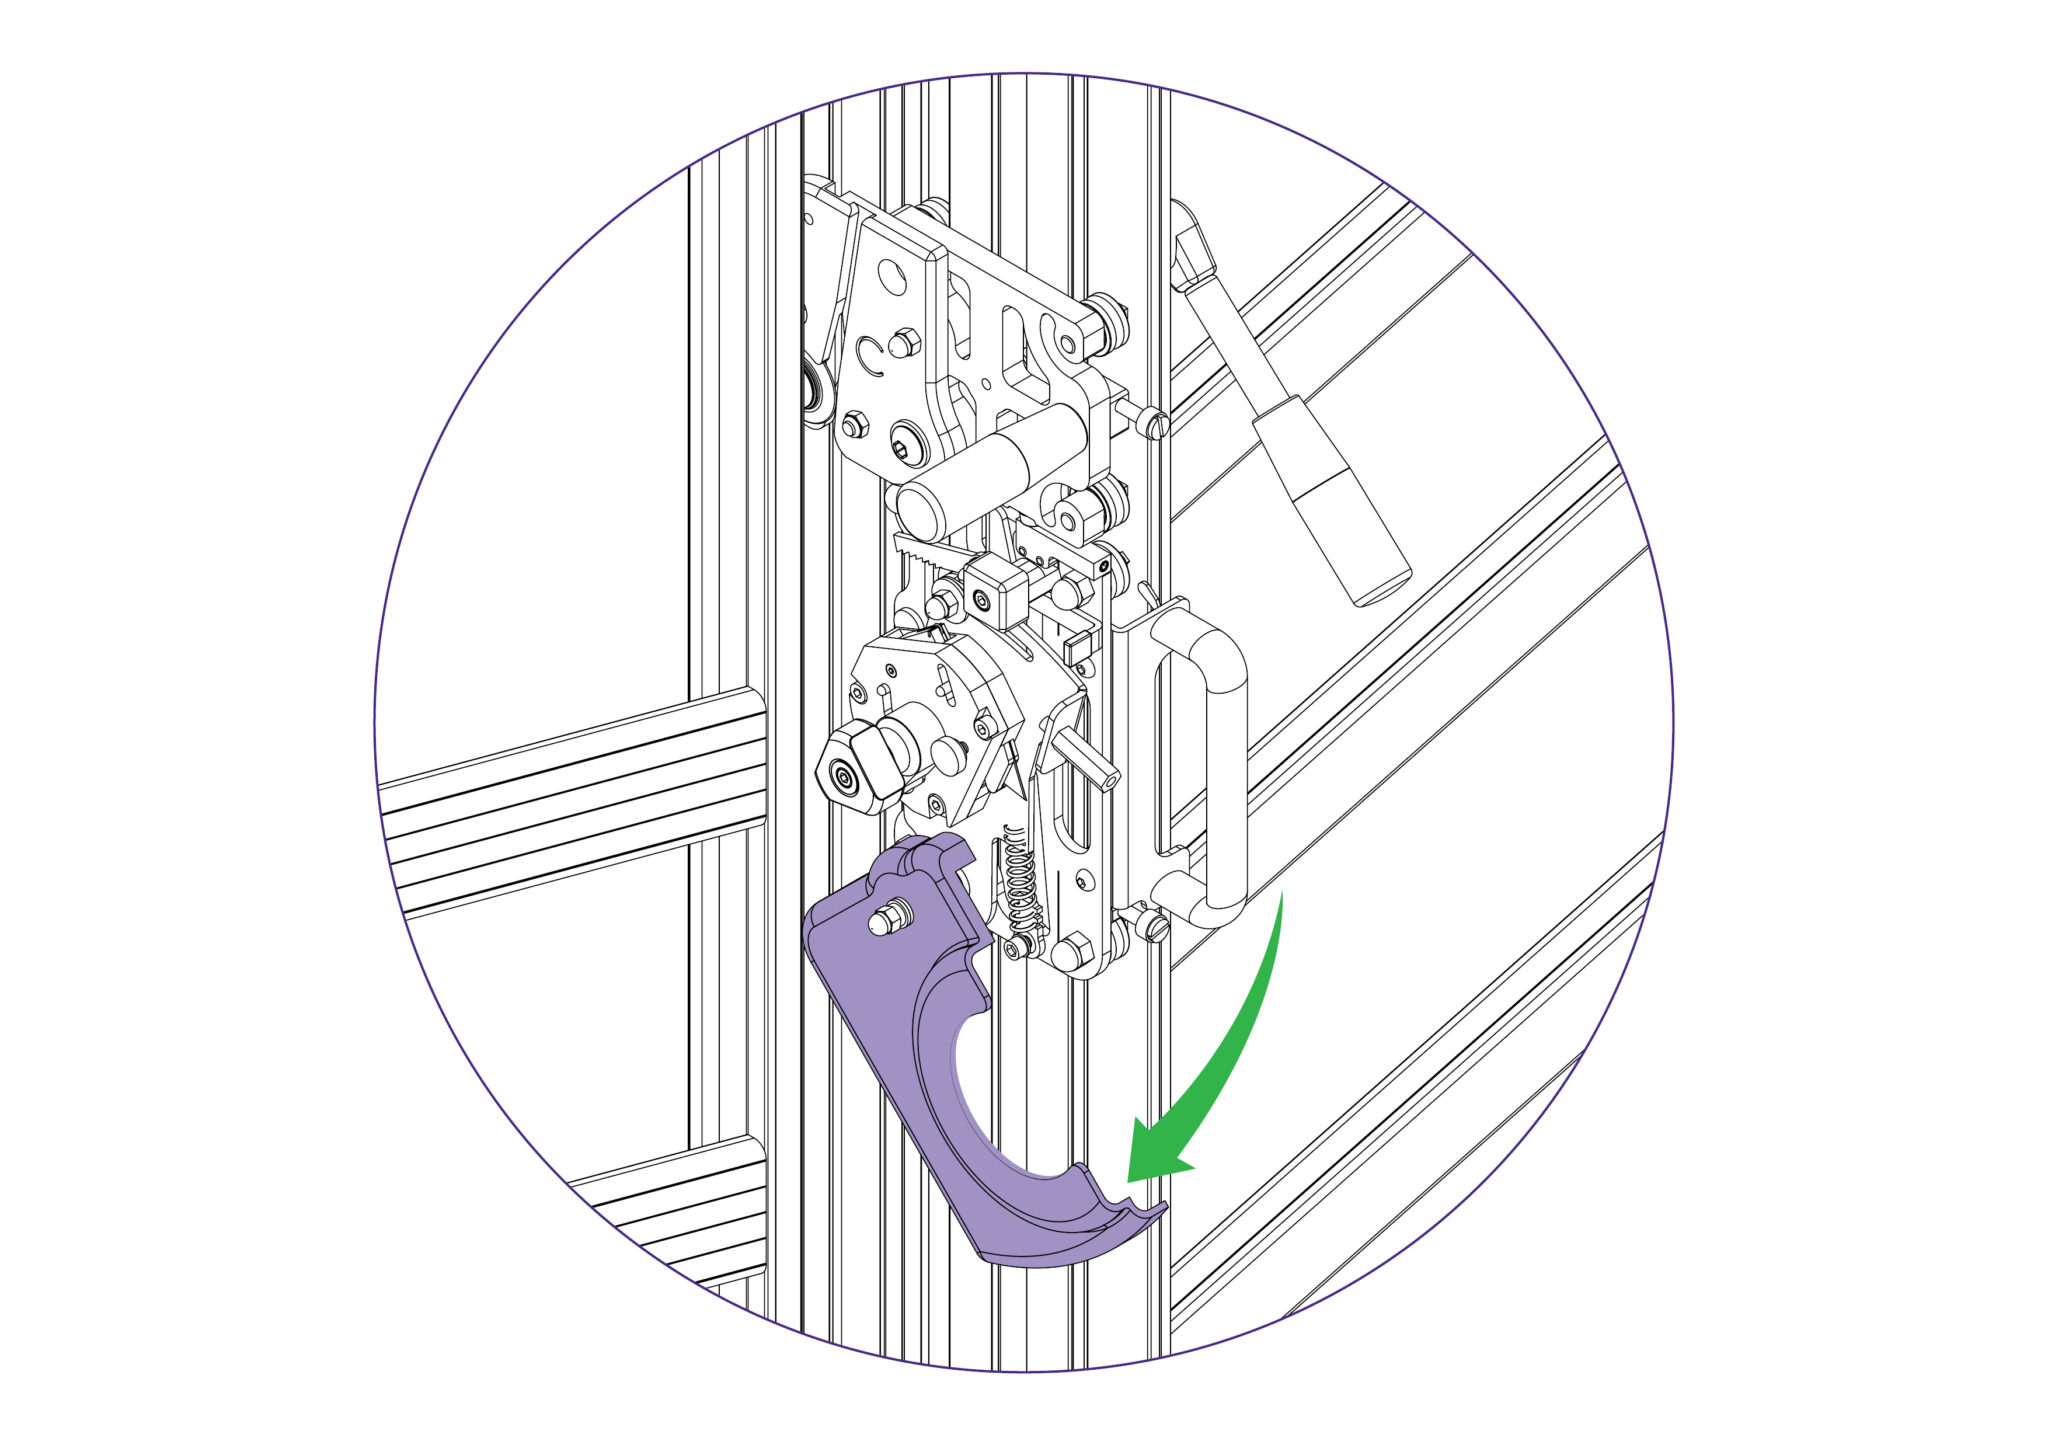
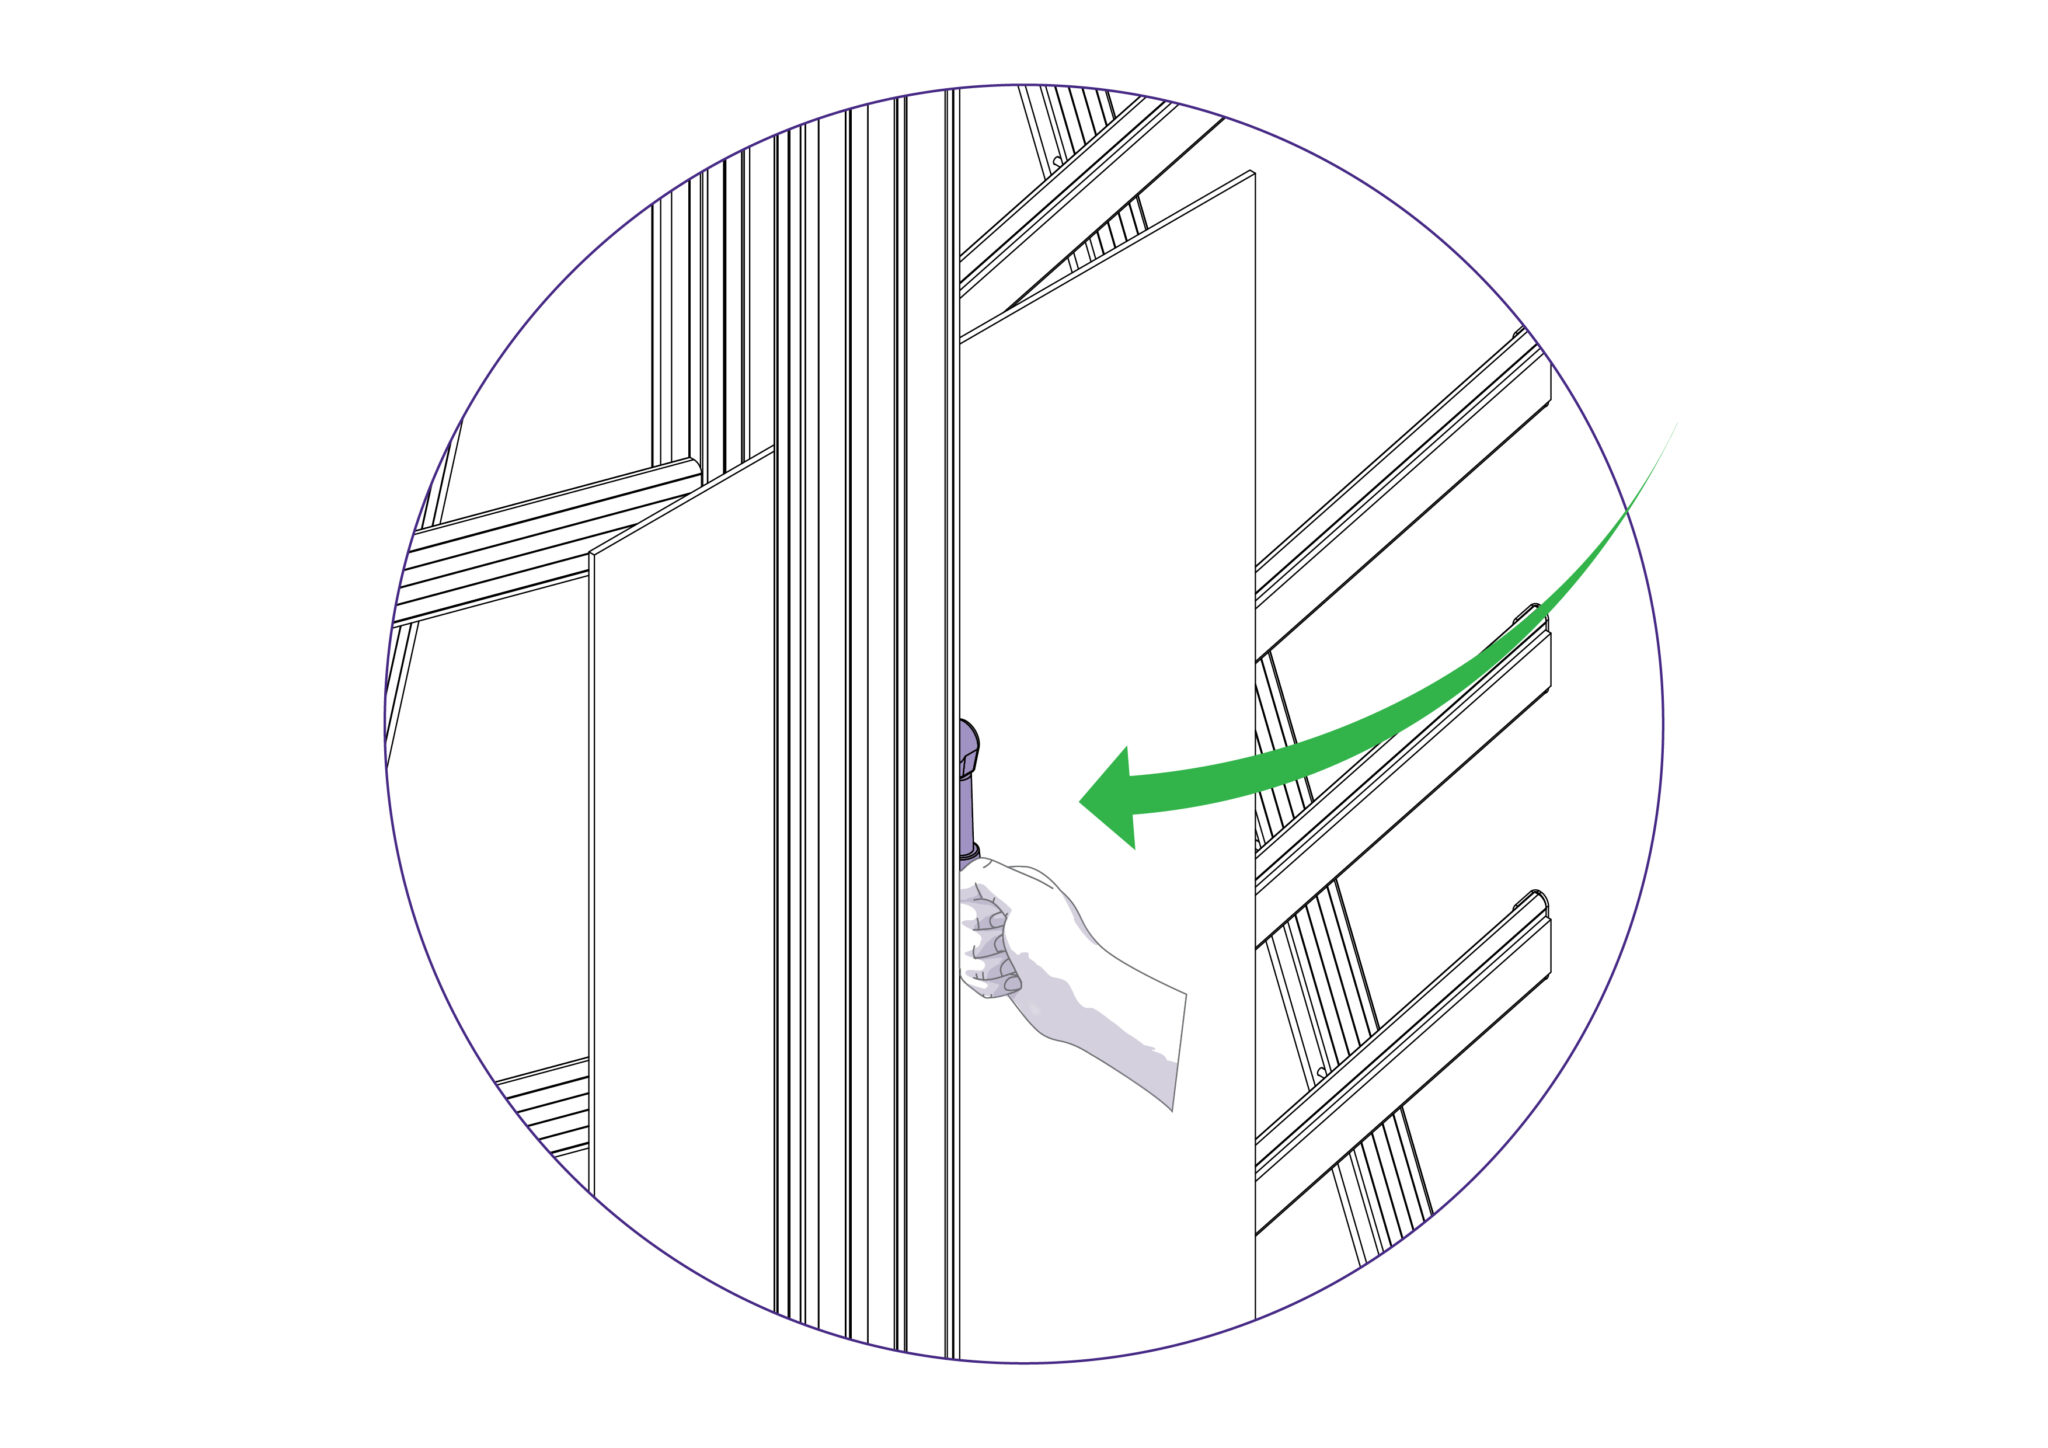
To select a different cutter pull the turret handle out to the left about 6mm (1/4”) and rotate in either direction, the turret will click into the correct position for the cutter indicated.
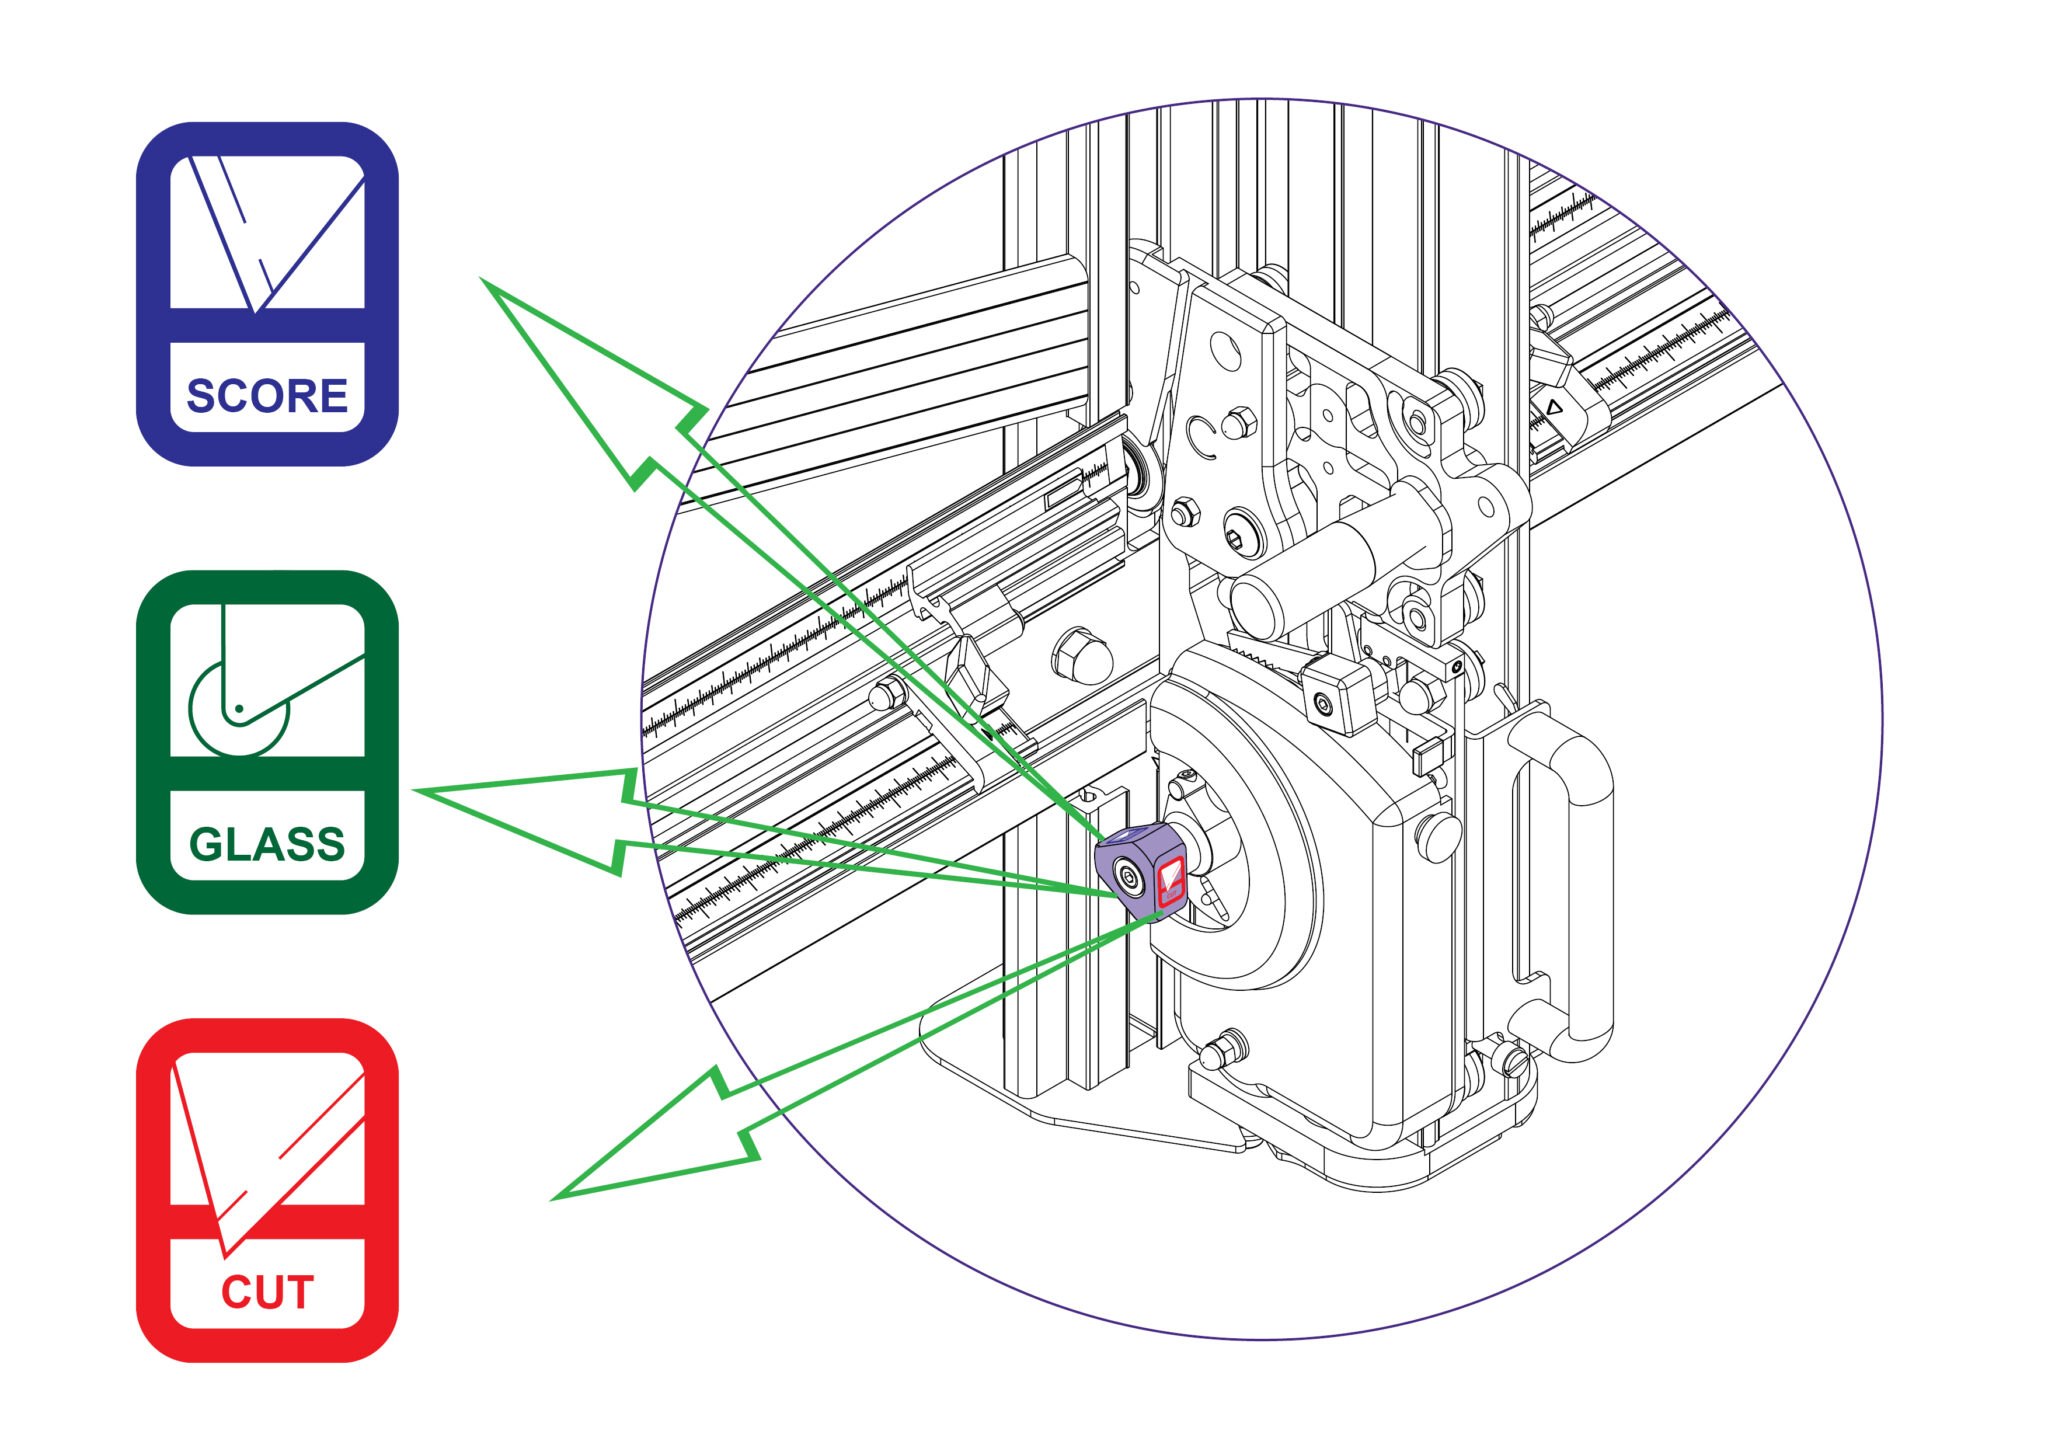
The indicator label on the turret handle, that faces the user, shows which cutter is active.
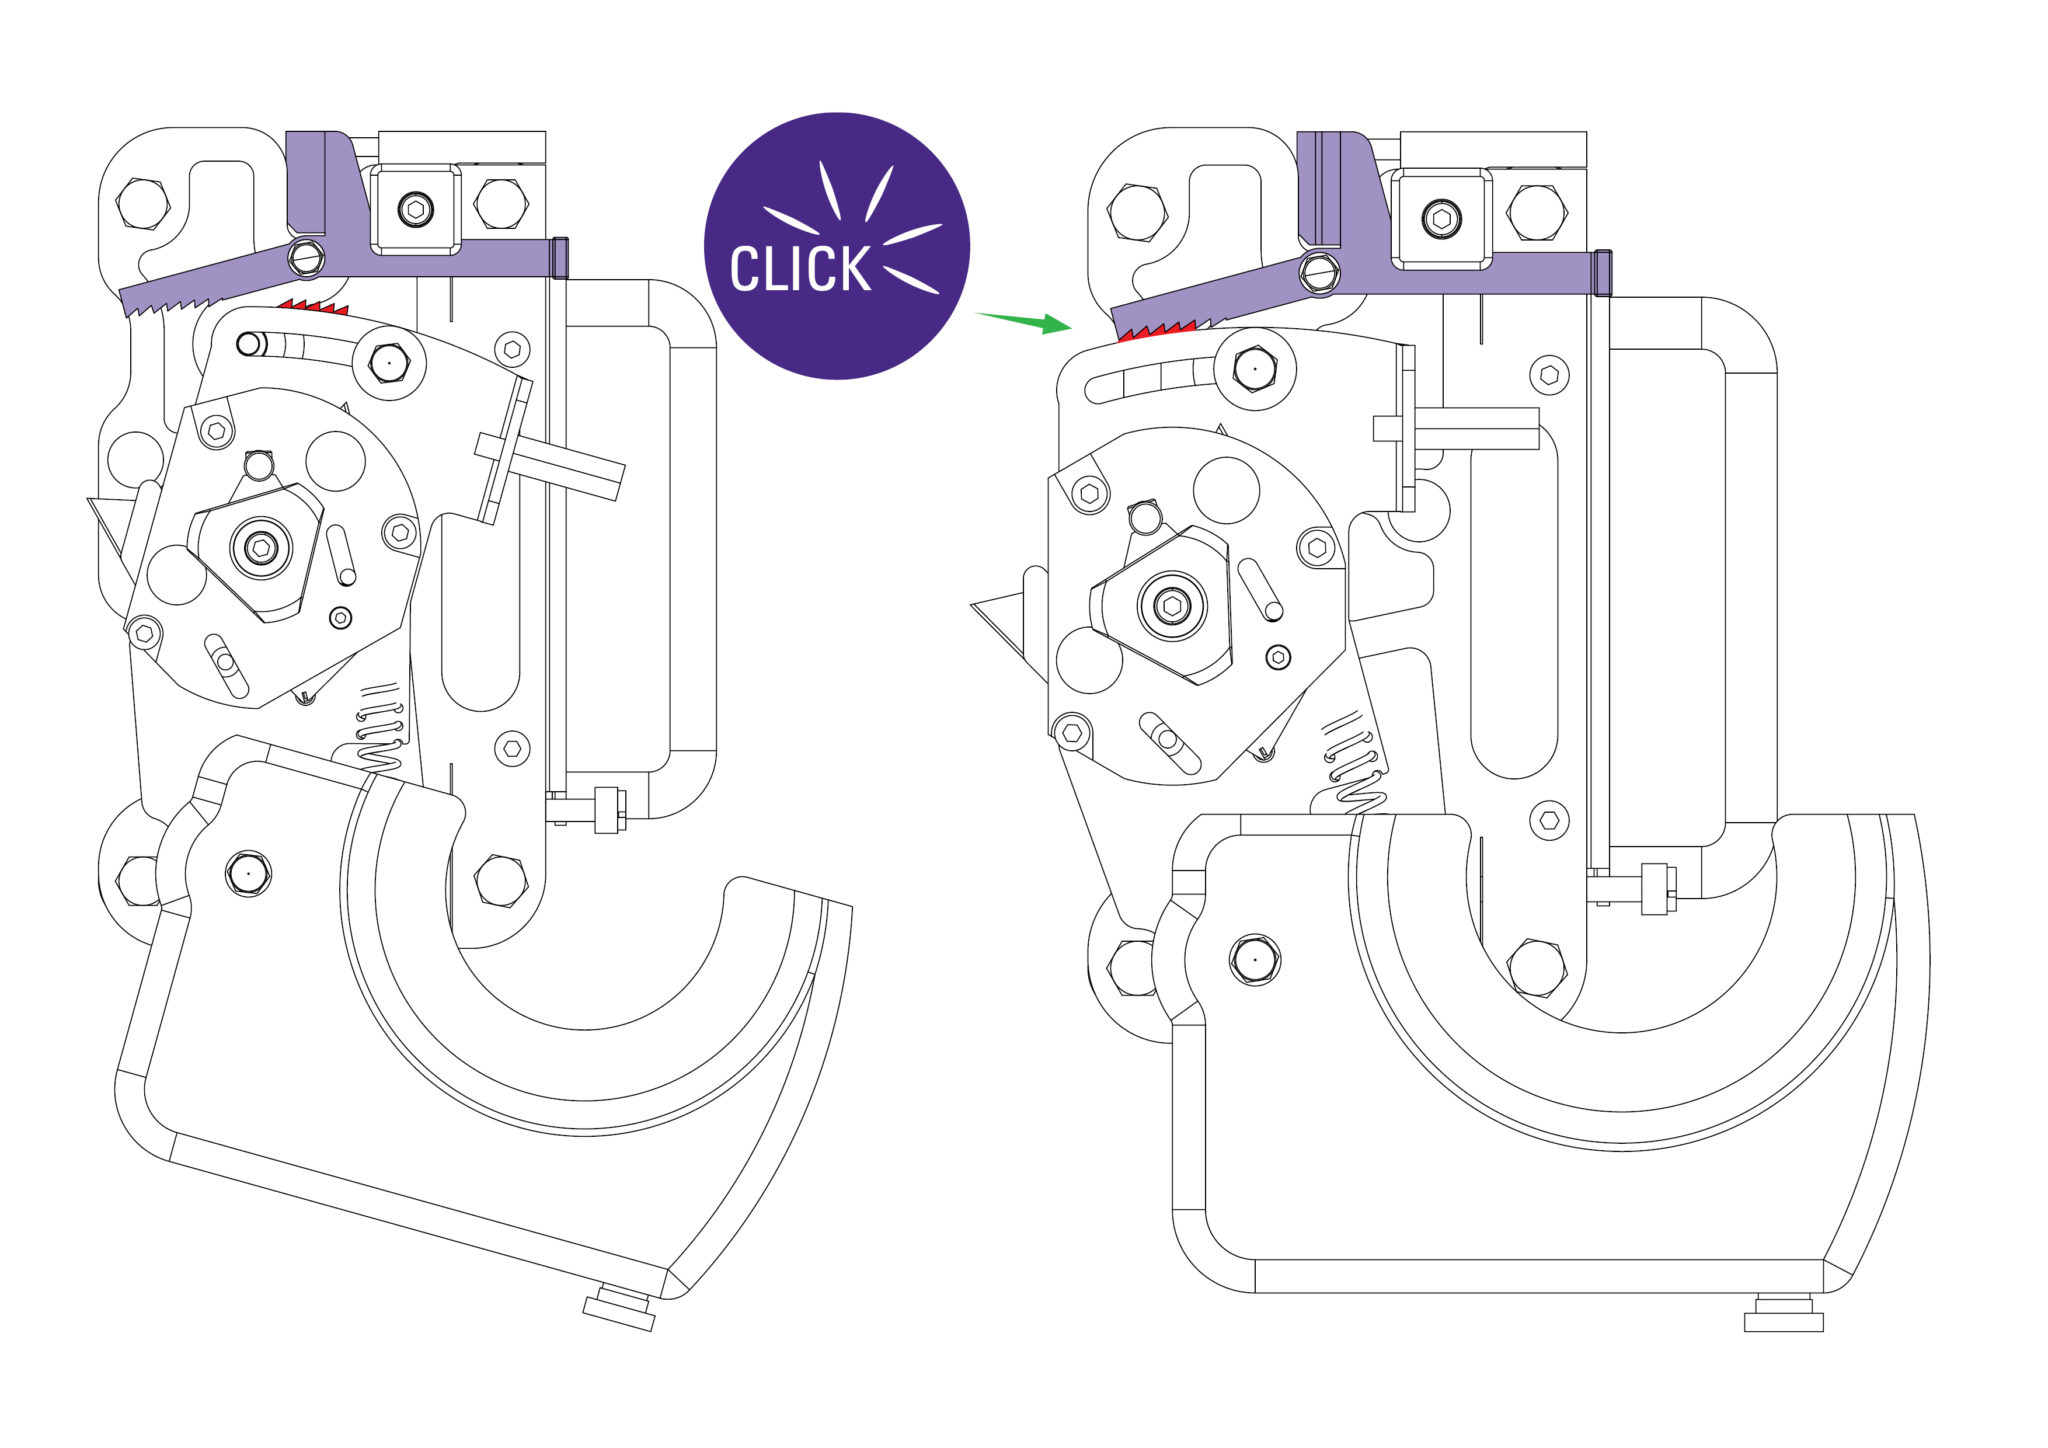
A unique feature of the Excalibur is the ‘ratchet latch’. This enables thick dense materials such as PVC foam board to be cut easily in stages. Count the number of ‘clicks’ to position the blade just below the surface of the material to make your first cut, and then add an extra ‘click’ for the second and subsequent cuts.
As a rough guide when cutting PVC foam board:
3MM (1/8”) Initial surface cut + 1 additional cut
5MM (1/4”) Initial surface cut + 1 or 2 additional cuts
10MM (3/8”) Initial surface cut + 3 or 4 additional cuts
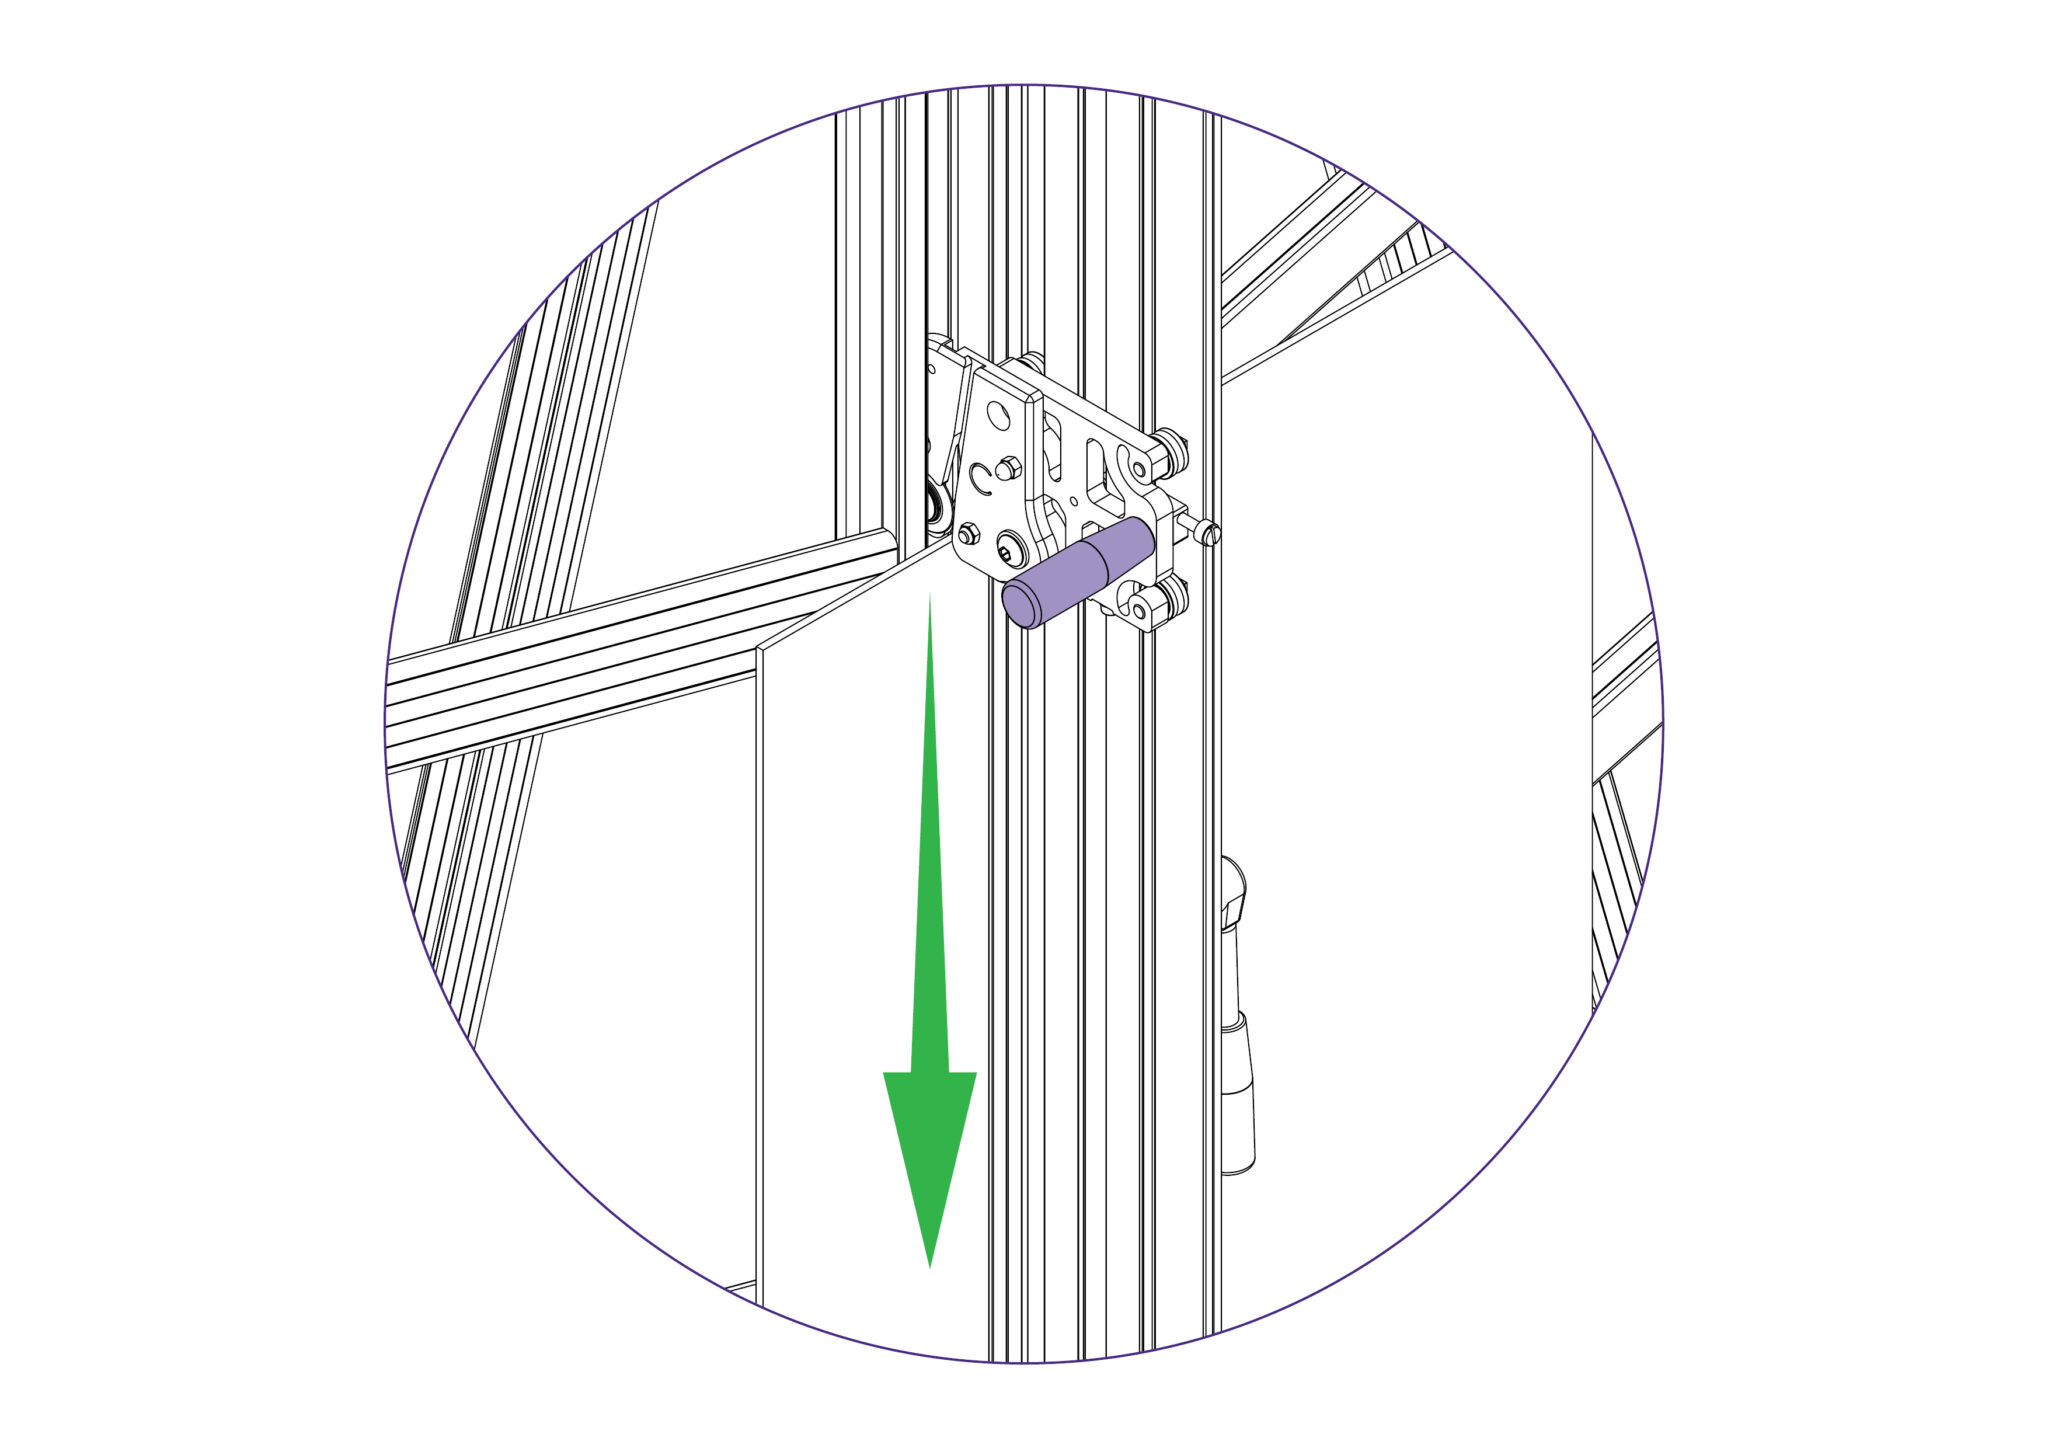
Should you engage the cutter by mistake or for any reason want to disengage the cutter without moving it to the bottom of the machine, pull down the cutter release lever.

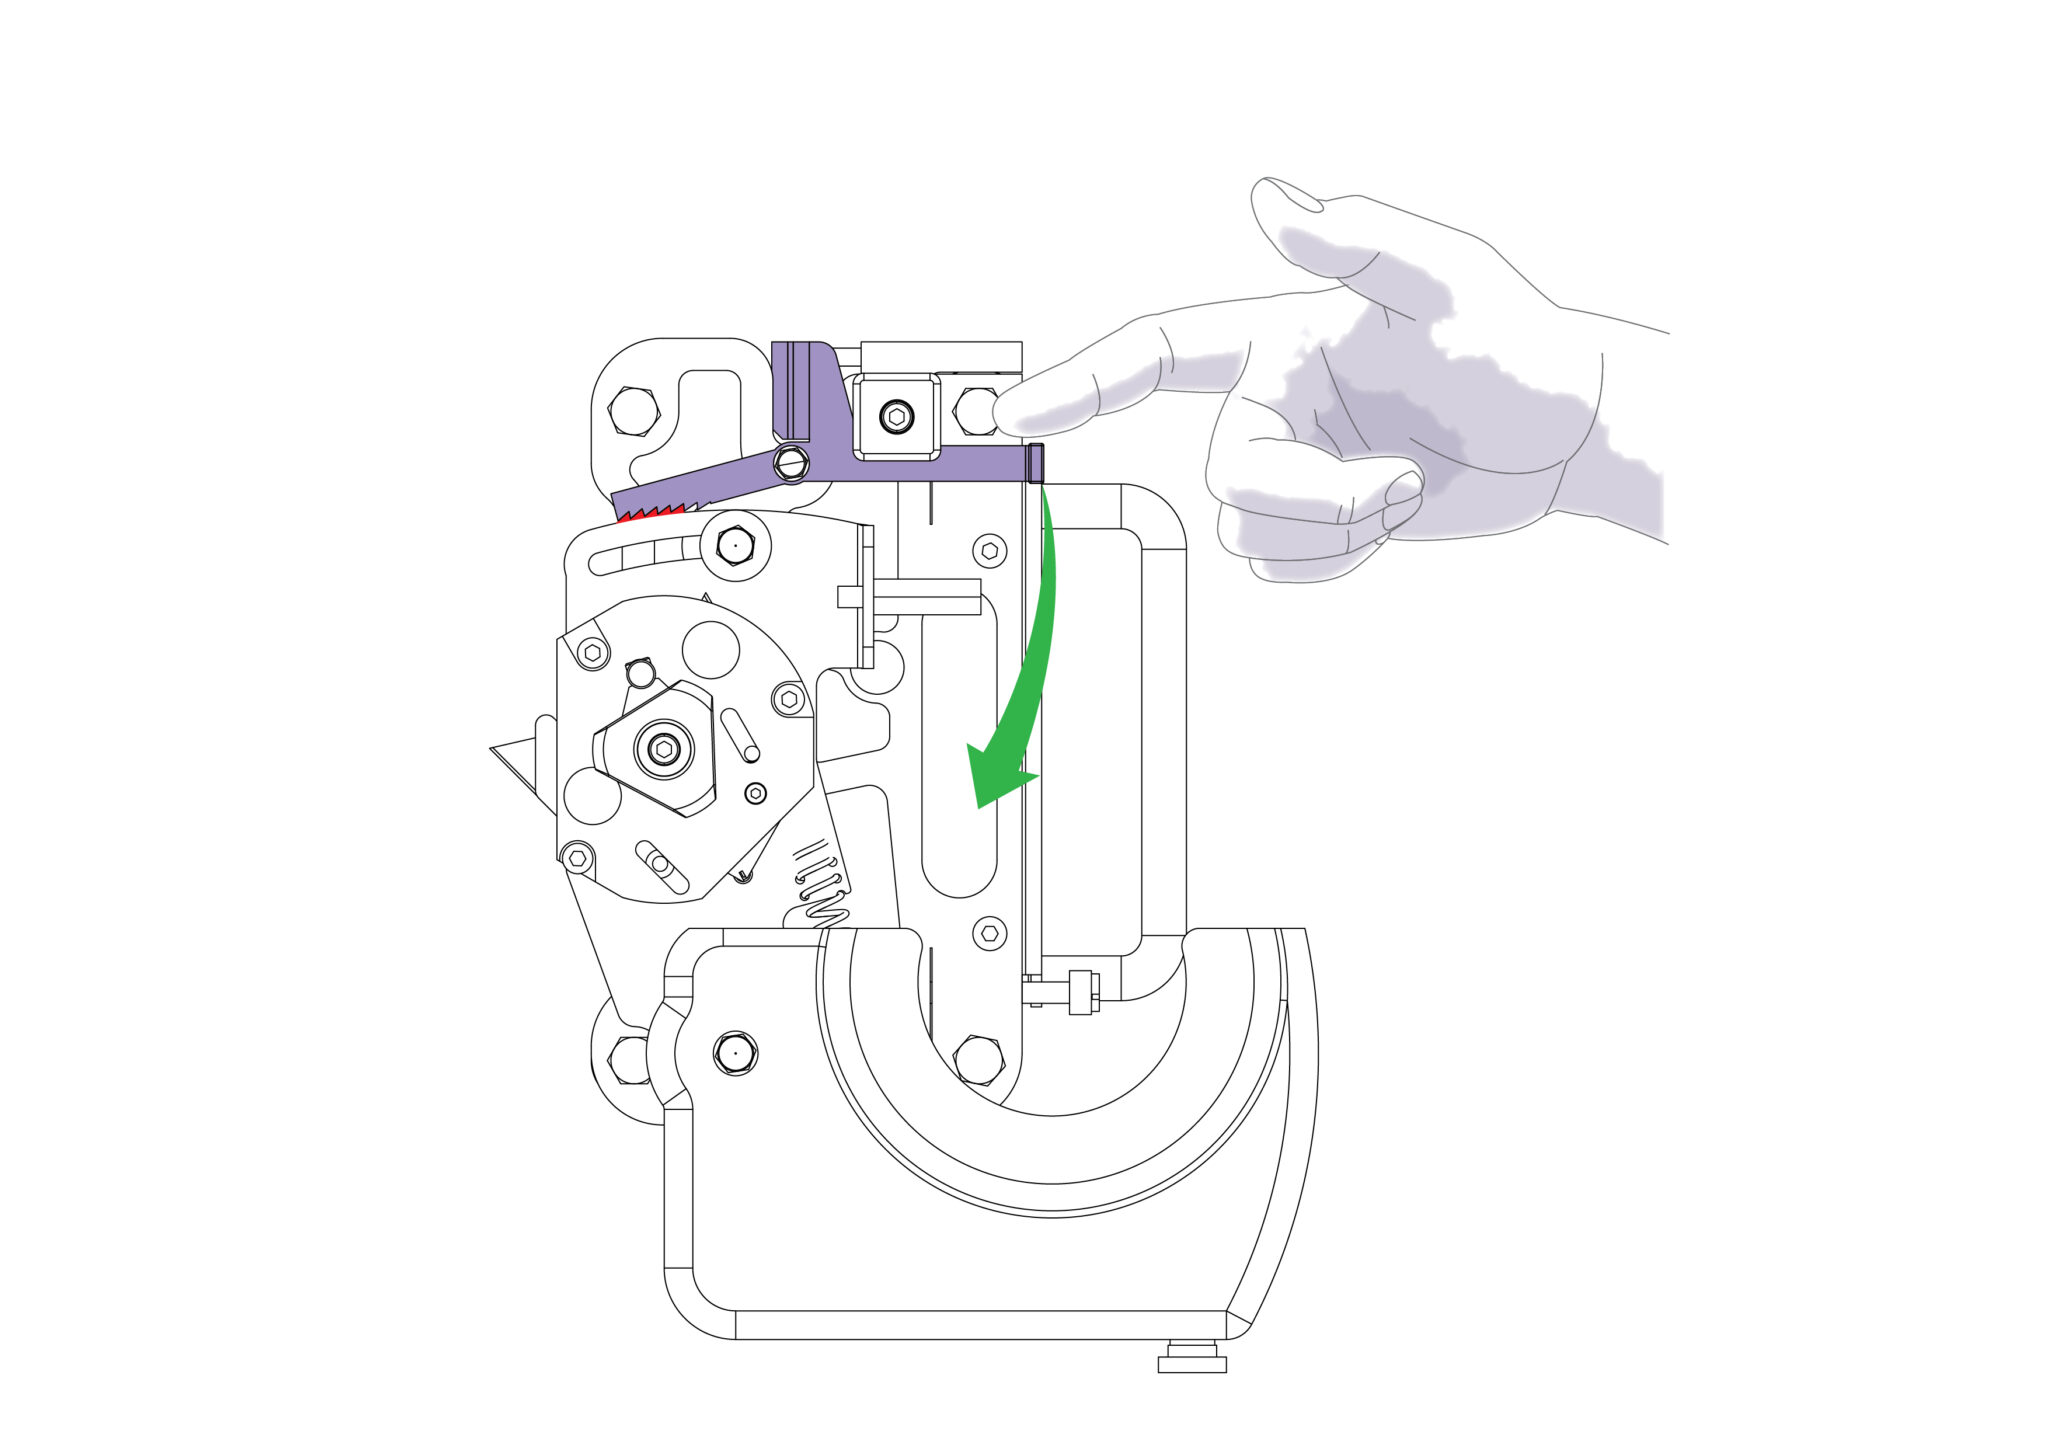
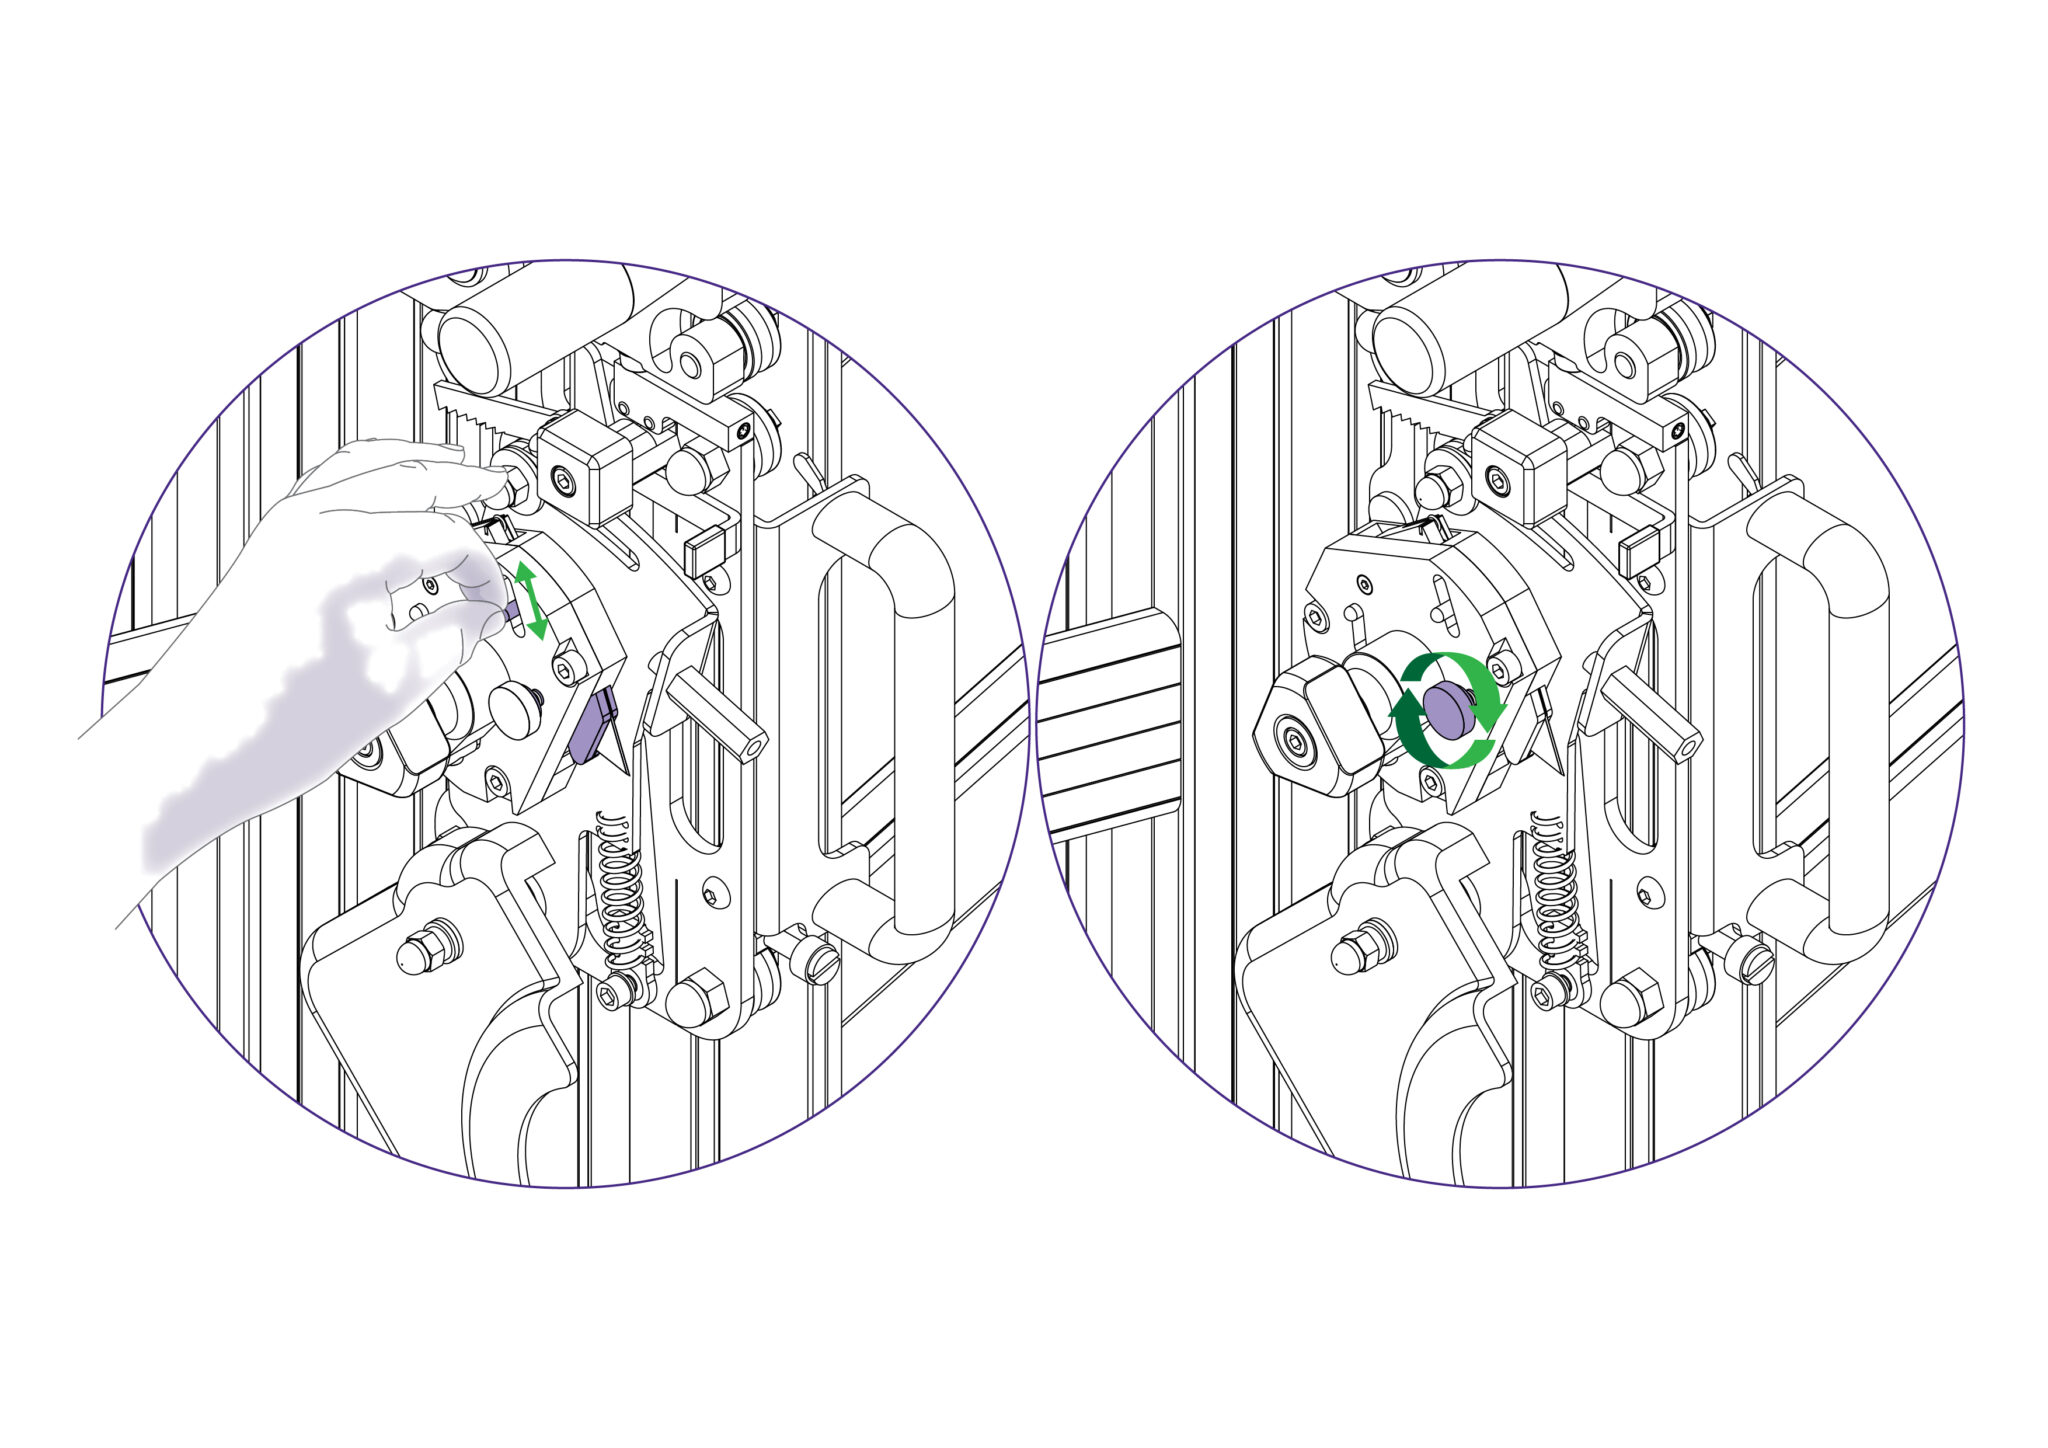
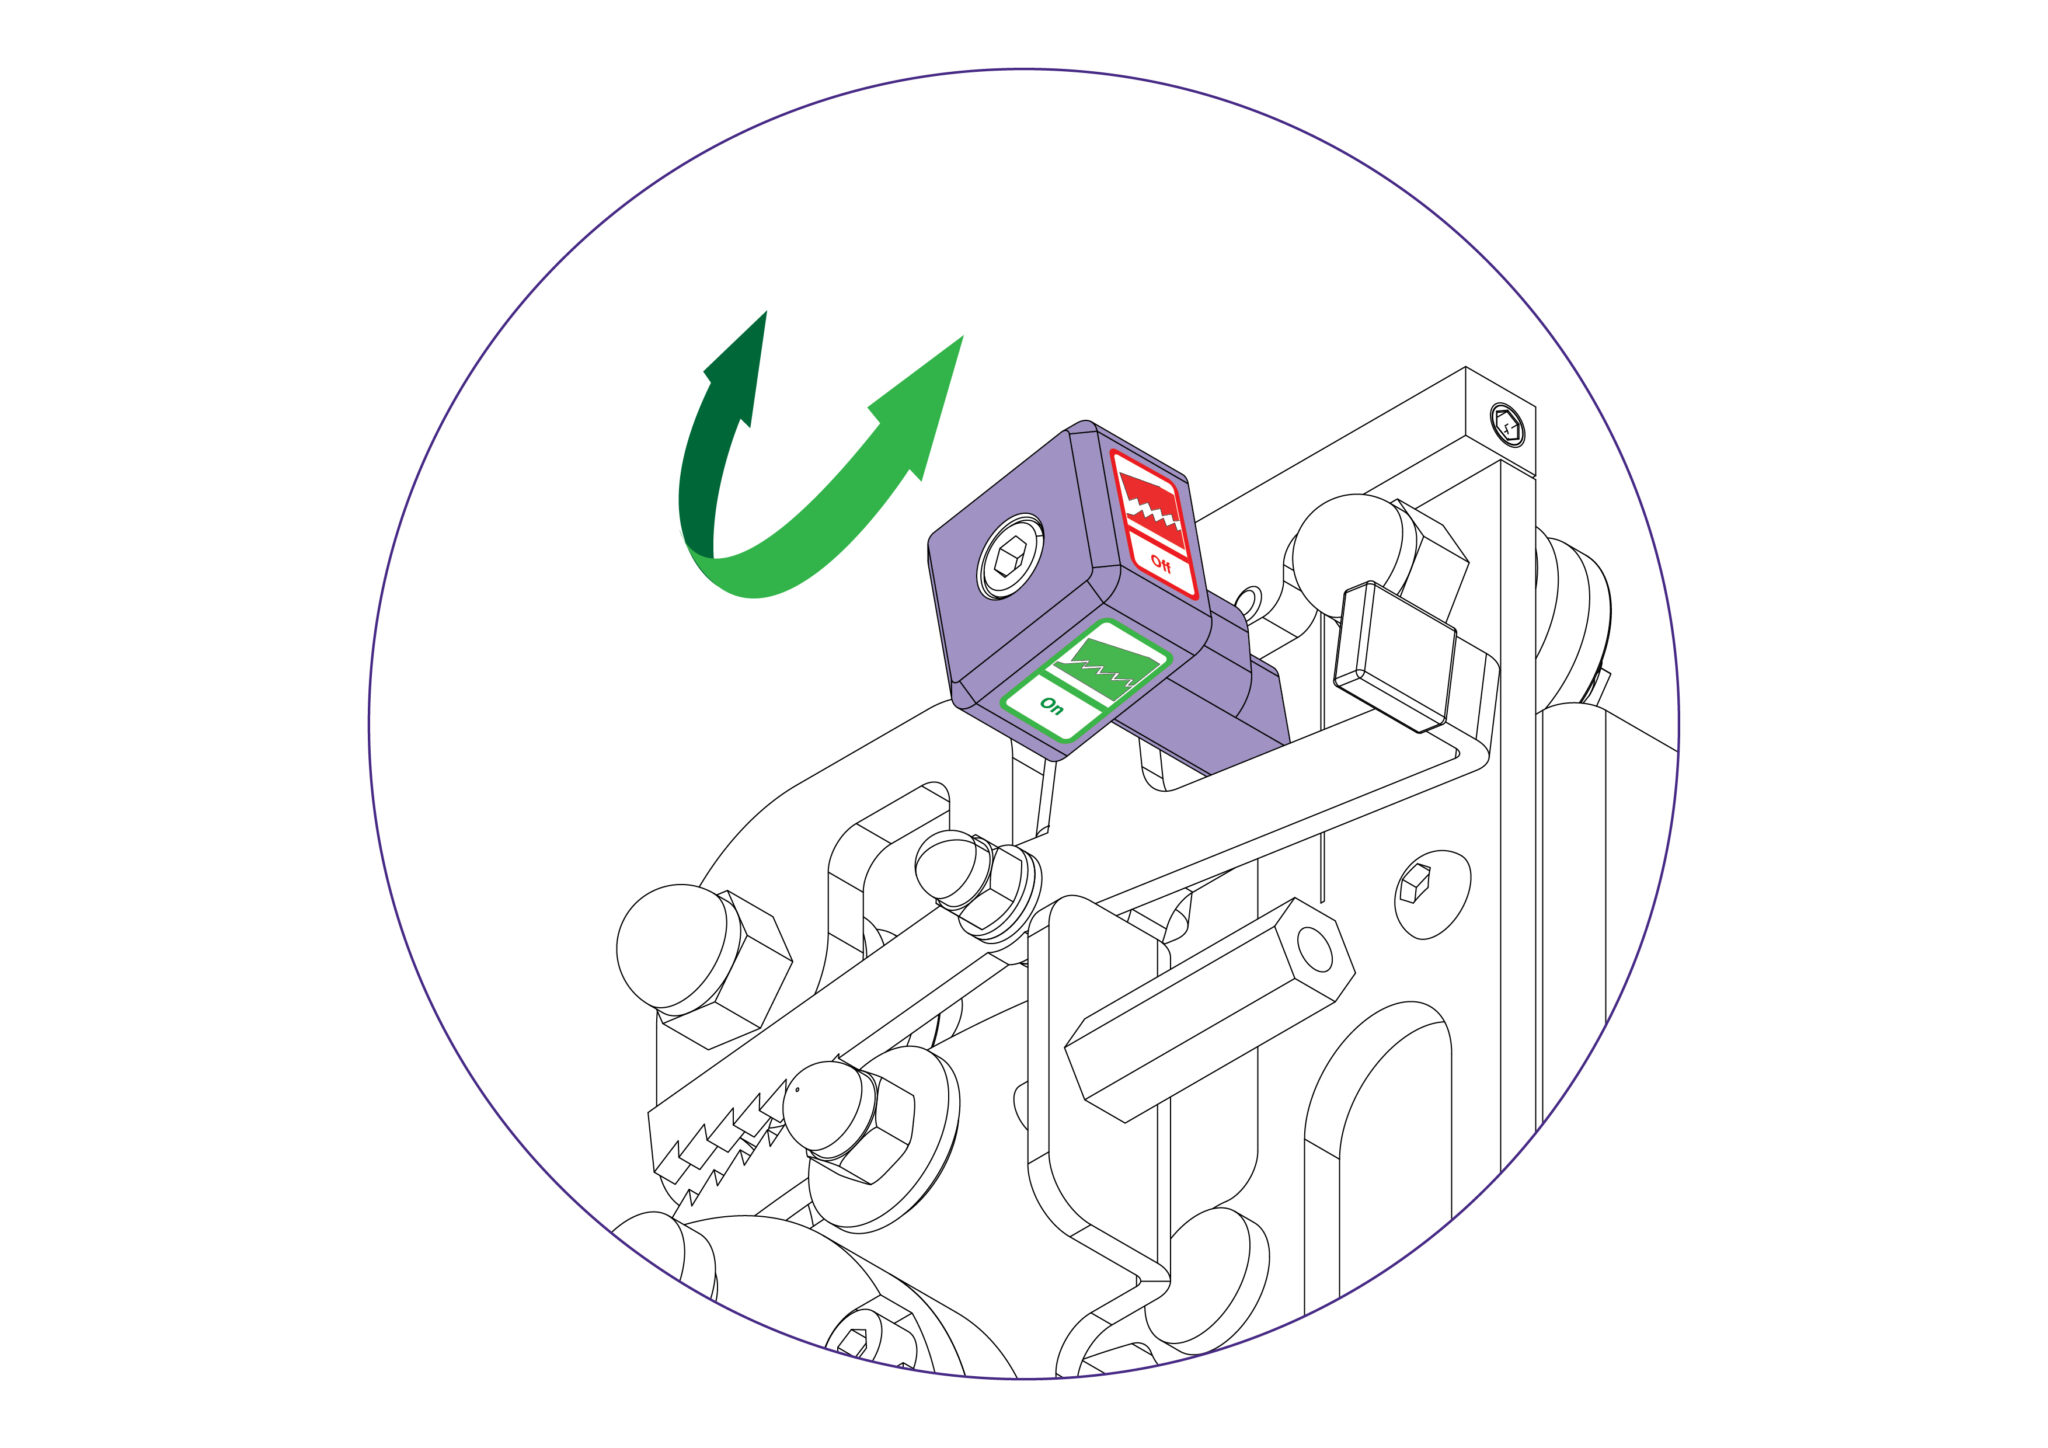
For some operations (such as scoring acrylic) the ratchet latch needs to be disengaged, so that finger pressure can be used to make the score/cut. This is done by turning the black knob with the ‘On’/’Off’ stickers such that ‘Off’ faces towards the user. To re-engage the ratchet latch, turn the black knob such that ‘On’ faces towards the user.
Select the cutting blade position on the turret and clamp the material in the machine.

Press to engage the cutter. Draw the cutter down to the bottom of the machine where it will disengage automatically.
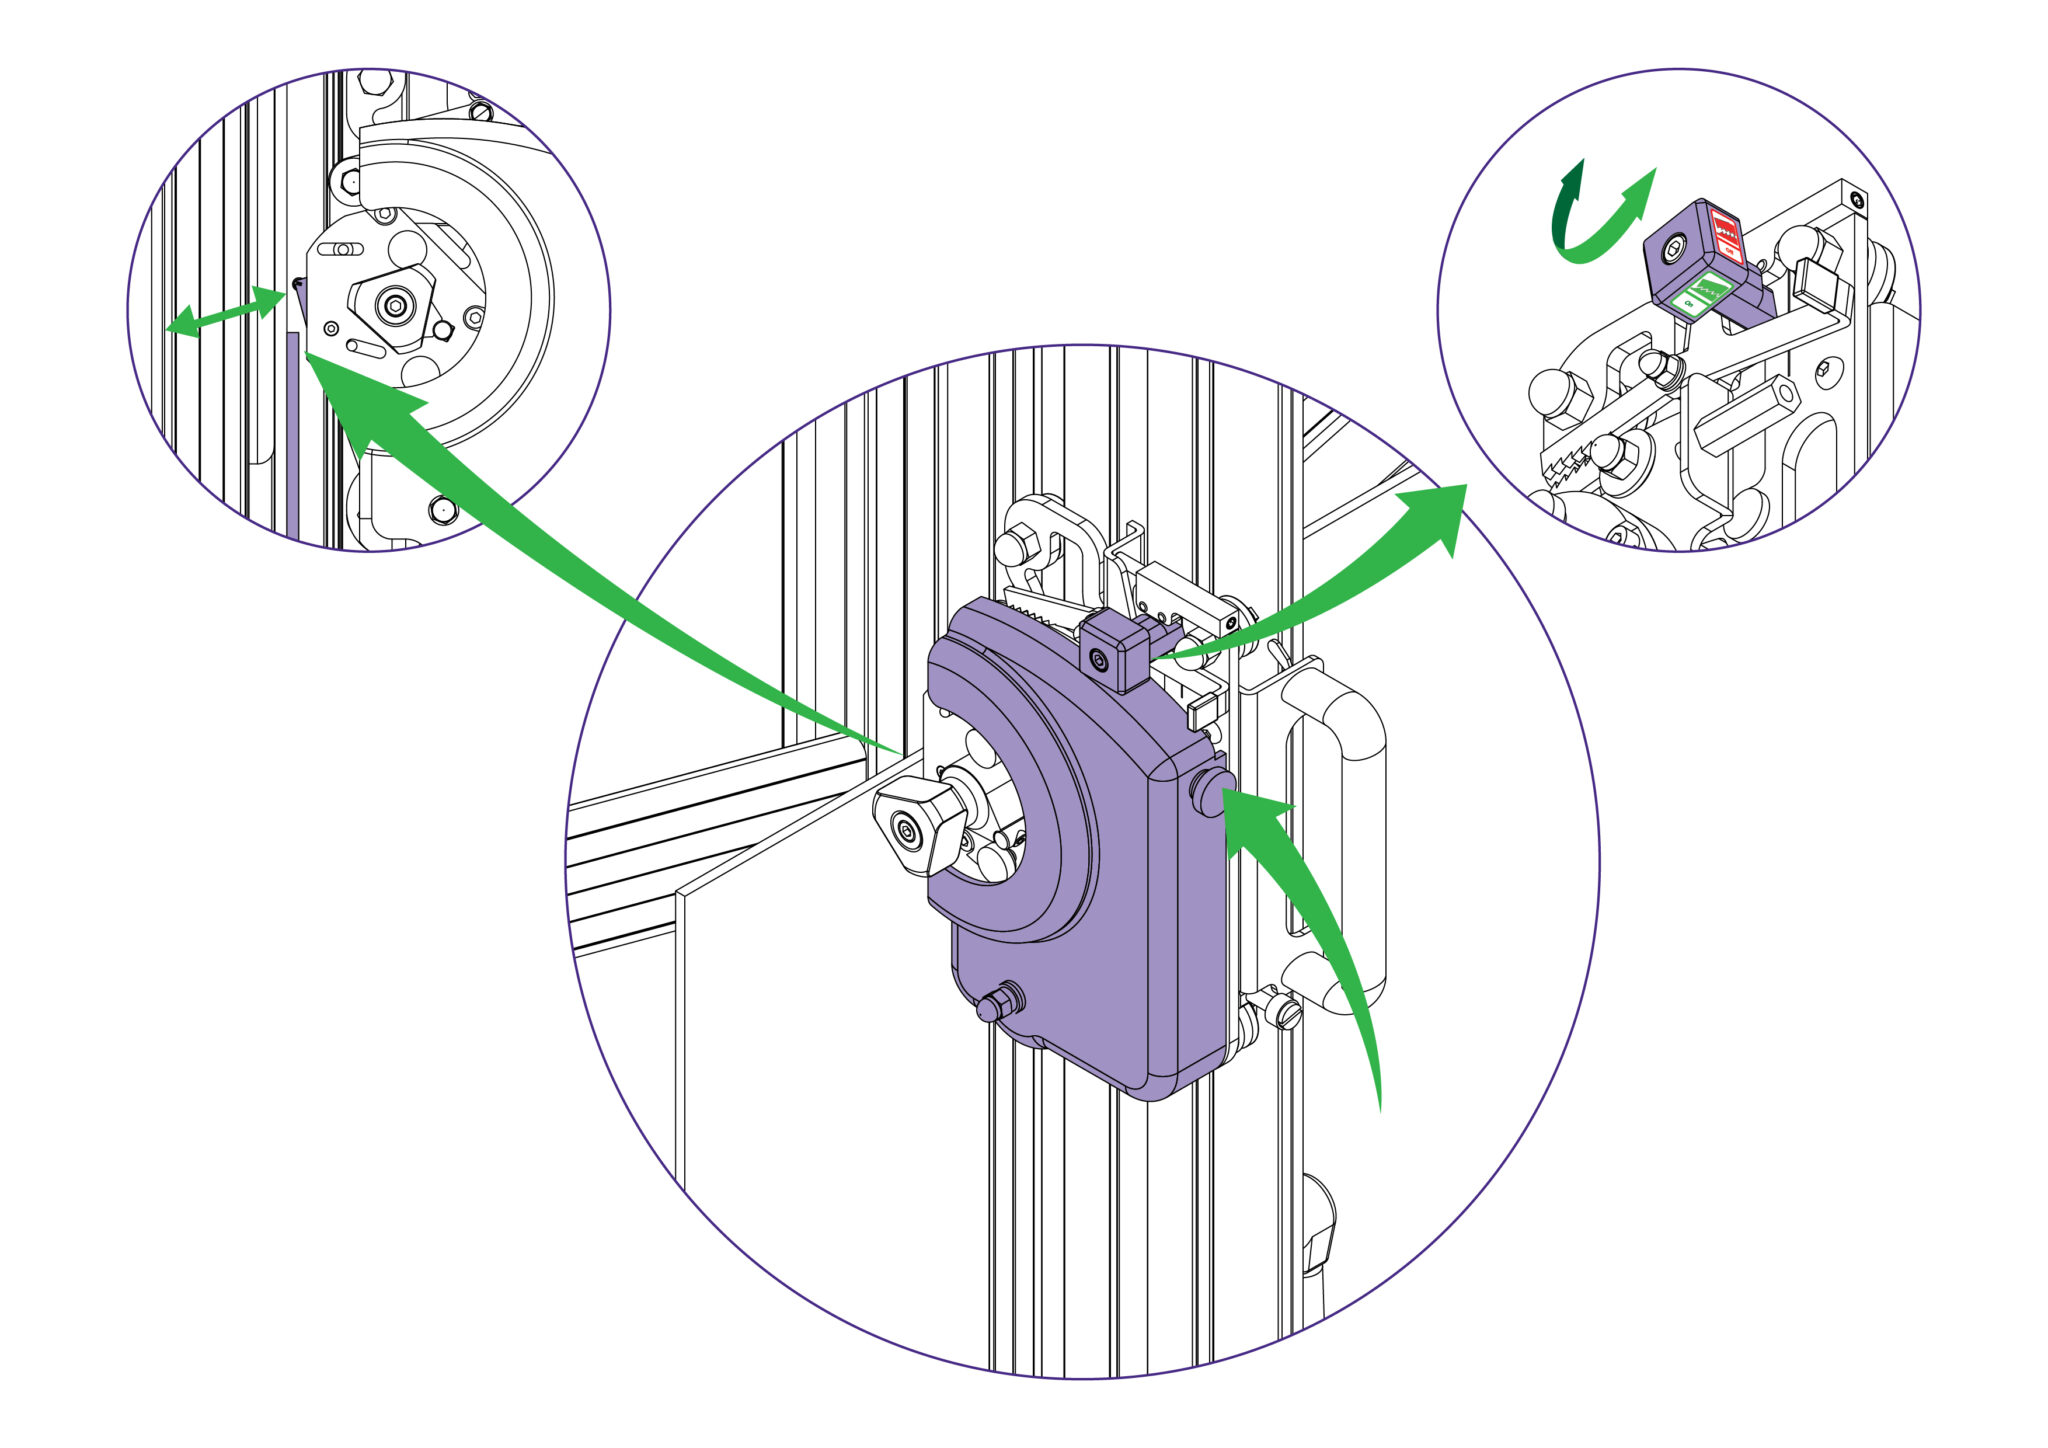
The two support plates either side of the blade are designed to give maximum rigidity of the blade when cutting hard or dense materials. To adjust the support plates, swing down the cutter guard by undoing the black locking knob (on the guard) facing towards the operator.
Turn the turret ½ turn until the blade is pointing towards you. Then unlock the blade clamping screw.
The support plates can be adjusted by sliding the black pin in the slot. Move the plates to suit the material and ensure that the blade is pushed as far back as it will go. Tighten the clamping screw once the support plates are in position.
For cutting most materials the support plates can be set about 12mm (1/2”) from the blade tip
CAUTION: ALWAYS USE HAND AND EYE PROTECTION WHEN SNAPPING PLASTIC
NOTE : The scoring blade is designed to score acrylics, Plexiglas and other similar rigid plastics. Trials should be carried out on scrap materials first to ensure you obtain the required standard of cut.
Select the scoring blade position on the turret and clamp the plastic to be scored in the machine.
Turn the ratchet’s black knob to ‘Off’ to disengage the ratchet.
Position and depress the cutting head so the blade touches the plastic at the top. Apply thumb pressure to the cutter and draw the blade down the material in one continuous motion.
Remove the plastic from the machine and snap it by hand. Ensure that the plastic is snapped in the opposite direction to which the score faces.
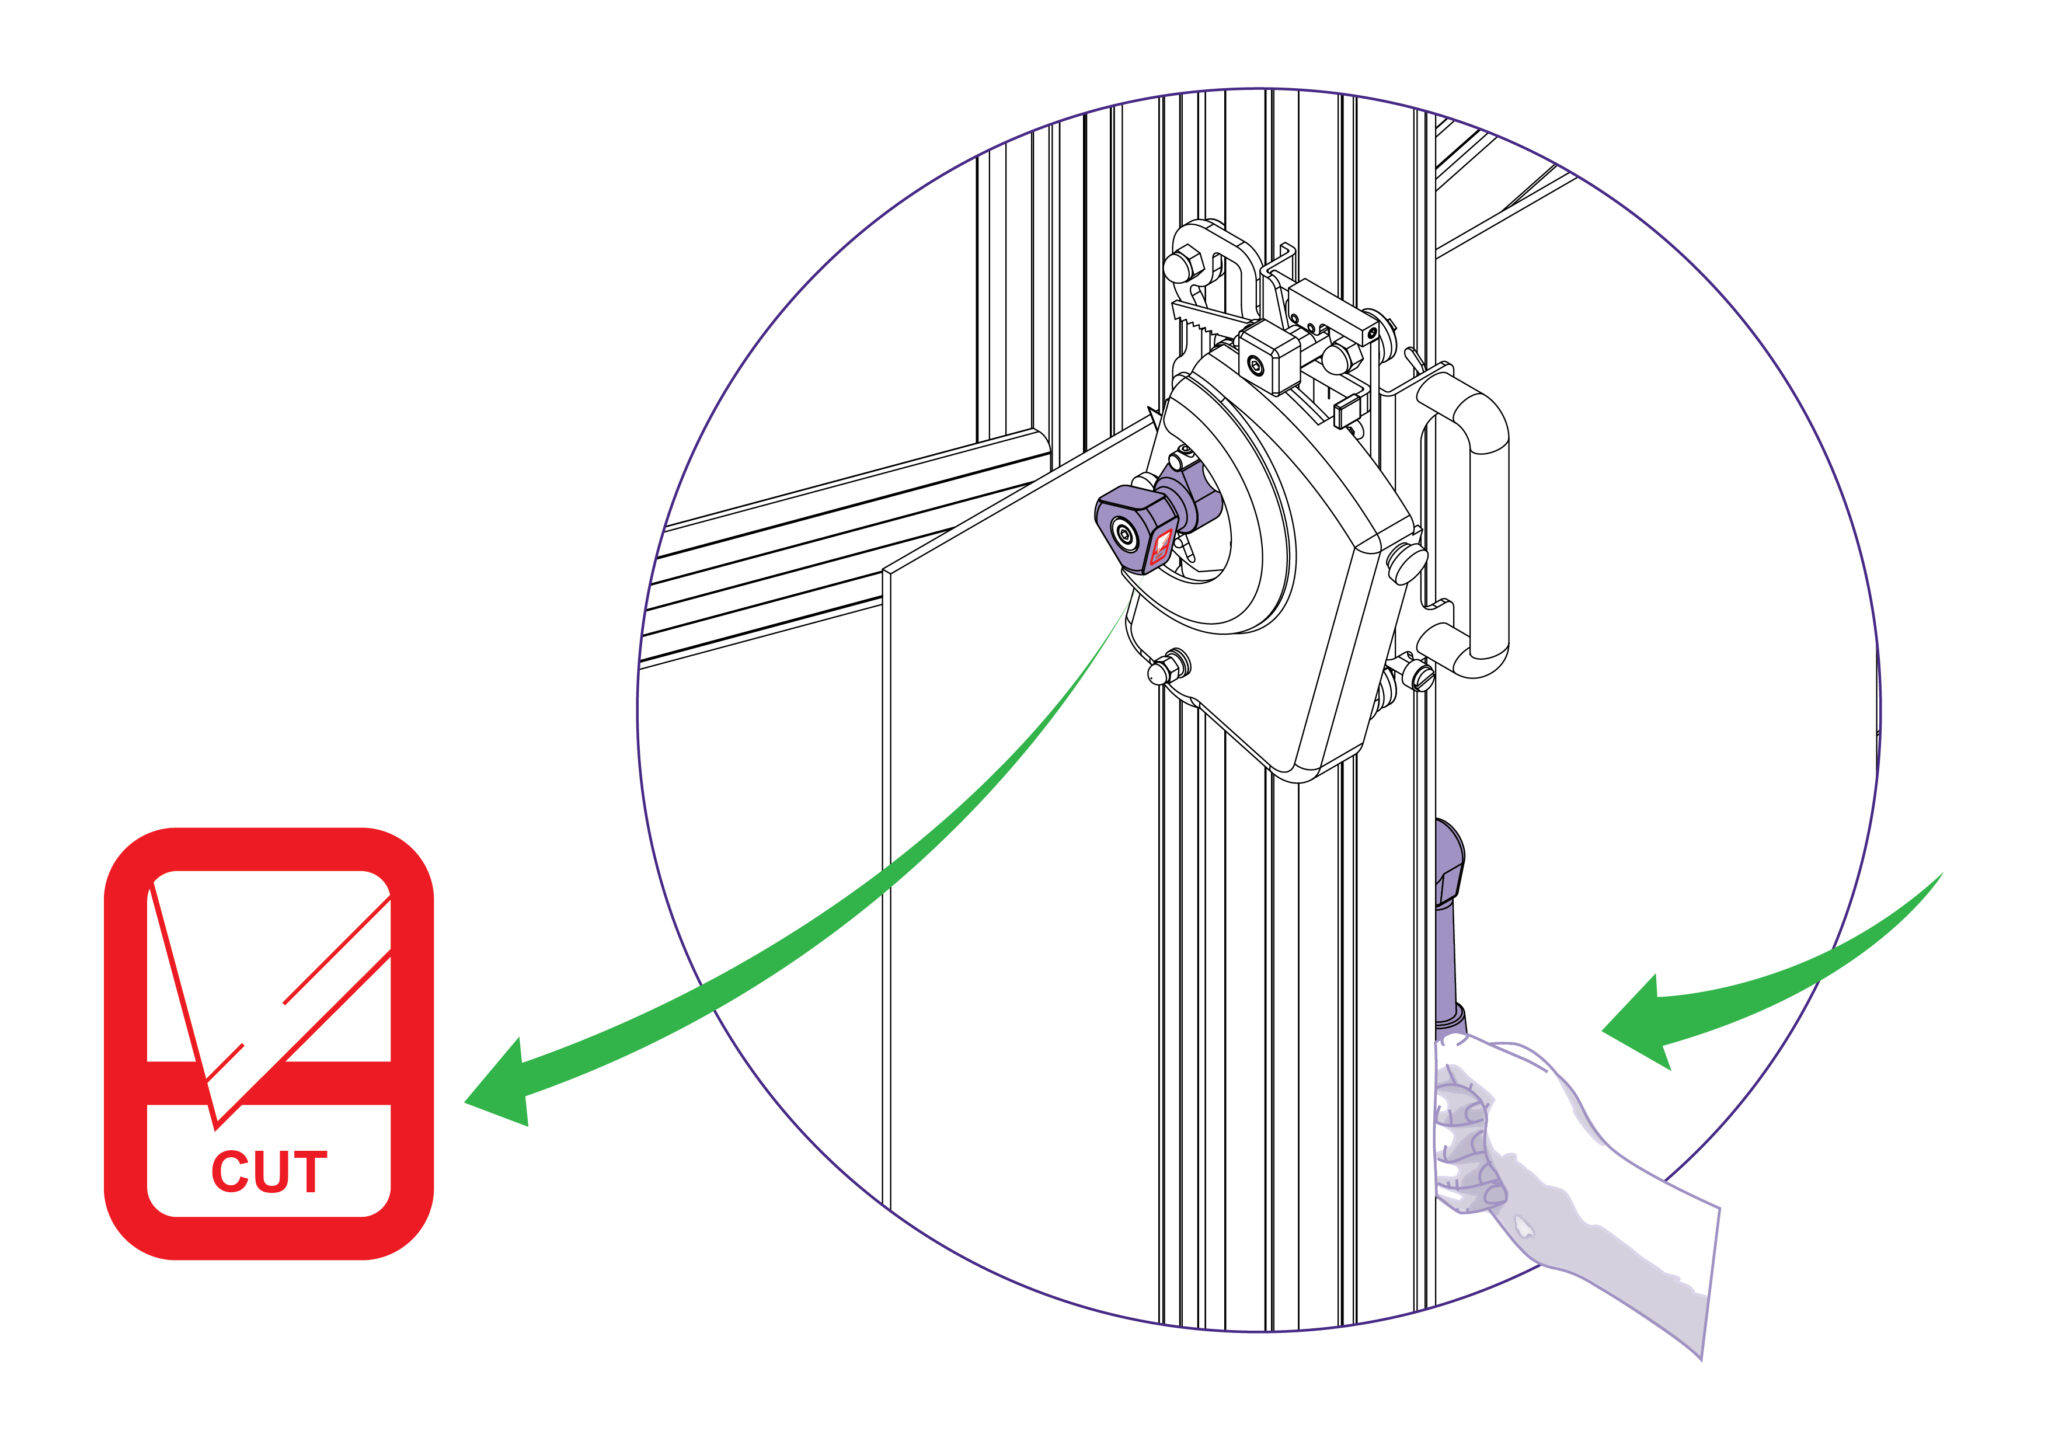
CAUTION: ALWAYS WEAR EYE PROTECTION AND GLOVES WHEN CUTTING GLASS
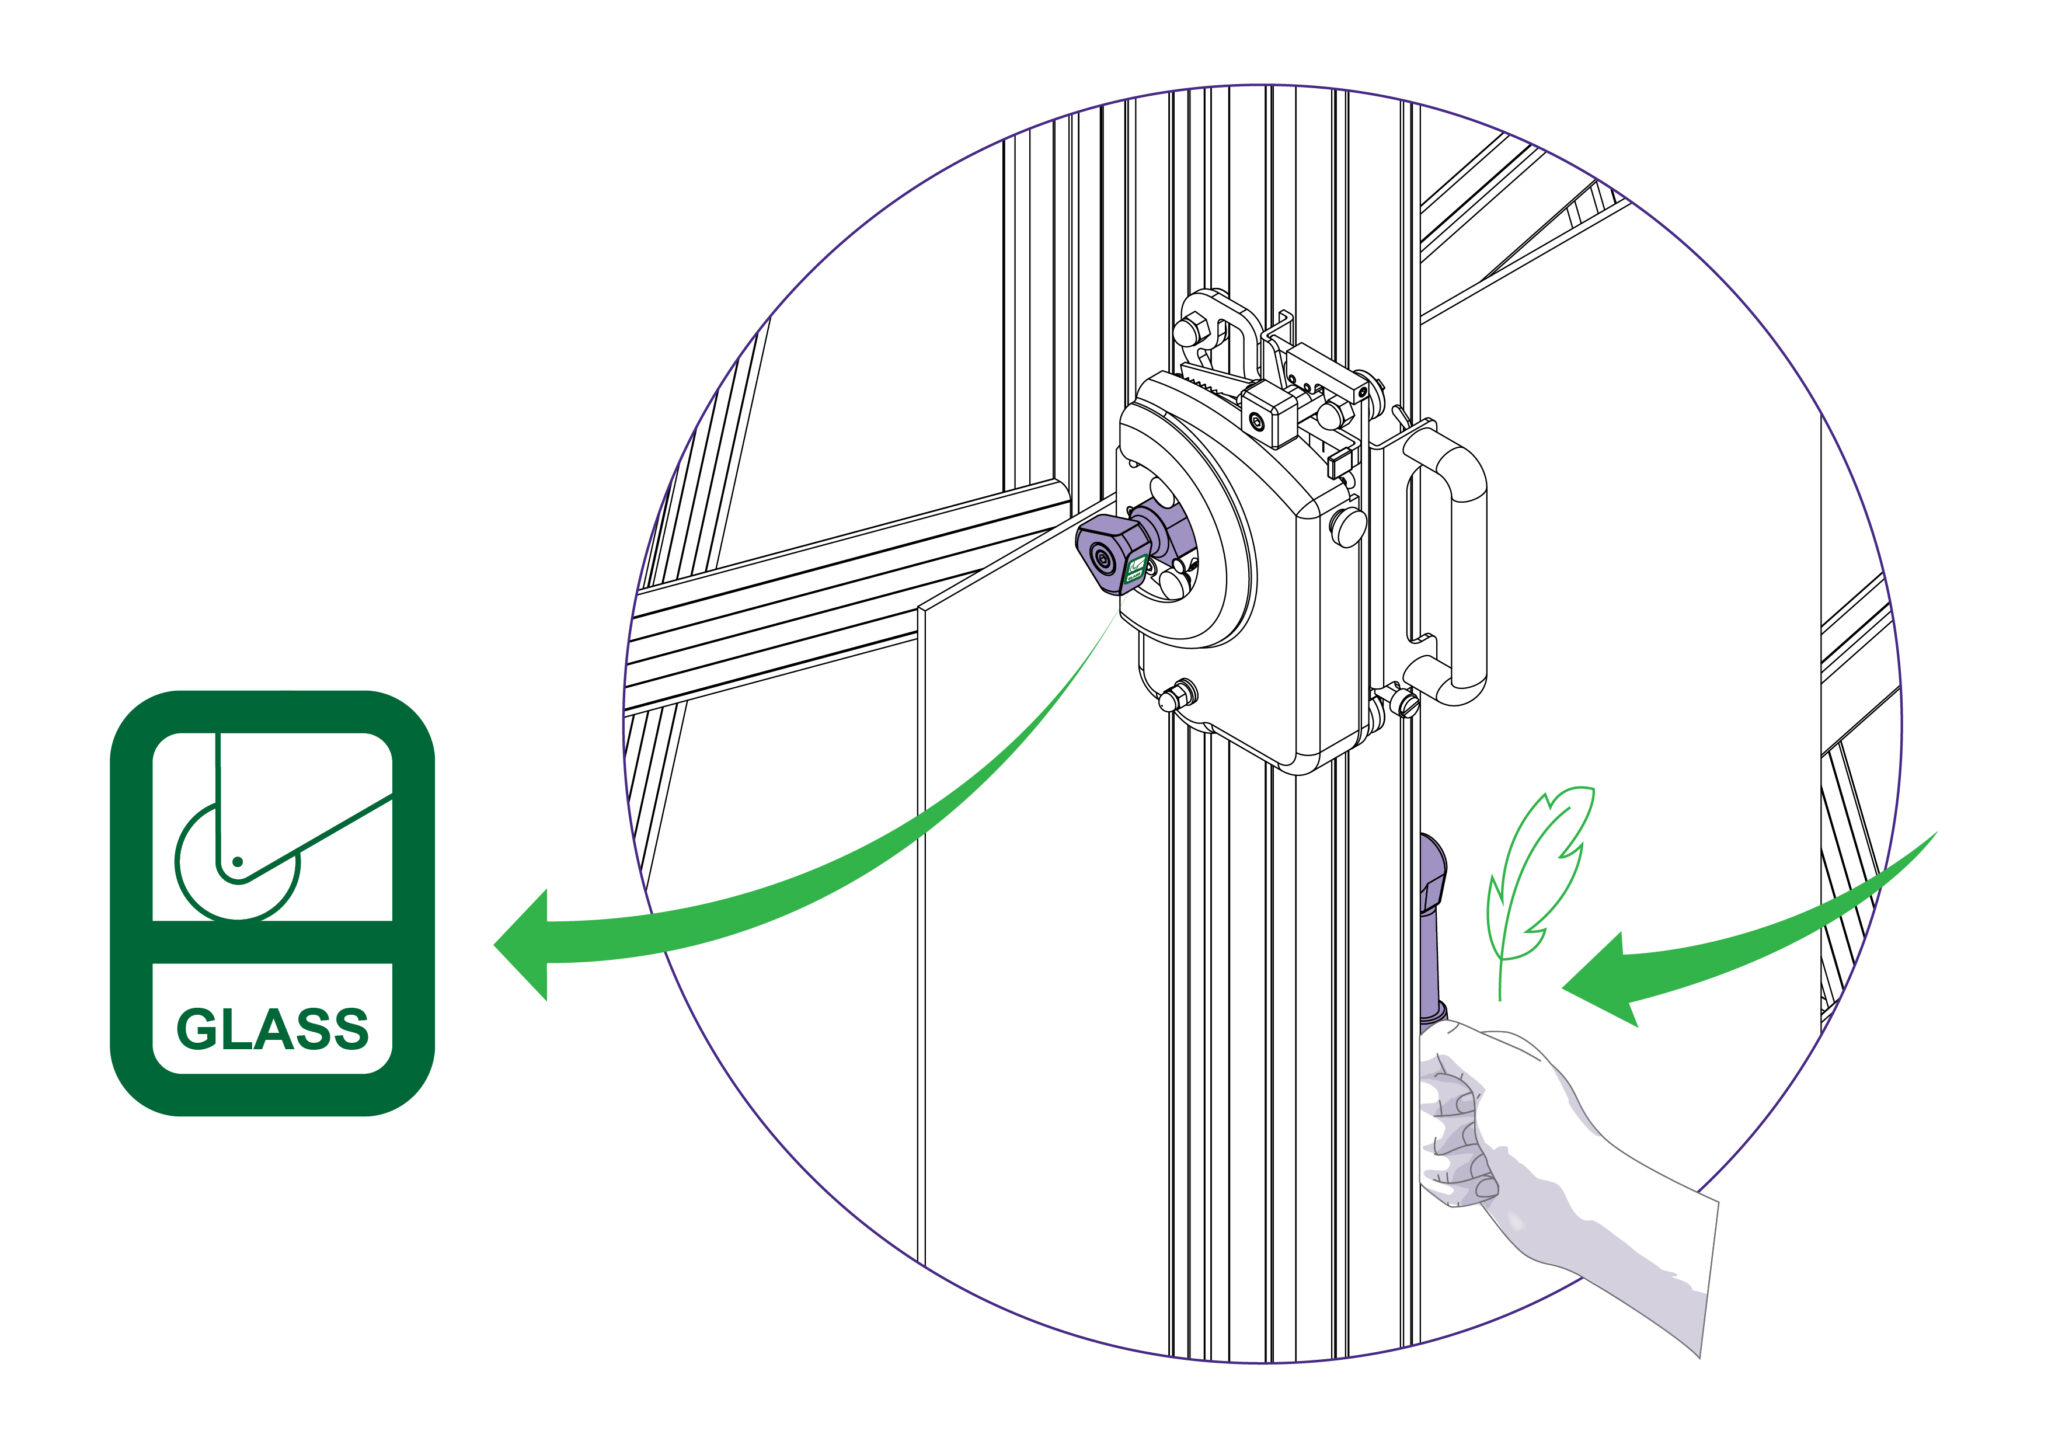
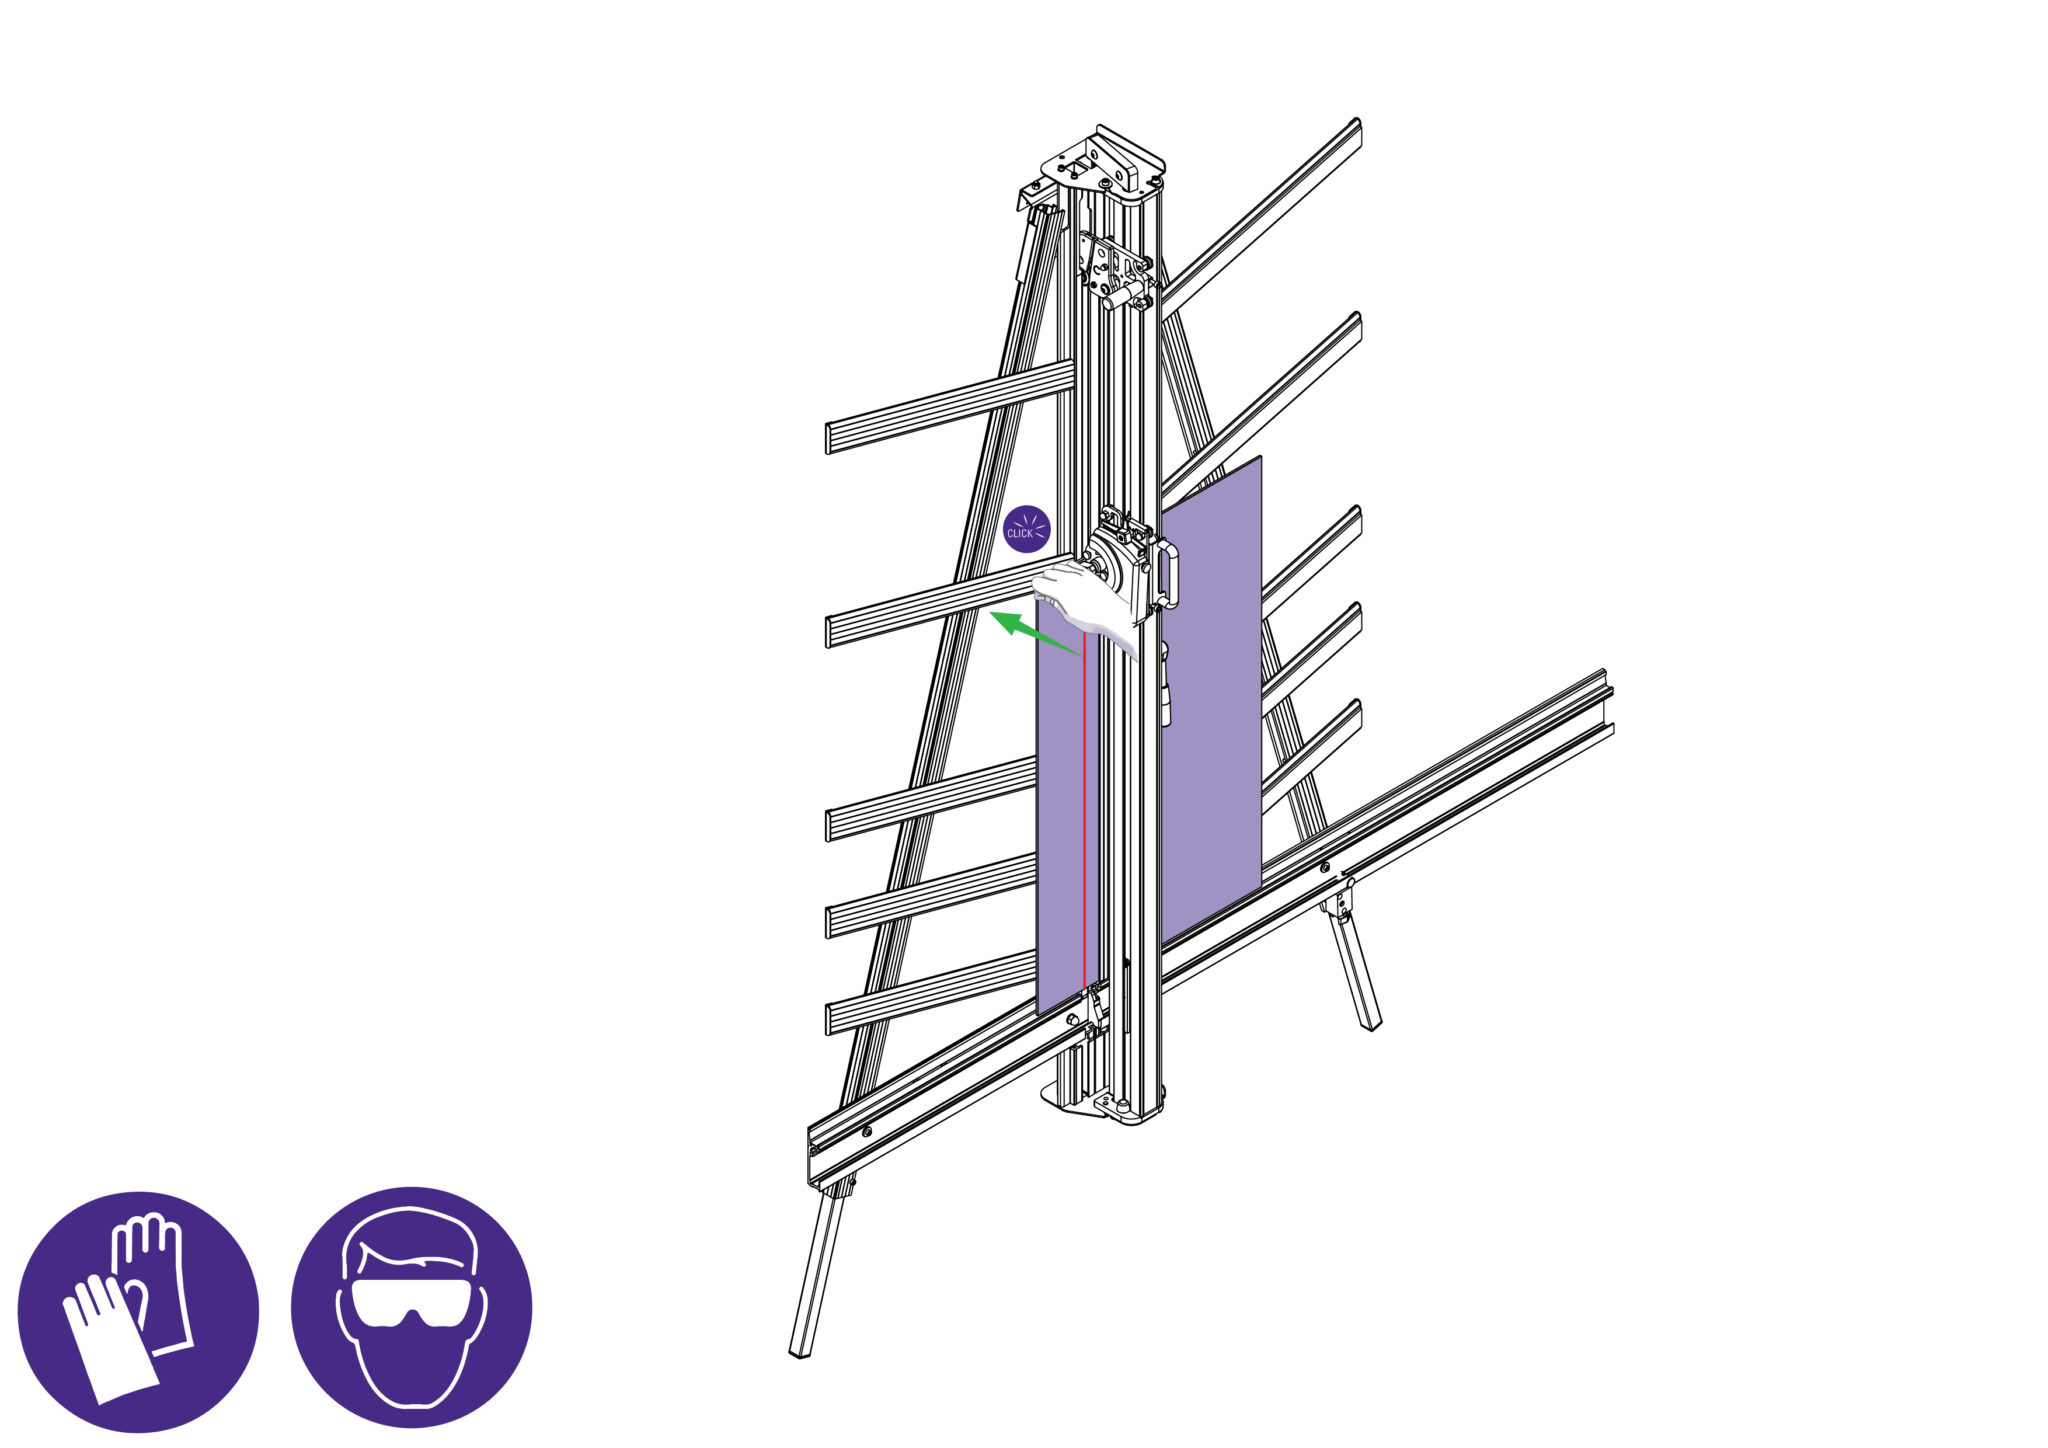
Select the glass cutting position on the turret and place the glass on the machine from the right hand side. Clamp the glass lightly in the machine.
Raise the cutting head above the top edge of the glass and press to engage the cutter fully (with the black ratchet knob switched to ‘On’). Then lower the cutting head to the top edge of the glass to be cut. The glass cutting wheel will automatically adjust itself for the thickness of the glass.
Gently draw the cutter onto the glass and down to the bottom of the machine in one gentle smooth and continuous motion where it will disengage automatically.
Check the score line, as it should be very faint and continuous.
- If the score is too deep, the line will appear white and small slithers of glass may be seen falling from it. The scoring pressure will need reducing.
- If the score is too light, the glass cutting wheel ‘skips’ and does not produce a continuous line. The scoring pressure will need increasing.

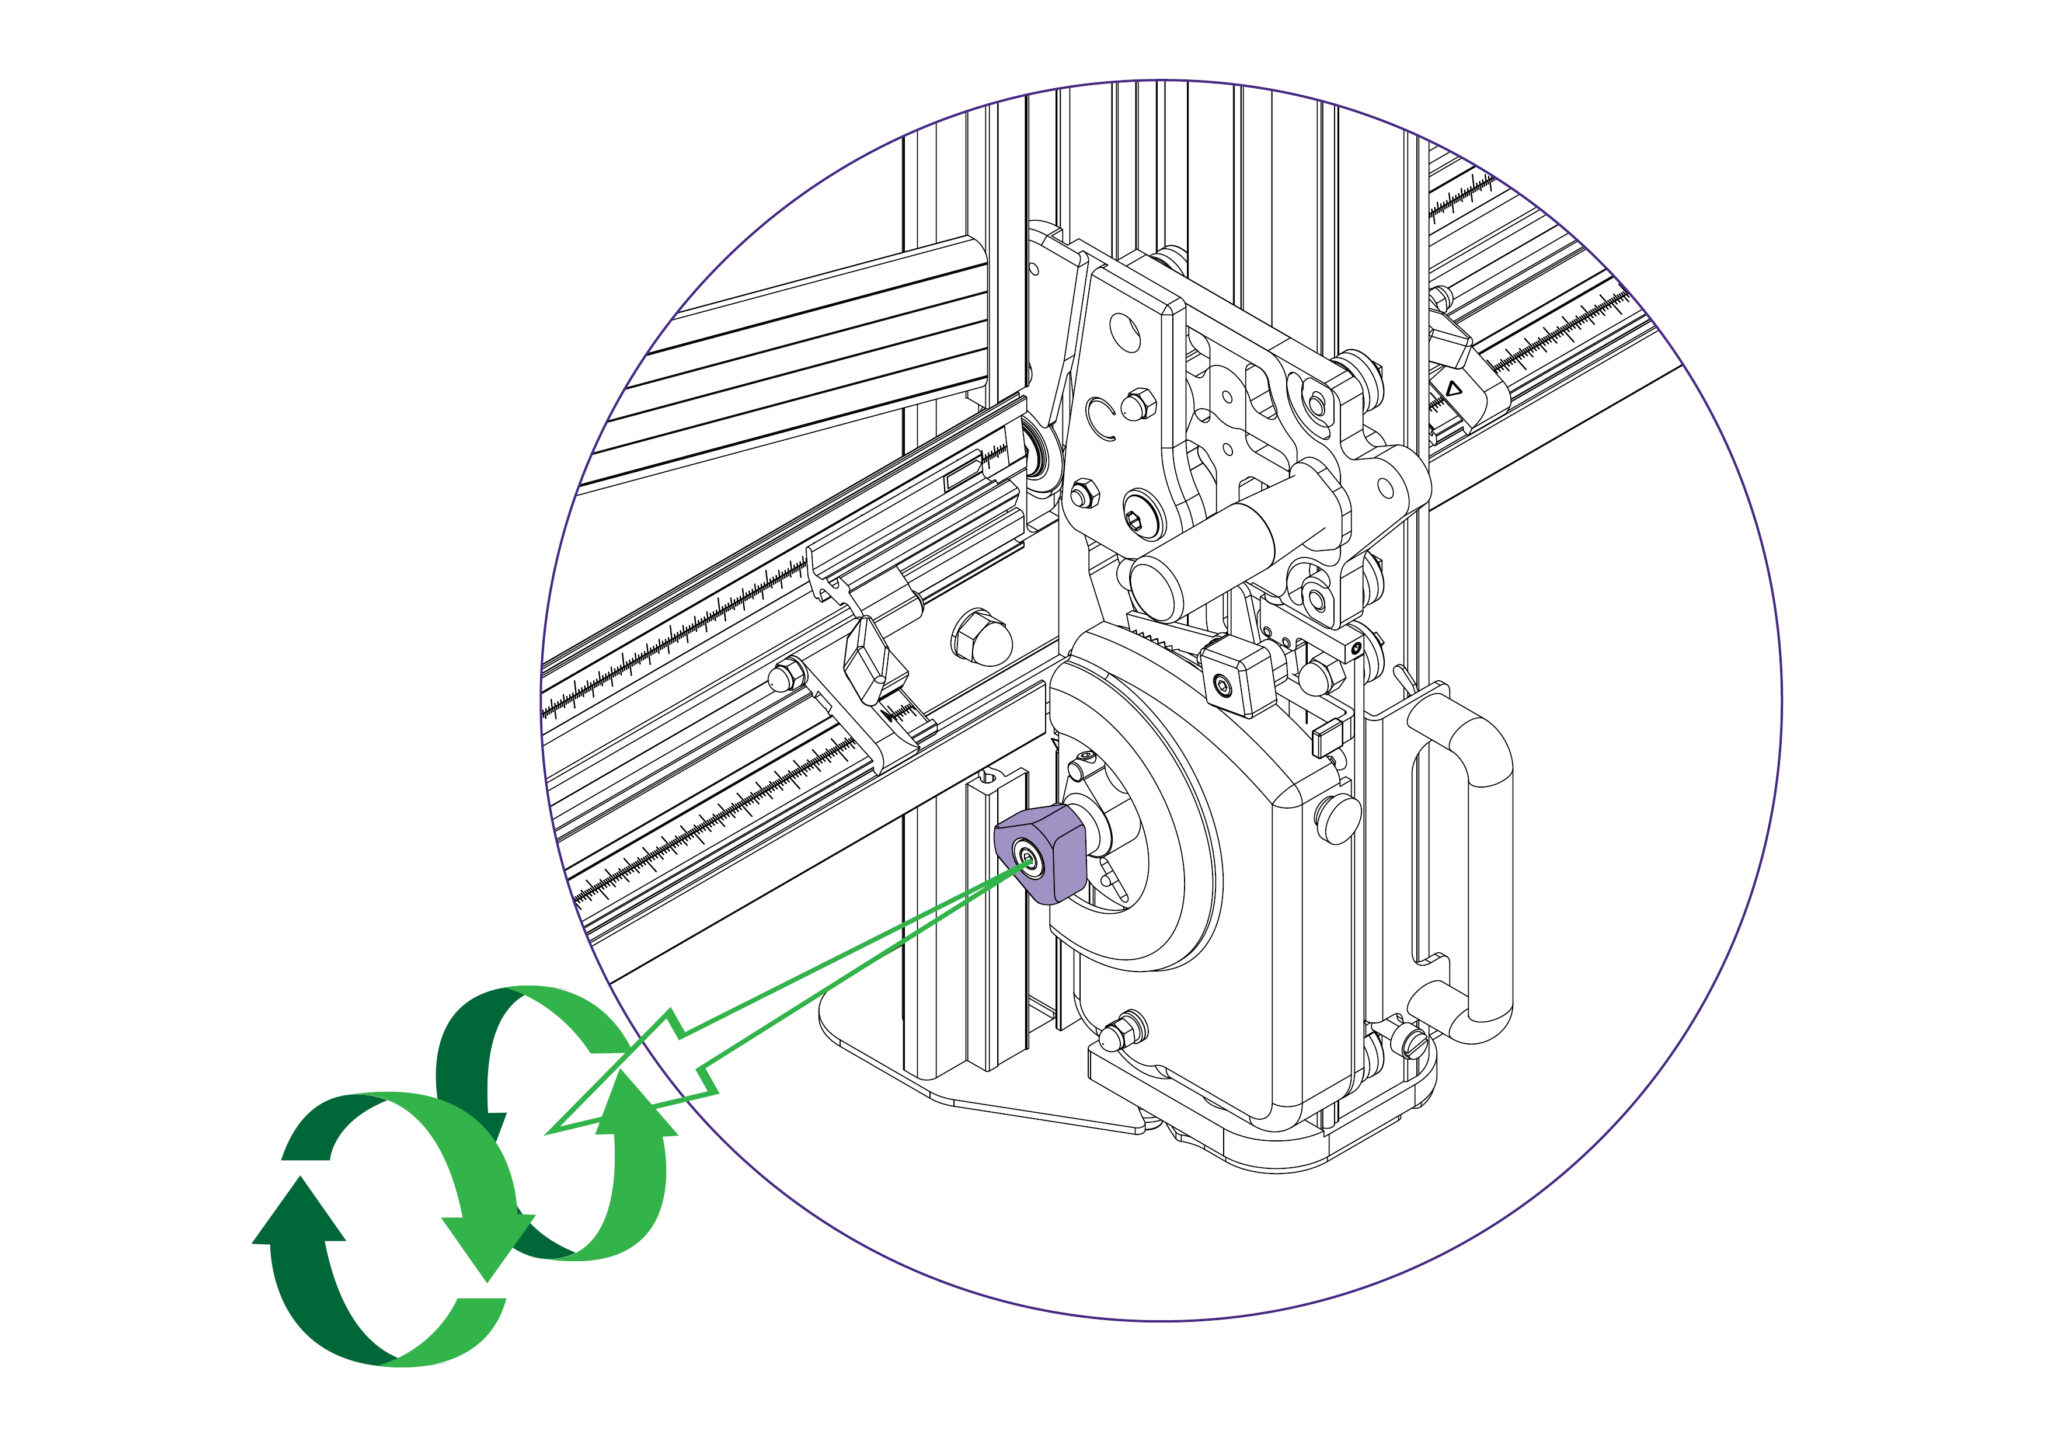
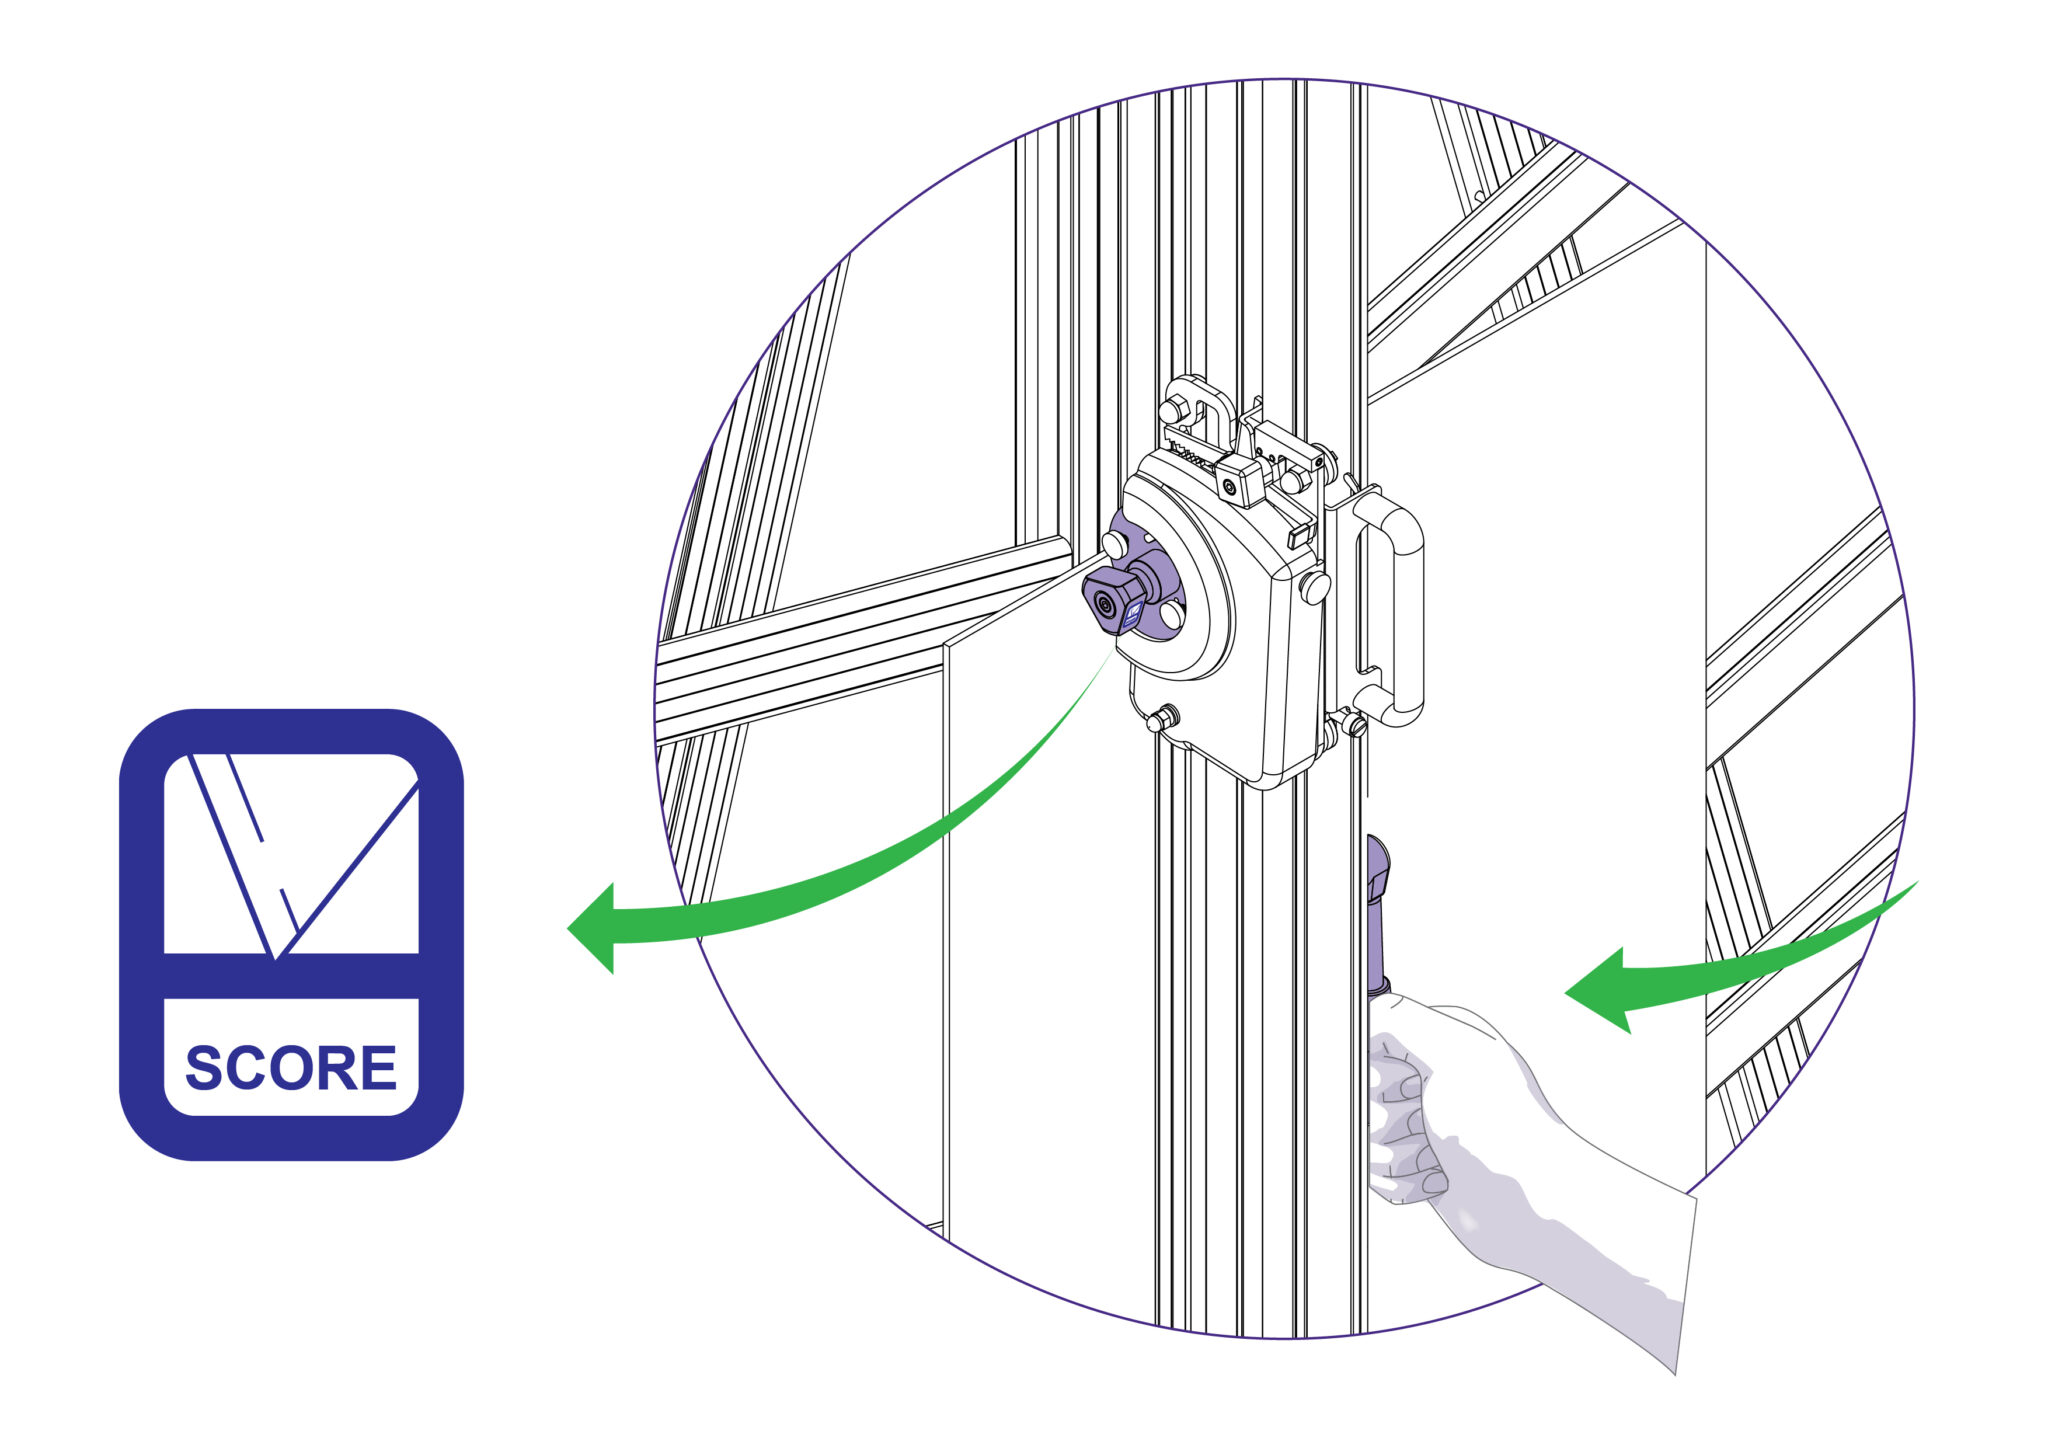
Should the score pressure require increasing or decreasing, the scoring pressure adjustment screw can be adjusted by turning it clockwise or counter-clockwise accordingly.
To break the glass, apply firm pressure to the left hand side of the score line adjacent to the top edge of the glass.
The glass should break easily, however if it resists breaking or feels springy, check the spring pressure setting.
Note: On large sheets of glass the break may only go part way down the score line, press again near the end of the
break to continue it. Never score the same line twice. We recommend the use of glass nibbling pliers for the removal of amounts less than 25mm (1”)
The twin wheel cutter is mounted on the upper cutting head and is used for cutting rigid materials such as medium density fibreboard (MDF, also known as SBS) and standard hardboard up to 3mm (1/8”) or harder materials like high density fibreboard (HDF) up to 2mm (1/16”). Many other softer boards and card can also be cut. Trials should be carried out to ensure the desired quality of cut is obtained.
Position the material in the machine and apply the clamp.
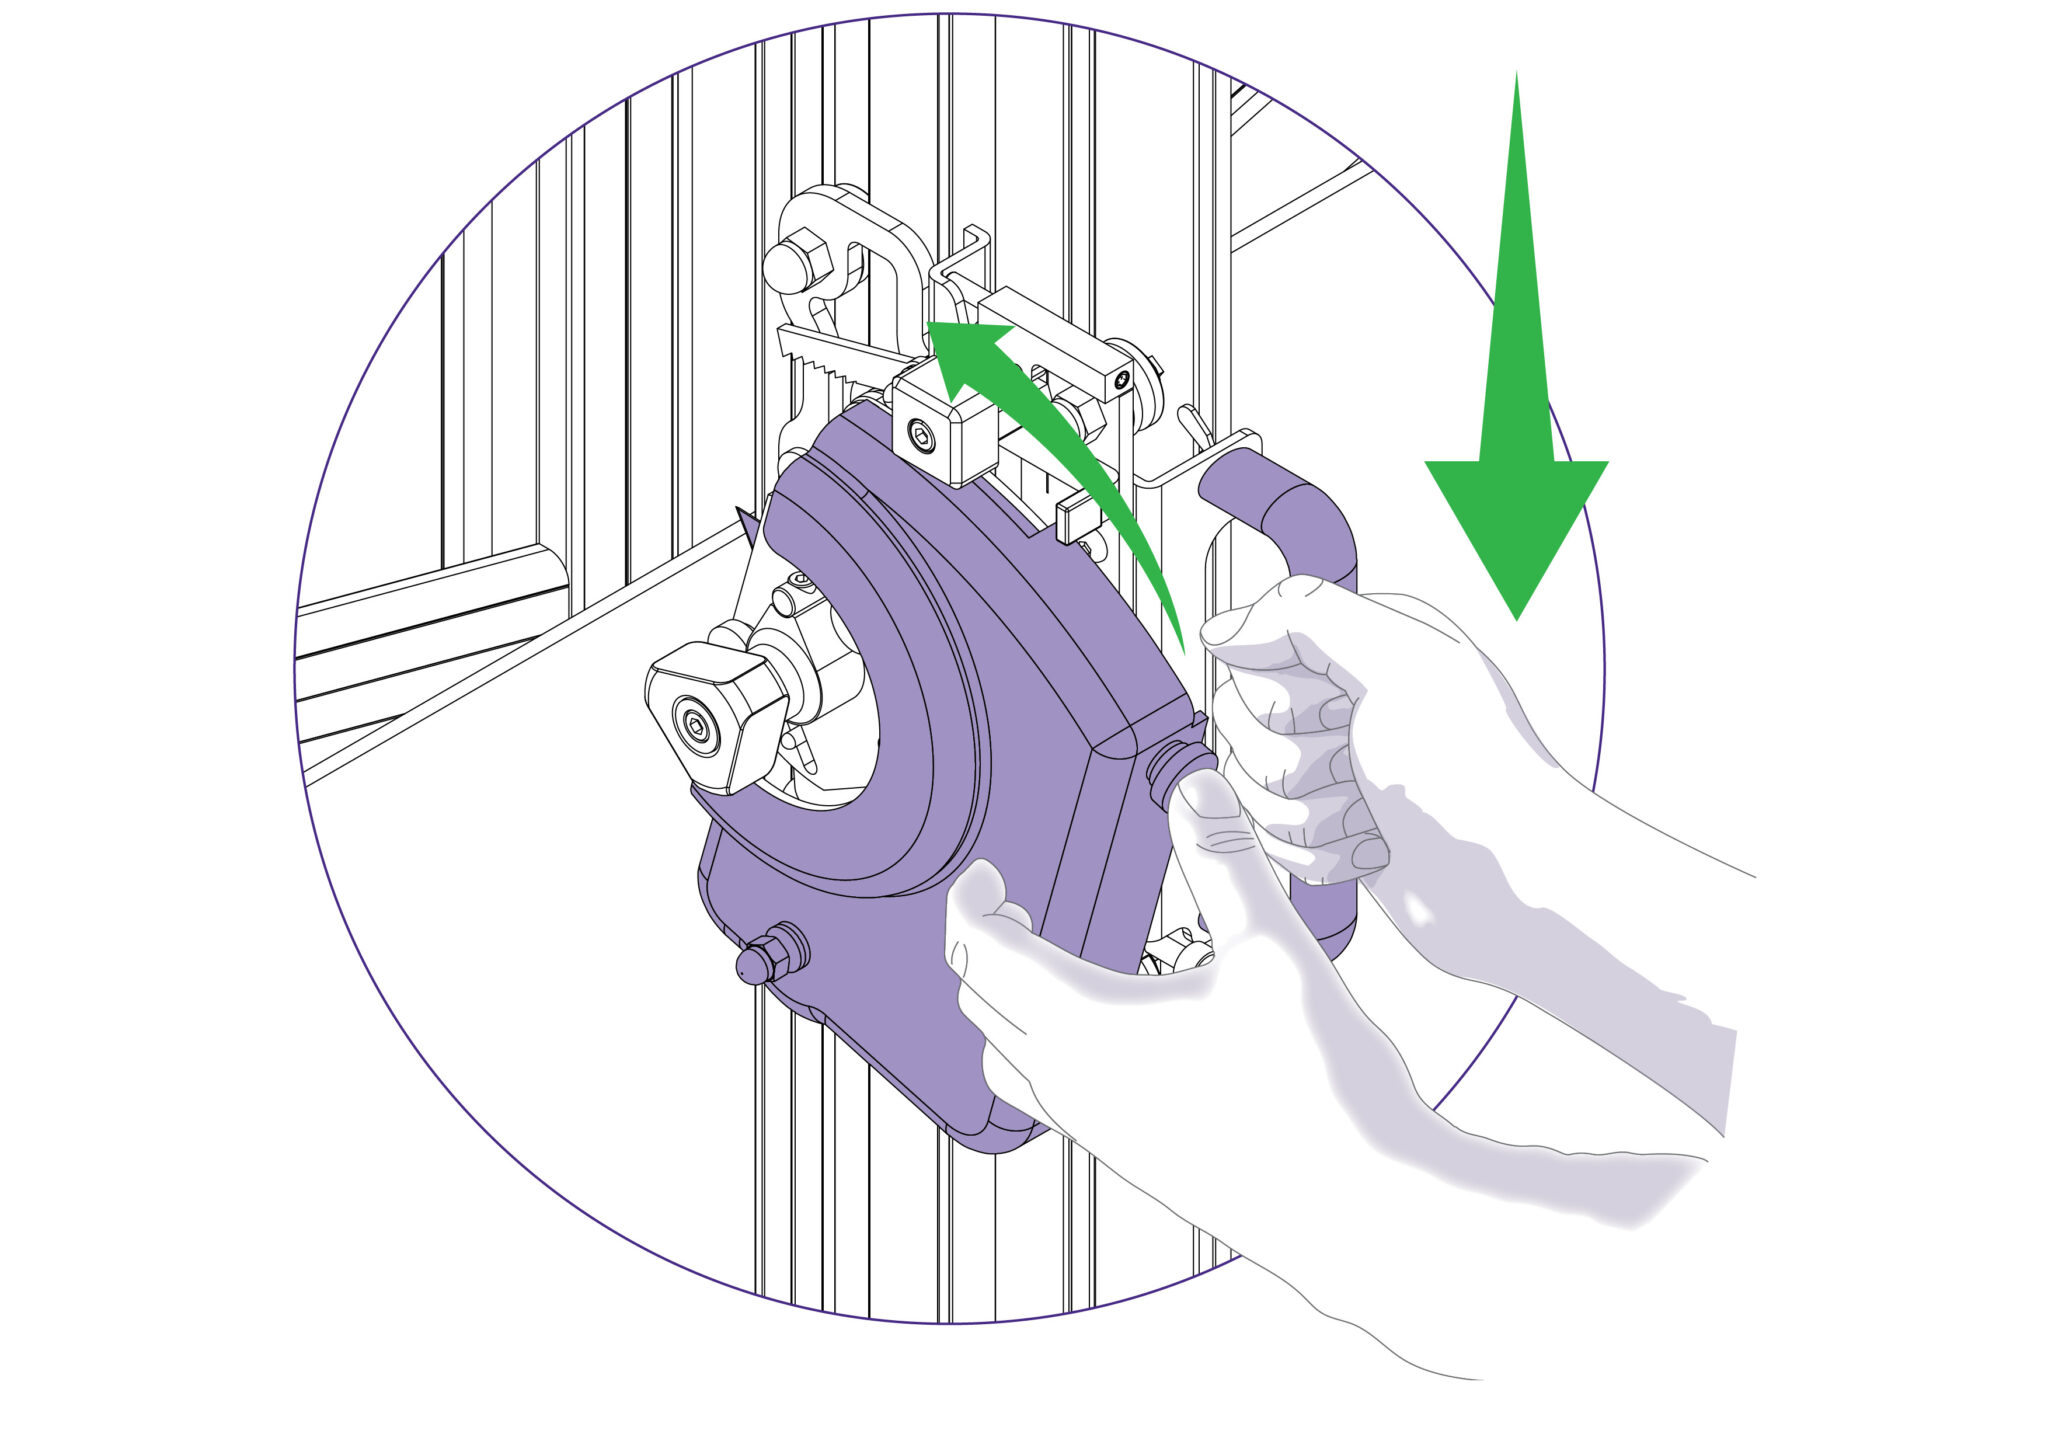
Bring the twin wheel cutter down until it makes contact with the sheet edge and stop. Take a firm grip and then push the cutter down through the material without stopping.
The cutting wheels generally last more than a year with average use, but this is dependent upon the daily usage and the material being cut.
Signs that the wheels are wearing out are:
1) A rough finish predominantly on the right hand side of the cut, with flaking on material such as MDF.
2) The bottom of the cut bursting out rather than being cut neatly.
3) The board trying to turn under the clamp when being cut (also check the clamp pressure).
The right and left hand measuring stops enables the operator to slide in and position the materials to be cut at a set length, as decided by the fixed position of the stop.
As seen in the picture, the edges (with the arrows pointed at them) indicate the exact same length at which the material will be pushed up against the measuring stop. Ensure that both scales on the machine are calibrated as defined within the “Calibrating the squaring arm scales >” and “Calibrating the Easy Measuring Scale >” sections of the instruction manual.
Rotate the black knob on the measuring stop counter-clockwise to loosen the stop and move it to the desired length measurement on either scale.
Rotate the black knob on the measuring stop clockwise to fasten the stop and set the material (to be cut) against the measuring stop.
The clamping system enables the operator to control the grip pressure by means of an integral friction brake, that maintains the clamping force at the pressure applied by the operating lever.
Soft materials can be held firmly without sustaining damage and solid materials are held rigidly without movement.
By following the guidelines below it will help you to get the most from the machine.
The Excalibur 6000 is fitted with two Cutting Heads running on two vertical stainless steel tracks. The lower or multi-tool cutter head has a rotating turret arrangement where any one of the three cutting tools can be selected:
1) Cutting Blade – Using a standard Medium Duty utility blade (not Heavy Duty – they will not fit) to cut PVC Foamboards like Forex®, corrugated plastic such as Correx®, card, matboard and many other types of rigid boards up to 13mm (1/2″) thick.
2) Scoring Blade – An inversely positioned Medium Duty utility blade is used to score the surface of any brittle plastics including Acrylic’s such as Perspex® and Plexiglass. Once scored the plastic sheet is removed from the machine and ‘snapped’ along the score line. Any thickness (up to 13mm 1/2″) can be scored but tests should be carried out on a sample of the sheet to ensure it does ‘snap’ and to an acceptable quality (remember to use hand and face protection when doing this).
3) Glass Cutting – A high quality tungsten carbide wheel is used to score glass.
The top carriage in a standard machine is fitted with the TW (Twin Wheel) cutter for use with rigid boards such as MDF, hardboards, and some mountboards up to 4mm. Refer to Using the twin wheel cutter > or Changing the twin wheel cutter > for more details.
The cutting wheels are made from high grade tool steel and are heat treated to give a long life but this is dependent upon daily use and the materials being cut.
The signs of the wheels wearing out are:
1) A rough finish predominately on the right hand side of the cut, with flaking on materials such as MDF.
2) The bottom of the cut bursting out rather than being cut neatly.
3) The board trying to turn under the clamp when being cut (also check the clamp pressure).
To select a different cutter pull the turret handle out to the left about 6mm (1/4”) and rotate in either direction, the turret will click into the correct position for the cutter indicated.
The indicator label on the turret handle, that faces the user, shows which cutter is active.
A unique feature of the Excalibur is the ‘ratchet latch’. This enables thick dense materials such as PVC foam board to be cut easily in stages. Count the number of ‘clicks’ to position the blade just below the surface of the material to make your first cut, and then add an extra ‘click’ for the second and subsequent cuts.
As a rough guide when cutting PVC foam board:
3MM (1/8”) Initial surface cut + 1 additional cut
5MM (1/4”) Initial surface cut + 1 or 2 additional cuts
10MM (3/8”) Initial surface cut + 3 or 4 additional cuts
Should you engage the cutter by mistake or for any reason want to disengage the cutter without moving it to the bottom of the machine, pull down the cutter release lever.
For some operations (such as scoring acrylic) the ratchet latch needs to be disengaged, so that finger pressure can be used to make the score/cut. This is done by turning the black knob with the ‘On’/’Off’ stickers such that ‘Off’ faces towards the user. To re-engage the ratchet latch, turn the black knob such that ‘On’ faces towards the user.
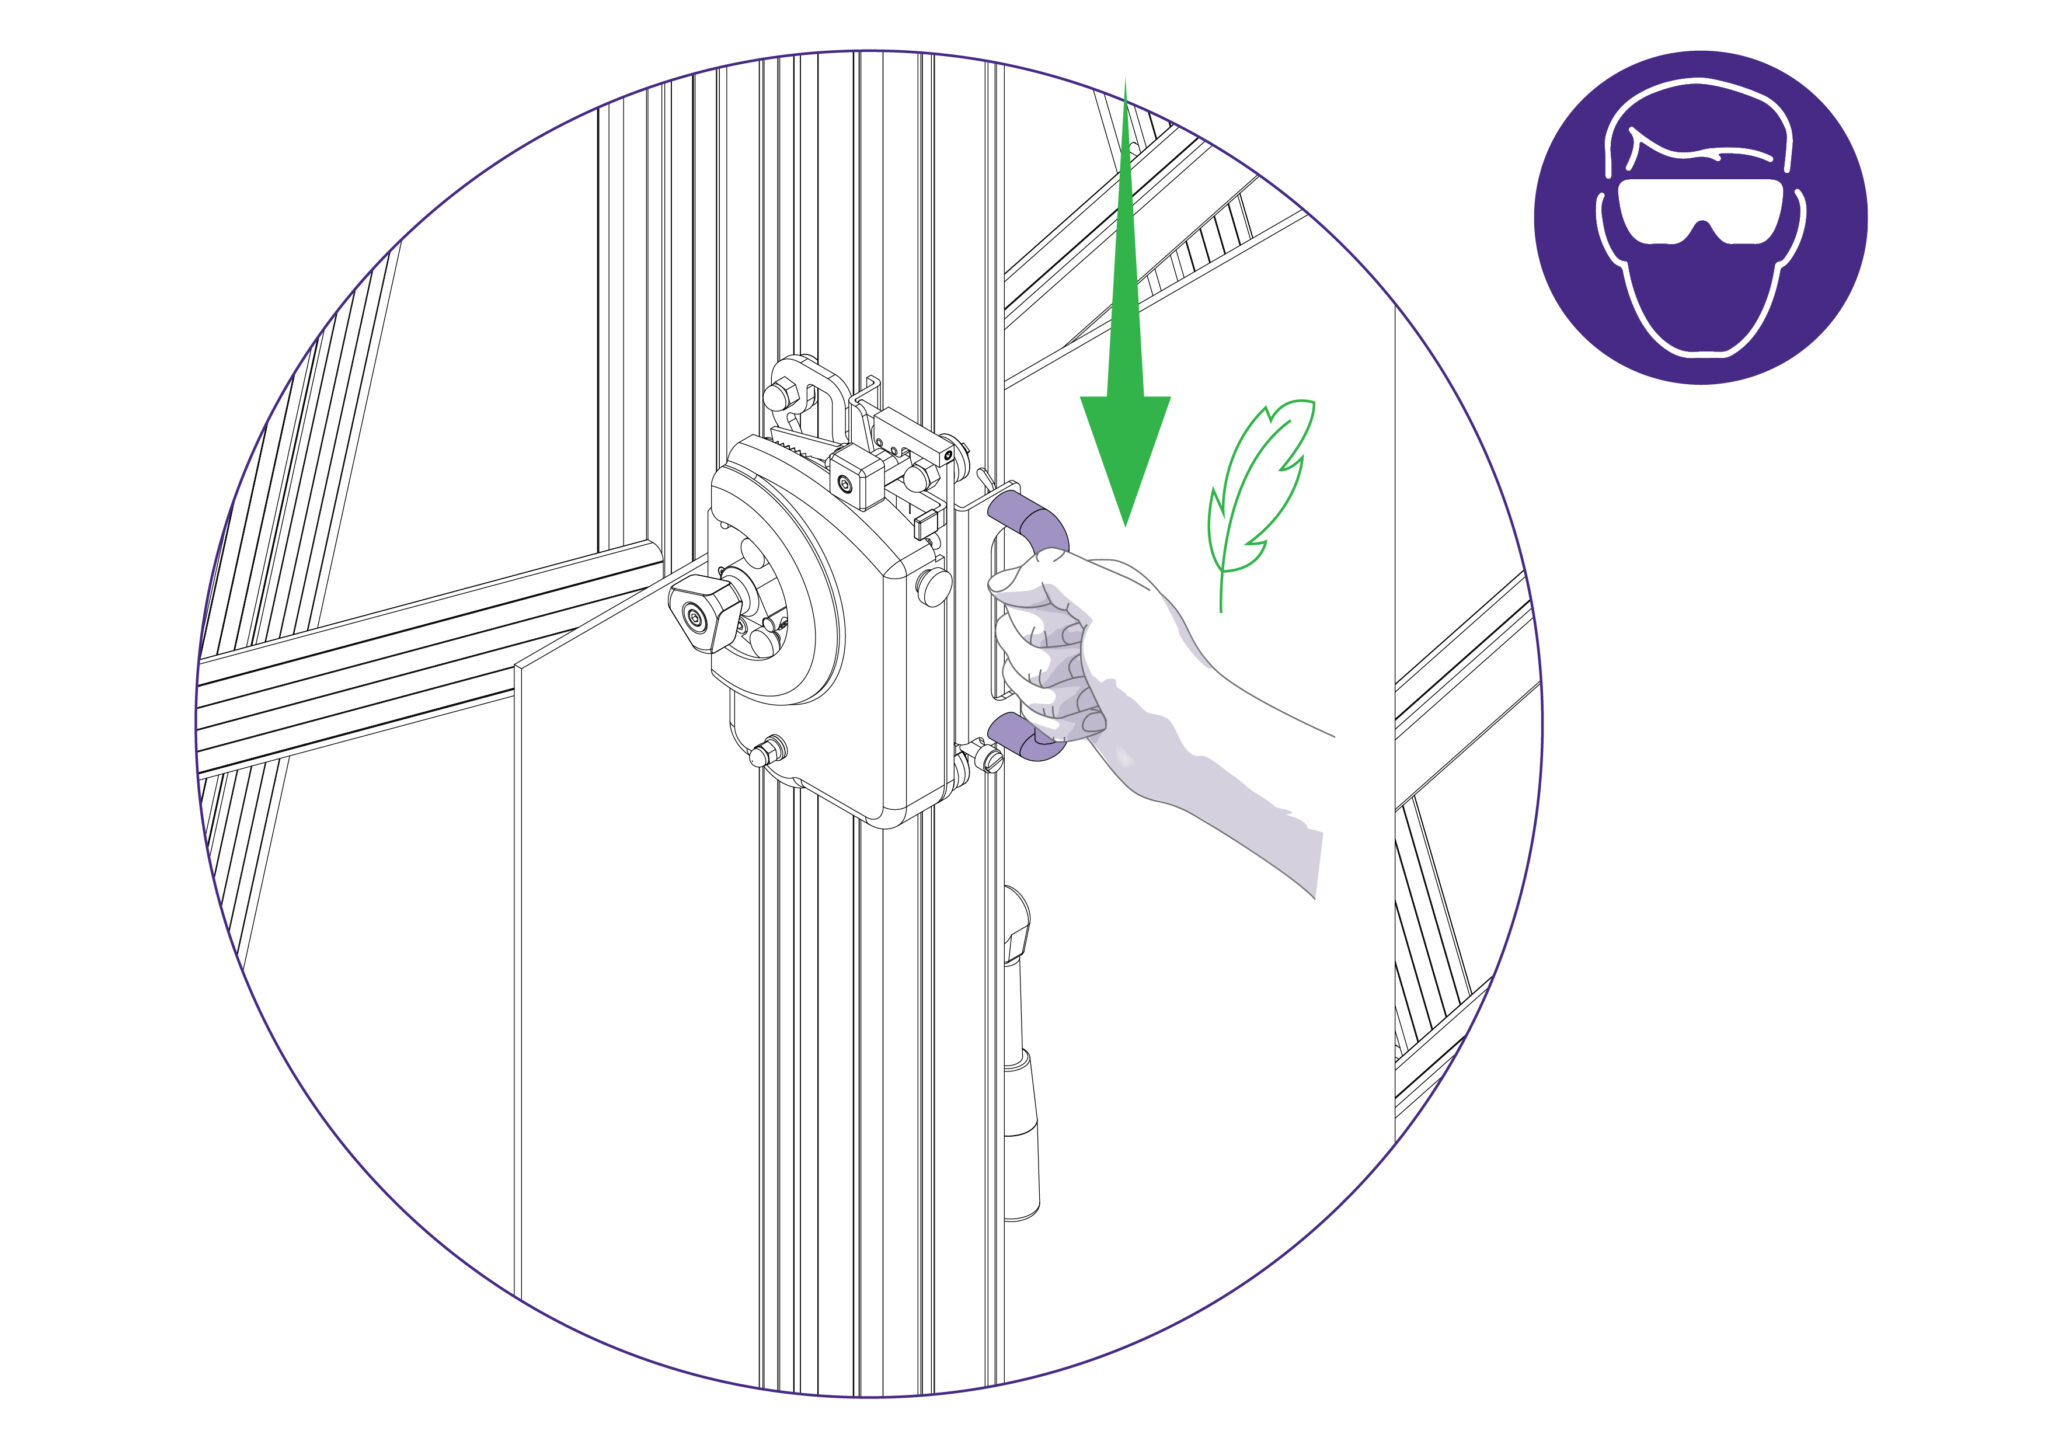
Select the cutting blade position on the turret and clamp the material in the machine.
Press to engage the cutter. Draw the cutter down to the bottom of the machine where it will disengage automatically.
The two support plates either side of the blade are designed to give maximum rigidity of the blade when cutting hard or dense materials. To adjust the support plates, swing down the cutter guard by undoing the black locking knob (on the guard) facing towards the operator.
Turn the turret ½ turn until the blade is pointing towards you. Then unlock the blade clamping screw.
The support plates can be adjusted by sliding the black pin in the slot. Move the plates to suit the material and ensure that the blade is pushed as far back as it will go. Tighten the clamping screw once the support plates are in position.
For cutting most materials the support plates can be set about 12mm (1/2”) from the blade tip
CAUTION: ALWAYS USE HAND AND EYE PROTECTION WHEN SNAPPING PLASTIC
NOTE : The scoring blade is designed to score acrylics, Plexiglas and other similar rigid plastics. Trials should be carried out on scrap materials first to ensure you obtain the required standard of cut.
Select the scoring blade position on the turret and clamp the plastic to be scored in the machine.
Turn the ratchet’s black knob to ‘Off’ to disengage the ratchet.
Position and depress the cutting head so the blade touches the plastic at the top. Apply thumb pressure to the cutter and draw the blade down the material in one continuous motion.
Remove the plastic from the machine and snap it by hand. Ensure that the plastic is snapped in the opposite direction to which the score faces.
CAUTION: ALWAYS WEAR EYE PROTECTION AND GLOVES WHEN CUTTING GLASS
Select the glass cutting position on the turret and place the glass on the machine from the right hand side. Clamp the glass lightly in the machine.
Raise the cutting head above the top edge of the glass and press to engage the cutter fully (with the black ratchet knob switched to ‘On’). Then lower the cutting head to the top edge of the glass to be cut. The glass cutting wheel will automatically adjust itself for the thickness of the glass.
Gently draw the cutter onto the glass and down to the bottom of the machine in one gentle smooth and continuous motion where it will disengage automatically.
Check the score line, as it should be very faint and continuous.
- If the score is too deep, the line will appear white and small slithers of glass may be seen falling from it. The scoring pressure will need reducing.
- If the score is too light, the glass cutting wheel ‘skips’ and does not produce a continuous line. The scoring pressure will need increasing.
Should the score pressure require increasing or decreasing, the scoring pressure adjustment screw can be adjusted by turning it clockwise or counter-clockwise accordingly.
To break the glass, apply firm pressure to the left hand side of the score line adjacent to the top edge of the glass.
The glass should break easily, however if it resists breaking or feels springy, check the spring pressure setting.
Note: On large sheets of glass the break may only go part way down the score line, press again near the end of the
break to continue it. Never score the same line twice. We recommend the use of glass nibbling pliers for the removal of amounts less than 25mm (1”)
The twin wheel cutter is mounted on the upper cutting head and is used for cutting rigid materials such as medium density fibreboard (MDF, also known as SBS) and standard hardboard up to 3mm (1/8”) or harder materials like high density fibreboard (HDF) up to 2mm (1/16”). Many other softer boards and card can also be cut. Trials should be carried out to ensure the desired quality of cut is obtained.
Position the material in the machine and apply the clamp.
Bring the twin wheel cutter down until it makes contact with the sheet edge and stop. Take a firm grip and then push the cutter down through the material without stopping.
The cutting wheels generally last more than a year with average use, but this is dependent upon the daily usage and the material being cut.
Signs that the wheels are wearing out are:
1) A rough finish predominantly on the right hand side of the cut, with flaking on material such as MDF.
2) The bottom of the cut bursting out rather than being cut neatly.
3) The board trying to turn under the clamp when being cut (also check the clamp pressure).
Ⓒ Keencut 2020 | Baird Rd, Corby NN17 5ZA United Kingdom | Contact us
Created by DeType | Privacy | Website Disclaimer | Terms & Conditions