
Replacing the base edge strip on the Technic ARC & ARC TE
Before you start
Before starting any work, check that you have the following equipment:
- Screwdriver, cross head style
- Small, flat ended screwdriver
- Pair of pliers or grips
- Hand and eye protection
- Cloth and solvent
1. Be very aware of safety
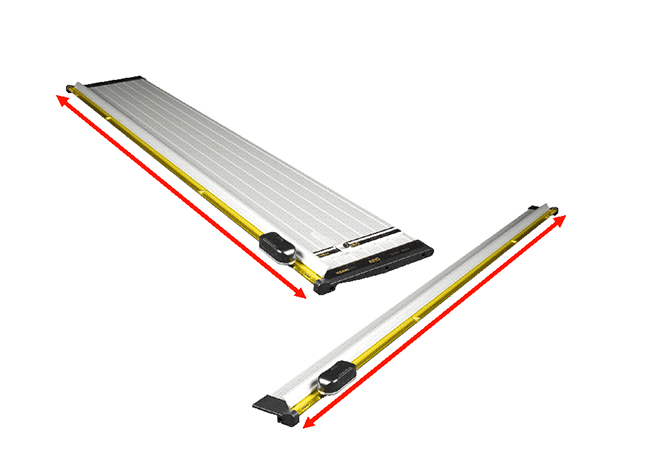
The cutting head contains two very sharp circular blades and the edge of the base plate has a sharp steel strip fixed along the full length of the machine, as shown by the red lines in the image.
- For safety – do not place your fingers near the circular knives or the base blade.
- For safety – move or pick up the cutter using the moulded finger grips at each end and fit the protective cover to the fixed blade.
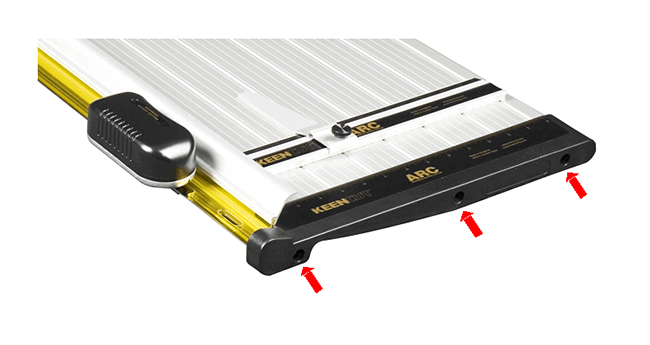
2. Remove the base end covers
Remove the three cross head screws holding the base end covers in position on both ends. Be careful not to loose the cup washers under each screw between the end cover and the base, then carefully slide the cutting head off of the end of the base, being careful not to touch the edge of the wheels, or the base edge strip that the cutting wheels run against.

3. Remove the base edge strip
The base edge strip is held in place by a strong adhesive tape, ensure you are wearing hand and eye protection when removing/replacing the strip.
Carefully lever the end of the edge strip up with a small flat ended screw driver, grip hold of the strip firmly with a pair of pliers or grips, DO NOT grip the strip with your fingers and pull the strip upwards to peel it back from the base. Clean the surface of any remaining adhesive or pieces of tape, using a scraper or a cloth and solvent.
4, Replace the base edge strip and reassemble
Check the length of the strip by laying it on the edge of the base, it should be slightly smaller than the base. It is important that when fitted, the edge of the strip does not overhang either end of the base. The strip must also be the correct way round, the edge of the strip that MUST overhang the edge of the base is indicated by a series of black ‘x’s.
Once happy with the position of the strip, peel back the release paper from the adhesive tape and stick the strip down, working from one end ensuring the back edge of the strip butts firmly up to the edge of its recess in the base. Once in place, carefully smooth down firmly with a cloth.
Replace one base end cover and position the blue plastic clamping strip ready to fit the cutting head. Gently slide the new cutting head onto the base, being careful not to allow the edges of the cutting wheels to touch the base.
To replace the other base end cover put the three cross headed screws in the holes and then two cup washers, facing each other. Offer the end cover to the base and using a screw driver turn each screw in just a few turns. When all three screws have been located, tighten them, so that the cup washers are slightly compressed.
The end covers can be adjusted for squareness by the tightening/loosening the three fixing screws. A square cut piece of paper can be used against the cutting edge as a gauge.
Ⓒ Keencut 2020 | Baird Rd, Corby NN17 5ZA United Kingdom | Contact us
Created by DeType | Privacy | Website Disclaimer | Terms & Conditions