The picture framers guide to blades and blade selection
Every picture framer will know there have been many industry changes in fashions, styles, methods and materials over the last twenty-five years or so and that includes major changes and advancements in mount board. Particularly, the advent of conservation framing which has brought with it a much wider variety of board. The original ‘standard board’ of twenty five years ago is very different to the standard board of today.
Conservation board in itself brought a complete new set of rules to mount cutting as it is as different as cutting wood compared to slicing bread . Whilst there are common rules that apply to all boards there are others that are very specific, let’s cover the common rules first, these can be classed simply as blade control rules.
Blade control rules
- Any sideways movement in the cutting head either between the cutter bar and the main body of the cutting head or the main body and the blade holder itself will promote inconsistencies in the behaviour of the blade. If the blade tip is not positioned accurately at the start of the cut it will bend as it enters the board and produce a curve shaped bevel, often referred to as a ‘hooked’ corner.
- Blade depth also falls under the category of blade control, there is one simple rule here ‘the longer the blade tip the more flexible it is’. When cutting any type of mount board the blade needs to be set at a minimum depth just to cut through the board. The best test is to check your slip-mat by bending it backwards, the blade tip should just be entering the top surface and certainly not cutting any deeper than half way through.
Once you are happy you have the above sorted you can begin to consider board ‘toughness’.
Board toughness
When cutting the wide range of boards that are available now, the property that makes all the difference is the ‘toughness’ or how much the board resists the blade to cut through it.
At one end of the spectrum we have the softer boards like the old standard boards at the other end the very tough conservation boards. Lying in the middle there is the whole range of acid free , white core, modern day standard type boards.
Choosing a single edged (Tech S) or double edged (Tech D) blade and why
A saw blade will remove material when it cuts but when cutting any material with a knife blade the material itself has to do one of two things for the blade to cut along a straight path.
- The material on each side of the blade must compress (or shrink back) by half the thickness of the blade.
- The material must physically move away from the cut line, again by half the thickness of the blade.
So what happens when we cut a bevel mount from tough conservation board with a standard double edged blade (Tech D)?
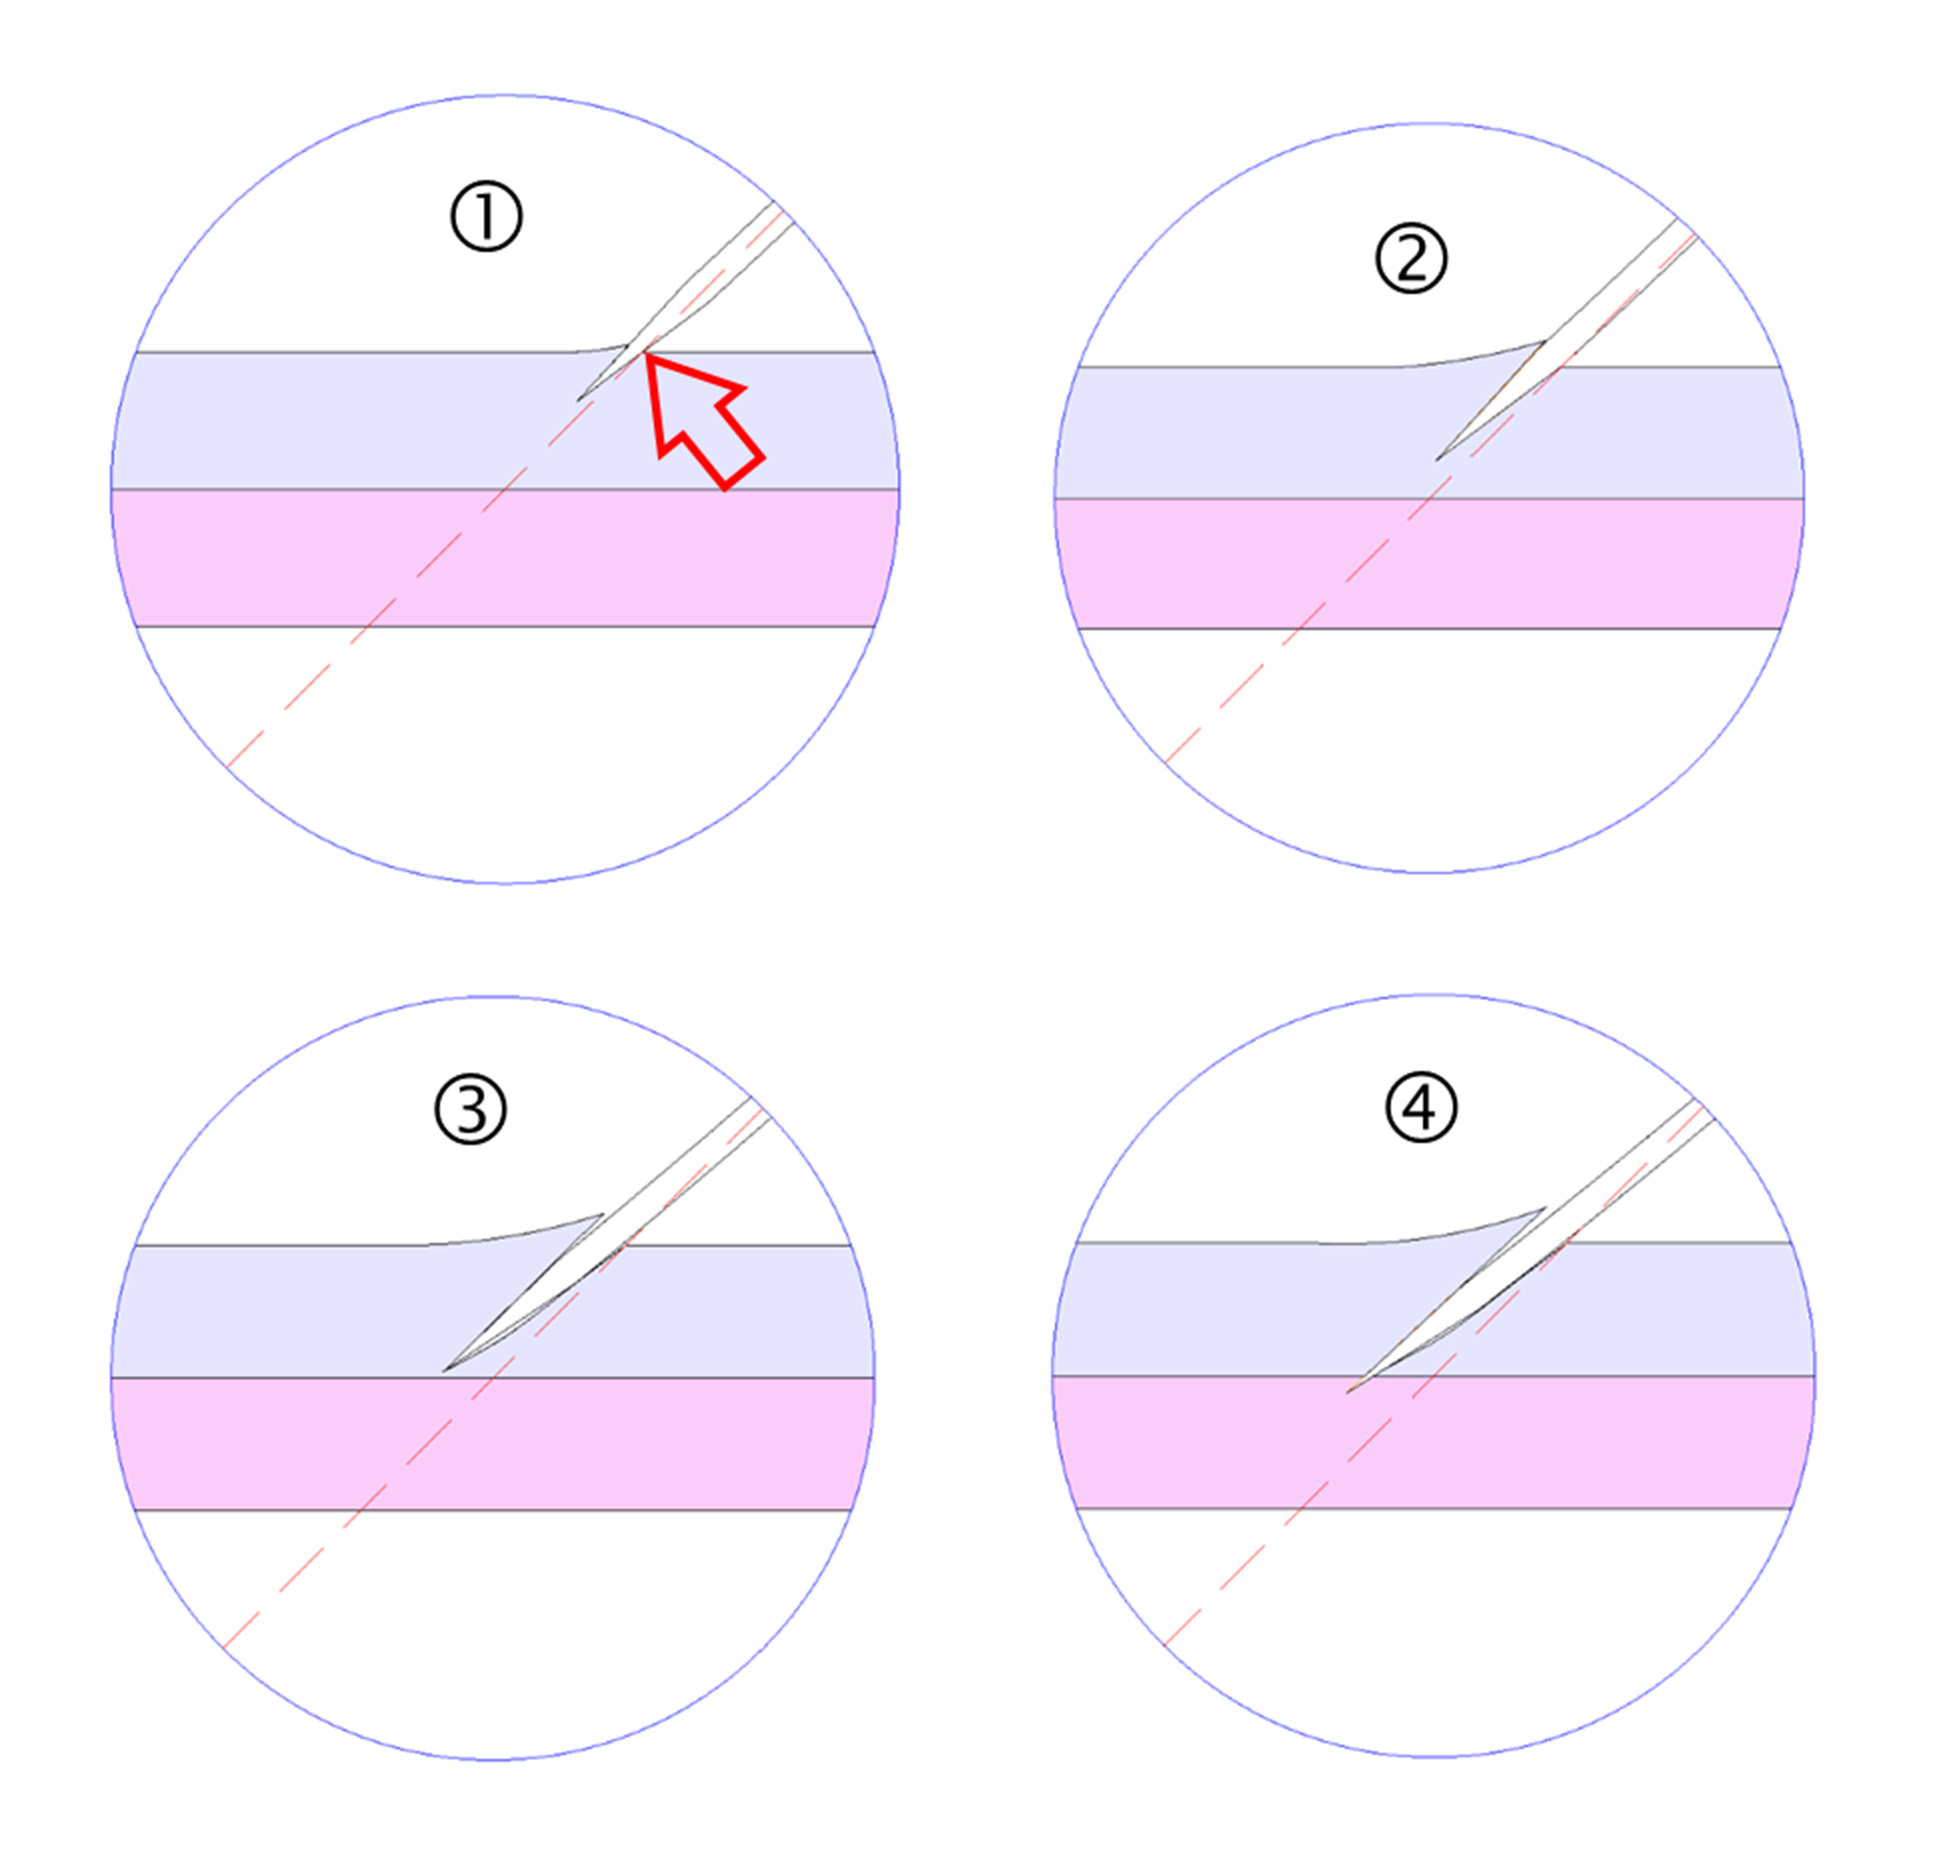
The drawing below shows the mount on a slipmat and the blade together with its cut line. On the right hand side of the blade is the cutter bar (not shown for clarity) which is holding the mount and slipmat from moving. (click on image to increase size)
Remember the board is too tough to shrink back when the blade enters.
So as the blade progresses, the right hand side of the board is pushing on the ground edge of the blade deflecting it off course and bending the blade (red arrow in picture 1).
The left hand side of the mount begins to lift to allow the blade space to enter and as the blade goes deeper it is progressively bent off track.
The resulting bevel is much shallower than it should be.
The images show this process.
Single edged blades (Tech S)
Care needs to be taken when using single edged blades (Tech S) that they are loaded into the cutter in the correct way, if the wrong tip of the blade is used the flat face of the blade will be uppermost so the right hand half of the board will push it away even more than it does with a double edged blade.
So, why not use a single edged blade (Tech S) for all boards?
As there needs to be balanced pressure on both sides of the blade the pressure on the left from the board being pushed up may be enough to push the blade to the right if the board on the right is soft enough to allow it to. This results in a reverse hook and inconsistent bevel. Also, you will only be able to use one tip rather than the two therefore increasing blade cost.
Blade thickness and how it affects cutting
The other consideration in blade choice is blade thickness, choosing between a 0.12 and 0.15 blade.
It is unfortunately not as simple as a thicker, tougher blade is more suitable for tougher boards.
A thicker blade sets in place a sequence of events, firstly the board has to open up wider to allow the blade to pass through it, putting the board under increased strain and secondly it pinches onto the sides of the blade harder which increases the friction you feel when making the cut.
This extra pressure on the side of the blade may increase the tendency to bend it, so trying to cure a hooked corner by using a thicker blade will often not work.
It is worth noting that a thicker blade does often help when cutting thicker materials as it does give added strength to the blade tip and can decrease the chance of tip breakage particularly on boards thicker than 3mm (1/8”) thick.
How to choose the best blade for your board
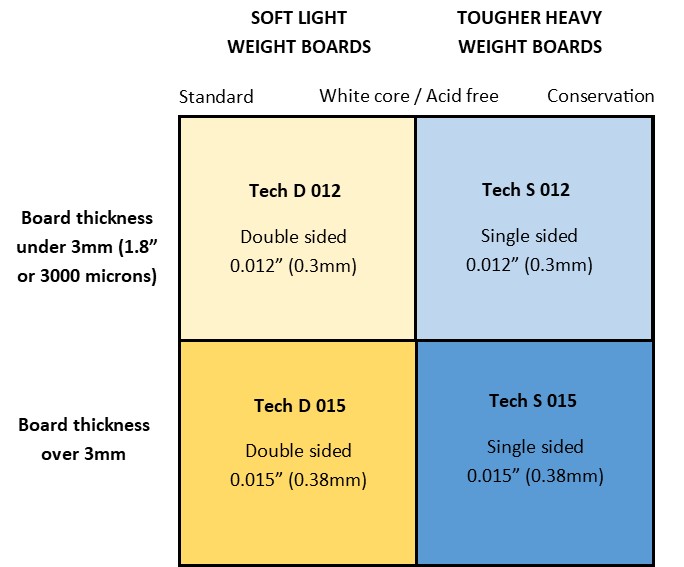
This chart will give a starting point regarding which blade to use but it is not fool proof, a few minutes of experimentation is always valuable.
There are four choices of blade to cover all thicknesses and types of board, it is not always easy to assess how tough a board is but by comparing its rigidity (resistance to bending) and how easy/difficult it is to emboss the surface you should get an idea.
For example if you are cutting a 4 ply tough conservation board that is 1.4mm (0.05”) thick then the chart will guide you to using a Tech S 012 blade. If you do not get a good cut quality try a blade from one of the neighbouring boxes, do not go straight to the box diagonal.
Many white core and acid free boards fall in the middle ground regarding toughness so if not sure where to start try both blade types according to the board thickness a compare between the two.
Bear in mind the single sided blades (Tech S) will work out at twice the cost as only one tip of the blade can be used. But in the whole scheme of things blade costs are a very small proportion of the complete frame but a very important contributor to the quality of the finished product.


